categories
Updated on Published on in

Windows Remote Desktop File Transfer: Detailed How-to Guide

Author: Helga York
Helga York Article author

Remote desktop file transfer involves using the Remote Desktop Protocol (RDP) or a third-party app to move files between a local computer and a remote machine. You can easily access, share, and manage files stored on another computer with this feature.

Moving files between computers also makes it easier to work with others and keep projects moving. It helps you share data safely and access the files you need – without being in front of the remote computer. This makes it useful for IT support, remote work, and anyone who needs to manage files across different devices.

Wondering if you can transfer files through Remote Desktop? The answer is yes. We’ll explore several ways to do it. We’ll also explain compatibility, walk through each method, cover the best times to use them, and look at their pros and cons.

Choosing How to Transfer Files with Remote Desktop

The right way to transfer files depends on the size of your files and how safely you want to share them. It also depends on your setup and how much help you can get from the person using the remote computer. The comparison below shows how the most common methods differ.
Parameter Copy-Paste (RDP) Drag & Drop (RDP) Drive Sharing (RDP) FTP/SFTP/ SMB HelpWire
Best for Quick, small file transfers Quick visual transfers of small files (where supported) Large files or bulk data Secure or networked transfers Support sessions, non-technical users, Windows Home & cross-platform
Ease of setup Very easy Easy (where supported) Moderate (pre-session config) Complex (server setup) Very easy (link-based)
Large file support Unreliable for large files Unreliable for large files Handles large files well Handles large files well Handles large files (no practical limit)
Transfer direction Bidirectional Mainly local → remote (unreliable) Bidirectional Bidirectional Bidirectional (copy-paste); operator → client (drag-drop)
Cross-platform Windows only Windows 10/11 only Windows only All platforms Windows, macOS, Linux
Remote host requirement Windows Pro/ Enterprise/ Education (not Home) Windows Pro/ Enterprise/ Education (not Home) Windows Pro/ Enterprise/ Education (not Home) Any OS with a server Any (including Windows Home)
Account needed Windows login on host Windows login on host Windows login on host Server credentials None for the client (operator: free account)
Security Encrypted by RDP (TLS) Encrypted by RDP (TLS) Encrypted by RDP (TLS); scope sharing Plain FTP unencrypted; SFTP/SMB3+ encrypted Encrypted, direct connection
Technical skill Low Low Medium High Low
Cost Free (built-in) Free (built-in) Free (built-in) Free tools available Free
Important:  The built-in RDP options only work on remote computers using Windows Pro, Enterprise, or Education. Windows 10 or 11 Home no longer accepts Remote Desktop connections. Still, these versions can connect to another computer. If the machine you want to access runs Windows Home, you’ll need SFTP or another tool that doesn’t require Remote Desktop. We’ll look at the HelpWire option later.

You may also want to use a dedicated tool on remote computers with Windows 10 or 11 Home operating systems. It can be a good choice in case you don’t want the other person to change any settings. You may also prefer it for a simpler way to work. We’ll look at this app later on.

Built-in Features of Windows OS for Remote Desktop File Transfer

Before you try any Windows remote desktop file transfer method, make sure your Remote Desktop connection is ready. A few simple setup steps can help you access files without problems. If you still need to set up or enable Remote Desktop first, see our guide on how to use Microsoft Remote Desktop.

To start, check if the local and remote computers have a stable connection. Then, check your file access settings before you connect.

Access files on the remote computer:

  1. Open Remote Desktop Connection (RDC) on your local computer.

  2. Enter the IP address or host name, then connect.

  3. Open File Explorer on the remote computer to view and manage your files.
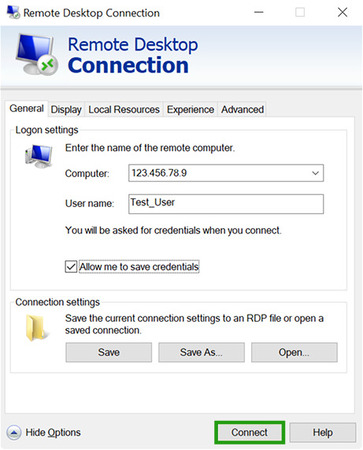
    Remote Desktop Connection window with computer IP and username entered

Enable local file access from a remote desktop:

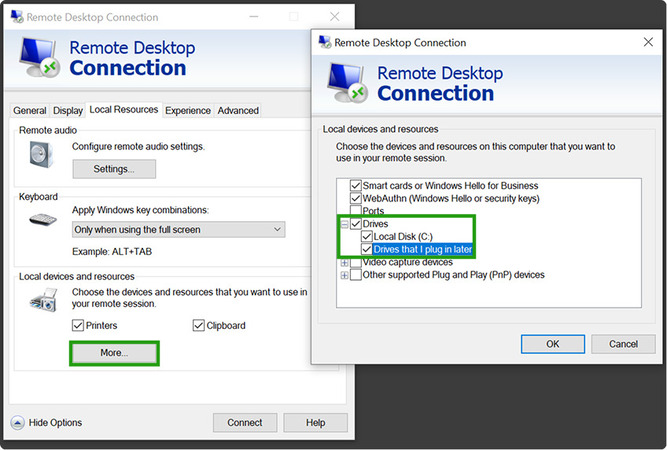
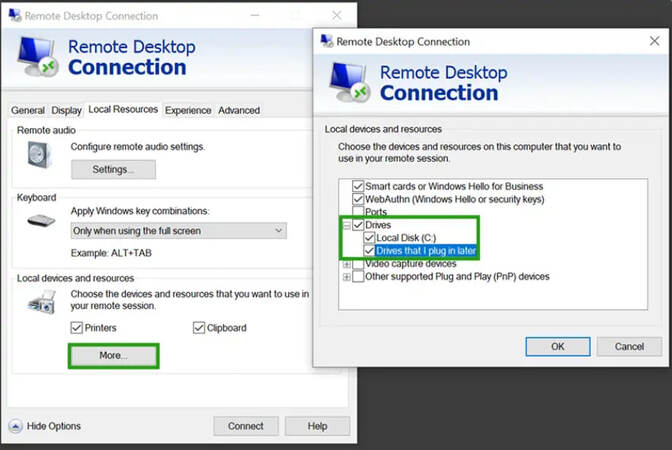
  1. Open RDC and select Show Options. Then go to Local Resources > More before you connect.

  2. Under Drives, choose the local drives you want to share.

  3. After you connect, open File Explorer on the remote computer. You’ll find your shared local drives under This PC.
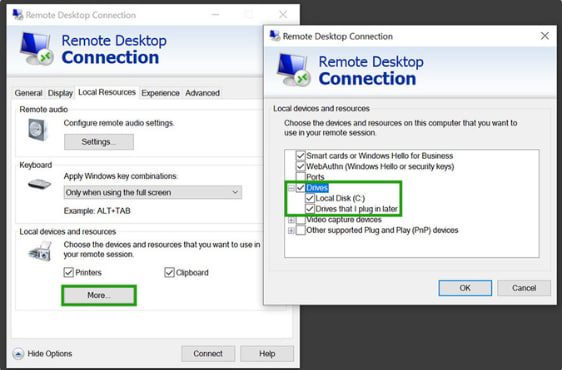
    RDC Local Resources tab with a local drive ticked for sharing

Next, we’ll explore each method closely. Copy and paste is up first. After that, we’ll look at drag-and-drop. We’ll also cover drive sharing and file transfers with FTP, SFTP, or SMB.

1. Copy-Paste

Compatibility: Windows 7/8/10/11, Windows Server (various versions)

Best use case: Moving small files quickly without changing extra settings.

This is one of the easiest ways to copy files using Remote Desktop. You can move files from the remote computer to your local computer or vice versa.

AdvantagesLimitations
Quick and easy to useMight not work well with large files
Doesn’t require extra setupMay not work if clipboard sharing is unavailable
Good for common files such as documents, photos, and small programsTurning on clipboard sharing in the Remote Desktop settings is needed

Steps:

  1. Open Remote Desktop Connection (RDC) on your local computer.

  2. Before you connect, select Show Options > Local Resources. Make sure Clipboard is turned on.
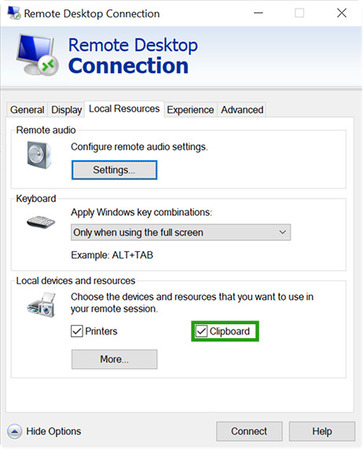
    RDC Local Resources tab with the Clipboard checkbox enabled
  3. Connect to the remote computer.

  4. Pick the file or files you want to move. Press Ctrl + C to copy them.

  5. Copy files in the remote session and paste them on your local machine. To move files from your PC to the remote end, do the other way around.
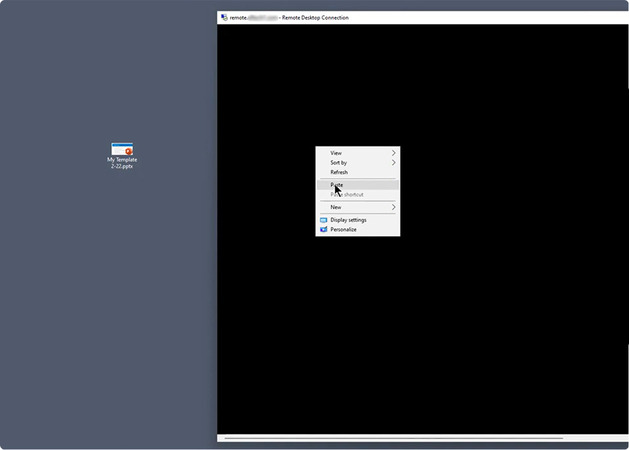
    Pasting a file into a local folder from the remote session
  6. Pasting a file into a local folder from the remote session

2. Drag-and-Drop

Compatibility: Windows 10/11 built-in Remote Desktop client (limited)

Best Use Case: A quick and simple way to move small files when your Remote Desktop client supports drag and drop.

This method lets you transfer files to a remote desktop by dragging them from your local computer. However, drag and drop is only available in some RDP versions. In most cases, it only works in the native Windows 10/11 client, normally from your local computer to the remote computer. Older desktop clients and some mobile RDP apps may not support it at all. If dragging a file doesn’t work, don’t spend time trying to fix it. Use the copy-paste method-or drive sharing-to address the issue.

AdvantagesLimitations
Easy and natural to use when availableDoesn’t work in every RDP client
No need to copy and paste filesUsually only works from your local computer to the remote computer
 Need to turn on the clipboard and drive sharing before connecting

Steps:

  1. Before you connect, turn on clipboard and drive sharing in the RDC settings.

  2. Launch your Remote Desktop session.

  3. Pick the file you want to move from your local PC.

  4. Drag the file into the remote desktop window, then release it.
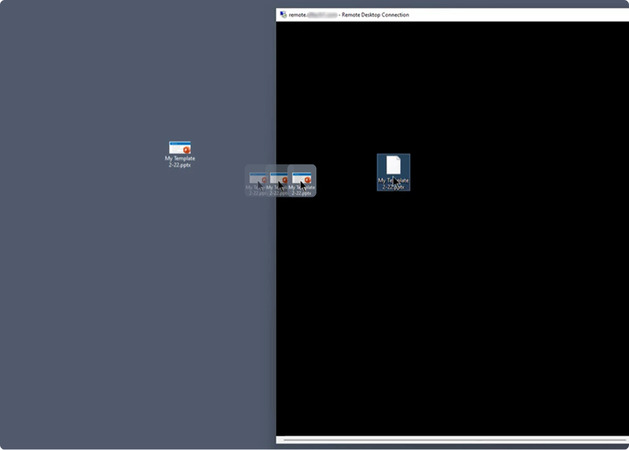
    Dragging a file from the local desktop into a Remote Desktop window

3. Drive Sharing

Compatibility: Windows 7/8/10/11, Windows Server

Best Use Case: Moving large files or many files at once.

This method makes it easier to share files with Remote Desktop by sharing one or more local drives. After you connect, you can access those drives and move files between both computers.

Advantages Limitations
Works well for large file transfers Need to set it up before you connect
Lets you access several files and folders at once Shared drives can expose personal or important files if you don’t manage access carefully

Steps:

  1. Open Remote Desktop Connection (RDC) on your local computer.

  2. Select Show Options > Local Resources > More.

  3. Under Drives, choose the drive or drives you want to share.

  4. Connect to the remote computer.

  5. Open File Explorer on the remote machine. Your shared drives will appear under This PC.
    Redirected local drive shown in File Explorer on the remote PC
  6. Copy and paste files between the shared drive and your local or remote folders.
4. File Transfer via FTP, SFTP, or SMB

Compatibility: All Windows versions with FTP or SFTP client support, as well as other platforms.

Best Use Case: Moving files safely across a network.

These methods support file transfer over remote desktop by using File Transfer Protocol (FTP), Secure File Transfer Protocol (SFTP), or Server Message Block (SMB).

AdvantagesLimitations
Handles large file transfers with easeNeed to complete some setup before you can use it
SFTP and SMB 3+ provide better protection for file transfers Need an FTP or SMB server. Avoid standard FTP for sensitive files because it doesn’t protect your data during transfer.

Steps (Example: SFTP):

  1. Install an SFTP server – such as OpenSSH – on the remote computer.

  2. Install an SFTP client – like WinSCP or FileZilla – on your local computer. You can also use a tool like CloudMounter to mount the remote SFTP or FTP server as a local drive. Moving files with drag and drop in File Explorer or Finder will be easier with this. Using a separate transfer app is no longer needed.

  3. Enter the IP address to connect. Type in the username and password as well.

  4. Drag and drop files between the local and remote computers.

Troubleshooting Issues

Slow File Transfer Speeds

Slow file transfer over RDP can happen for several reasons. A weak network connection, heavy system use, or the wrong RDP settings can all affect how fast the transfer will be.

Solutions:

    • • Use a stable network connection whenever possible. A wired connection usually works better than Wi-Fi.
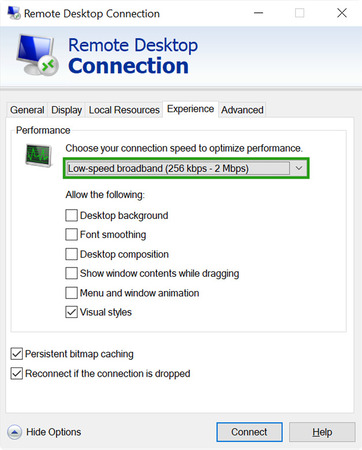
    • • Change your Remote Desktop settings to improve performance. In RDC, go to Show Options > Experience and choose Low-Speed Broadband to turn off extra visual effects. You can also turn on compression in the Group Policy settings.
RDC Experience tab set to low-speed broadband for better performance
• If file transfers are still slow, try using SFTP or FTP instead.

Remote Drives Not Showing

Your local drives won’t appear in File Explorer on the remote computer sometimes. This can happen even after you turn on drive sharing.

Fixes:

  • • Make sure drive sharing is turned on in RDC > Local Resources > More > Drives.
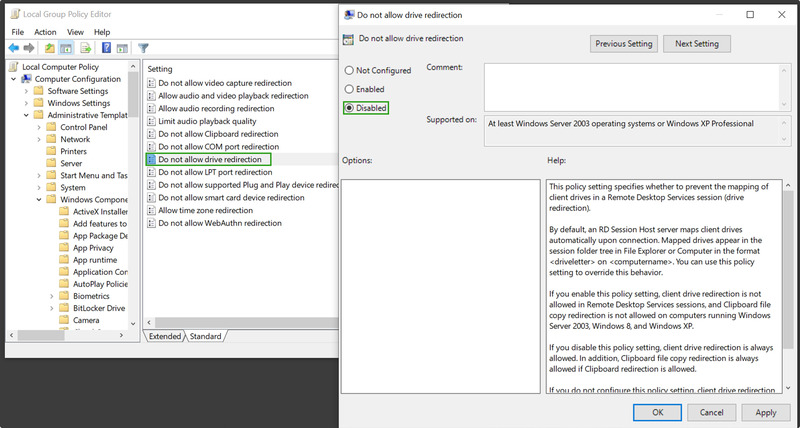
  • • Check whether the RDP session allows drive redirection. Open gpedit.msc, then go to Computer Configuration > Administrative Templates > Windows Components > Remote Desktop Services > Remote Desktop Session Host > Device and Resource Redirection. Make sure Do not allow drive redirection is set to Disabled.
Do not allow drive redirection' set to Disabled in Group Policy Editor

• Restart the RDP session after you make the changes.

Clipboard Issues

Clipboard problems can stop RDP copy files from working. You may not be able to copy and paste text or files between your local and remote computers.

Fixes:

  • • Make sure Clipboard is switched on in RDC > Local Resources > Clipboard.
  • • Restart the Remote Desktop Clipboard process. Open Task Manager (Ctrl + Shift + Esc), find rdpclip.exe, and end the process. Then, open Run and type rdpclip to start it again.
  • • Check whether a Group Policy setting is stopping clipboard sharing from working.
    Go to Computer Configuration → Administrative Templates → Windows Components → Remote Desktop Services → Remote Desktop Session Host → Device and Resource Redirection.

Double-click Do not allow Clipboard redirection. If it’s set to Enabled, clipboard sharing is being blocked — change it to Not Configured or Disabled to allow it. Click OK.

Do not allow Clipboard redirection' set to Disabled in Group Policy Editor

Connection and Network Issues

Network problems can interrupt the transfer of the file over RDP. Firewall settings, slow connections, or VPN restrictions can also prevent file transfers from working properly. If the session itself won’t start, see our guide on Remote Desktop Connection not working.

Fixes:

  • • Turn off your third-party firewall for a short time and test the connection.
  • • Change the RDP timeout settings through the Local Group Policy.
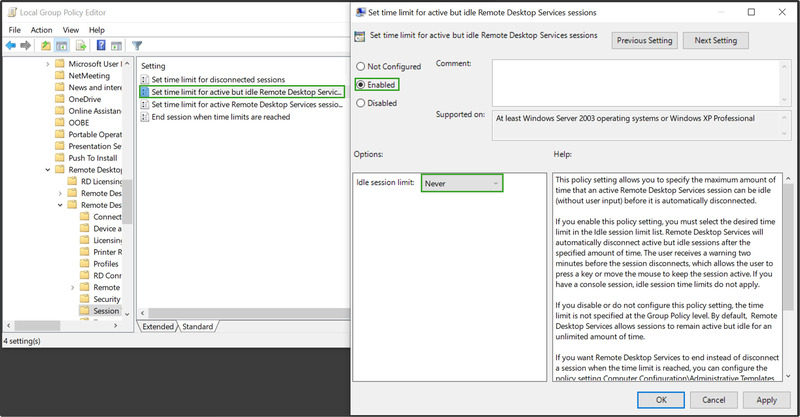
    Go to Computer Configuration → Administrative Templates → Windows Components → Remote Desktop Services → Remote Desktop Session Host → Session Time Limits. Double-click Set time limit for active but idle Remote Desktop Services sessions, choose Enabled, and set a longer interval (or Never) so the session doesn’t end mid-transfer. Click OK.
RDP idle session time limit set to Never in Group Policy Editor

• If the problem continues, try using SFTP instead.

Remote Desktop Not Working on Windows Home

Windows 10 or 11 Home doesn’t let other computers connect through Remote Desktop. They keep this feature turned off-meaning you can’t enable it through the normal settings. Because of this, you might see a message saying that Remote Desktop can’t connect to the remote computer. You may also notice that the option to turn on Remote Desktop is missing. For a deeper look at this limitation and the alternatives, see Remote Desktop for Windows 10 Home.

Fixes:

  • • Upgrade the remote computer to Windows Pro, Enterprise, or Education. This is the only way to use the built-in RDP host feature. Once on a supported edition, you can enable Remote Desktop from the command line if you prefer.
  • • If you can’t upgrade, use a method that doesn’t rely on RDP. For example, HelpWire works with Windows Home.

Using a different remote tool? See our fixes for Splashtop file transfer not working and TeamViewer file transfer not working.

Security Best Practices for Remote Desktop File Transfers

When you use remote desktop file sharing, you can access files on another computer. That’s why it’s important to protect your connection, especially when you work with sensitive files or use a public network.
  • • Use a VPN or another encrypted connection on public or untrusted networks. RDP already protects your connection, and a VPN can make it more secure when you connect over the internet.
  • • Share only the drive or folder you need for the session. Avoid sharing your entire C: drive to avoid giving people access to more files than necessary.
  • • Turn on multi-factor authentication (MFA) for the remote computer. MFA can help stop someone – who got your password – from signing in.
  • • Check your files after transferring large files. For important files, compare the MD5 or SHA-256 checksums before and after the transfer with Windows CertUtil.
  • • Turn off shared drive access when you finish your session. Some people might access your files without permission if you leave the drives shared.

How to Transfer Files Using HelpWire Remote Desktop Software

If the built-in remote desktop file transfer methods feel too complicated, a dedicated tool can make things easier. This is especially helpful if the remote computer runs Windows Home, or if clipboard sharing doesn’t work. It’s also great for those who don’t want to spend time changing settings before you connect.

HelpWire is a free remote support tool that keeps the setup simple. All you need to do is send a connection link to the other person. That person can just click the link – they don’t need to create an account or sign in first. This software works with every Windows edition, including Windows Home. It’s compatible with Windows 7 or later, macOS 11 or later, and Linux, too.

You don’t need to turn on drive sharing or use temporary storage to move files. HelpWire also doesn’t have a practical file size limit.

HelpWire gives you three ways to transfer files to a remote desktop

Right-click (copy/paste) – works in both directions:

  1. Right-click the file you want to move. Select Copy.

  2. Right-click the folder where you want to place the file on the client’s computer. Choose Paste.

  3. Wait while the file transfers. You can check the progress on the client’s computer.

To move files from the client’s computer to your own, follow the same steps in reverse.

Drag-and-drop – works only from your computer to the client’s computer:

  1. During an active remote session, select one or more files or a folder.

  2. Drag the items into the open HelpWire Operator window and release them. The software copies them to the client’s clipboard.

  3. On the client’s computer, right-click the folder where you want to place the files. Select Paste.

Keyboard shortcuts:

  • • Press Ctrl + C and Ctrl + V on Windows and Linux.
  • • Press Cmd + C and Cmd + V on macOS.
Note:  You can move files only while the remote session is active. If the client uses Linux with Wayland, turn on Allow Remote Interaction and Allow Clipboard Access when prompted.

For a complete walkthrough, see our guide on transferring files during a remote support session, or watch the video below.

FAQ

No. The built-in RDP host only works on Windows Pro, Enterprise, and Education. However, you can connect to it from a Mac or a mobile RDP client. If you want fewer limits, HelpWire supports file transfer to a remote desktop across Windows, macOS, and Linux.

You can use the clipboard, copy and paste, and drive sharing. And if your client supports it, there’s a drag-and-drop feature available for you. Moreover, you can transfer files over a network with SFTP, FTP, or SMB. Keep in mind that FTP, SFTP, and SMB work separately from Remote Desktop. They don’t run inside an RDP session.

Lower the display quality in the Experience tab and turn on compression. A wired network connection can also improve transfer speeds. If you move large files often, SFTP or SMB may work better.

Yes, but built-in RDP tools can’t do that. You can schedule file transfers with WinSCP and Task Scheduler. For automating SFTP, PowerShell with Posh-SSH is ideal for you. Robocopy with Task Scheduler is another choice to schedule large or repeated file transfers on the same network. These options work well if you regularly move files between several computers.