All You Need to Know About Remote Assistance in Windows 8
- HelpWire
- →
- Blog
- →
- Windows Remote Assistance
- →
- Remote Assistance in Windows 8
Here’s How Windows 8 Remote Assistance Works
All Windows systems, starting from Win XP, come with a standard tool for solving tech issues over RDP connection. Windows Remote Assistance in Windows 8 is just that — an app you can use in two ways:
1. Invite a Trusted Helper
You can invite a trusted person to connect to your computer remotely so they could see what’s going on with their own eyes and take some action right off the bat if need be.
2. Assist Someone Else
Or, you can attend to other people’s assistance requests by connecting to their computers via a network and providing some sort of resolution to their problems or performing technical maintenance.
Pros and Cons of Windows 8 Remote Assistance
We’ll get back to safety-related matters later, I promise. And for now, let’s stick with Remote Assistance in Windows 8 for a little while and see where (and how) we can find it.
Where to find Remote Assistance in Windows 8
There are so many known ways to launch the Remote Assistance application, it makes me think people would rather come up with their own method than follow someone else’s instructions. But I’ll do a quick skim of the most popular techniques, just in case you’re not feeling extra creative at the moment.
Here is how you can launch Remote Assistance in Windows 8:
-
Go to your System32 folder, scroll down to the msra.exe file, and double-click or tap on its name.
-
Hit Win+R on your keyboard, type msra.exe, and press Enter .
-
Use the search box to find the utility (if typing ‘remote assistance’ seems too much of a bother, go with ‘invite’ instead, It’ll do the trick just fine).
How to Send a Remote Assistance Invitation in Windows 8
Step 1: Choose the Type of Assistance
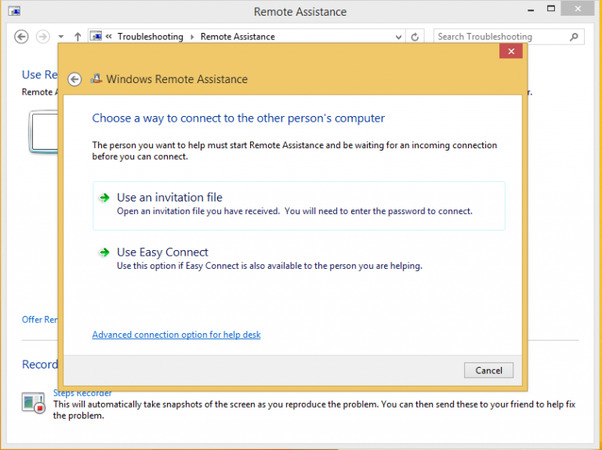
After launching Remote Assistance, a new window will pop up and you’ll get to choose whether you want to ask for help or provide it. Click the first option, and the application will automatically generate the Windows 8 remote assistance invitation file you’ll need to pass to your trusted helper in any convenient way.

Step 2: Try Easy Connect
Another option Windows 8 offers is Easy Connect, which creates a password your assistant can use to connect to your PC. No invitation file is needed.
Step 3: Ensure Remote Assistance is Enabled
For all of the above to work correctly, remote assistance connections must be enabled on both computers:
• Go to Remote settings in the left pane of the System window.
• In the System Properties dialog, make sure the ‘Allow…’ checkbox is ticked.
Other Methods of Remote Assistance Windows 8 Has to Offer
Quick Assist: Not Installed by Default
At this point, you may be asking: “Why do we have to use that outdated application from XP times? Doesn’t Windows 8 have Quick Assist?”
Well, not by default. But you can add it manually — provided you have access to the PC’s administrator account, since changing system properties may be required.
• Click the Optional Features link on the Apps pane.
• Add the optional Quick Assist feature by clicking the + icon and selecting it from the list.
How Quick Assist Works
Once installed, Quick Assist simplifies the remote assistance process:
• No need to mail out an invitation file.
• Log into your Microsoft account.
• Generate a security code to give to the person requesting your help, or enter a code you’ve received from someone you want to assist.
Security Considerations
As handy as Quick Assist seems, it’s not secure enough for office use, let alone enterprise-wide deployment.
Before opting for it, make sure to check your internal data safety instructions, regulations, and guidelines.