Zoho Assist Problems Troubleshooting
Zoho Assist is a popular cloud-based remote access tool with strong security features like AES 256-bit encryption, multi-factor authentication, and support for Windows, macOS, Linux, iOS, and Android.
However, users sometimes face issues that disrupt their remote sessions. Common problems include Zoho Assist black screen errors, failed connections, and difficulties with “Zoho Assist run as service” not working.
This guide will walk you through practical solutions to resolve these issues and ensure a smooth remote support experience.
Fixing Zoho Assist Not Connecting
One of the most common issues is when Zoho Assist can’t connect to servers. This issue is pontificated by a pop-up message.
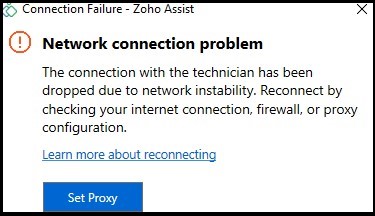
Now, let us discuss how to help resolve this Zoho Assist internet connection error by following the step-by-step guide below.
Check the Internet Connection on Both Computers
Step 1: Ensure a working internet connection is running on both computers participating in the remote session (AKA, the Server and the Client).
Step 2: Once a connection is confirmed, restart the network.
Step 3: Shut the device off.
Step 4: Disconnect the router or modem (or both) and wait for thirty seconds before plugging them back in.
Step 5: Reconnect the router and modem one by one (not simultaneously) and wait for their loading/rebooting process to finish.
Step 6: If the option is available, log into your ISP terminal and turn on the device.
Check the Antivirus Exceptions or Exclusions Settings
If you use Avast antivirus and it blocks Zoho Assist – follow the instructions below.
Double-click on the antivirus icon to open the UI (user interface).
Configure a Firewall to Work With Zoho Assist
Configuring one’s firewall to allow Zoho Assist to work requires a few steps and nuances, but we will describe these steps in detail below.
To begin solving this Zoho Assist not running problem, there are a few specific settings that users must check:
- • Go to the firewall and proxy settings to exclude Domains;
- • While also in the firewall settings, permit/allow specific Ports;
- • Within the firewall, include executable files or exclude directories.
How to Exclude Domains:
Navigate to the firewall and proxy settings and exclude Web Socket and TCP protocols for the domains listed below:
- • *.zoho.com
- • *.zoho.eu
- • *.zoho.in
- • *.zoho.com.au
- • *.zoho.com.cn
- • *.zohoassist.com
- • *.zohoassist.com.cn
This allows Zoho Assist to map all the IP addresses within the global Gateway network into a single domain name: gateway.zohoassist.com.
Fixing this domain name issue allows users to effortlessly automate IP whitelisting, as well as regularly maintain up-to-date database firewall rules.
How to Allow Ports in Your Firewall Settings
Step 1: From the search bar, open Windows Firewall.
Step 2: Click on Advanced settings.
Step 3: From the right-hand pane, hit New Rule.
Step 4: Click Port > Next.
Step 5: In the Specific remote ports field, type 80;443.
Step 6: Hit Allow the connection.
Step 7: Enable all checkboxes that apply.
Step 8: Provide a name for the newly created rule.
Step 9: Click Finish.
How to Permit Applications Through a Firewall
For those receiving Windows security messages explaining that Zoho Assist is being blocked, follow the steps below to solve this Zoho Assist access denied issue.
Step 1: From the search bar, open Windows security.
Step 2: Click the Firewall & network protection option.
Step 3: Hit the Allow an app through the firewall.
Step 4: Hit the button labeled: Change settings.
Step 5: Look for the “Zoho Assist” app and select it.
Step 6: Hit Okay.
How to Allow Executable Files in a Firewall Application
In some ways, this is a one-step process, only requiring users to navigate to their antivirus and firewall settings to permit the Executable files listed below.
- • ZA_Upgrader
- • agent.exe
- • ZMAgent.exe
- • ZohoUR Service.exe
- • ZohoMeeting.exe
- • ZohoTray.exe
- • ZohoURS.exe
How to Exclude Directories From a Firewall Application
Navigate to the appropriate window where you can configure firewall directories. Once there, exclude the Directories listed below.
- • 32 bit OS – %localappdata%/zohomeeting/, %programfiles%/ZohoMeeting
- • 64 bit OS – %localappdata%/zohomeeting/, %programfiles(x86)%/ZohoMeeting
What to do when Zoho Assist still can’t connect to servers: review reachability issues to fix Zoho Assist’s problem with running
-
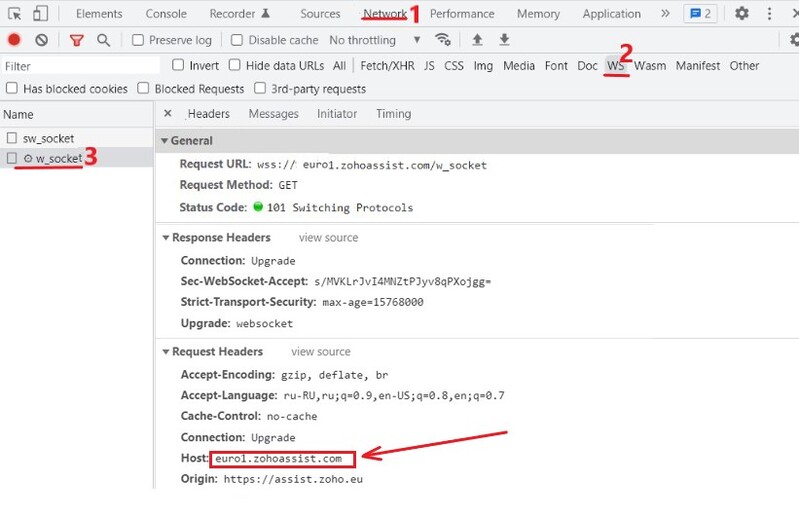
Step 1: Hit the Ctrl + Shift + I command to open Inspect.
-
Step 2: Open the Network tab, and navigate to the WS section.
-
Step 3: Hit w_socket to see the gateway (under the Headers tab > beside the row reading: Host).
See the example below.
-
Step 4: Implement the unreachable gateway within Inspect (located in the highlighted section).
-
Step 5: Hit Win+R.
-
Step 6: Type “powershell” into the Open field to run PowerShell (see below).

-
Step 7: Run the below command.
test-netconnection euro1.zohoassist.com -port 443
- • If TcpTestSucceeded : true, then there is no issue in reaching our server.
- • If TcpTestSucceeded : False, then there is an issue in reaching our server.


How to Check Machine Proxy Settings
To ensure a device is configured properly in its proxy environment, follow the steps below to locate or set proxy settings.
Via the internet options:
Step 1: Choose Run from the Start menu.
Step 2: Type inetcpl.cpl to open internet options.
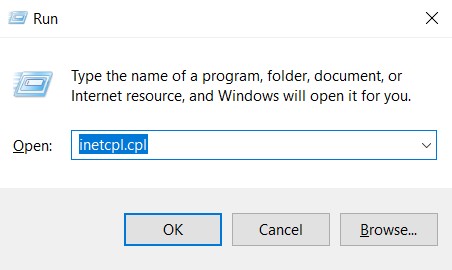
Step 3: Navigate to the Connection tab.
Step 4: Choose LAN settings.


A proxy can be configured in 3 ways:
Automatically detected settings.
Automated configuration script – configuration script is mentioned (PAC file).
Use a Proxy server – The IP address and port are specified directly using the internet options.
Running Zoho Assist in Service Mode Issues
When using Assist Remote Support via a standard user account, the application starts with fewer privileges. Any admin-level operations (like accessing applications with right-click and “Run as administrator” or accessing secure desktops, such as Windows UAC) executed during the session will result in screen freezes.
Performing such elevated operations requires running Zoho Assist in service mode.
How to Elevate Zoho Assist
To resolve the Zoho Assist domain admin not working issue, users acquire local admin credentials provided by the technician (via Assist UAC):
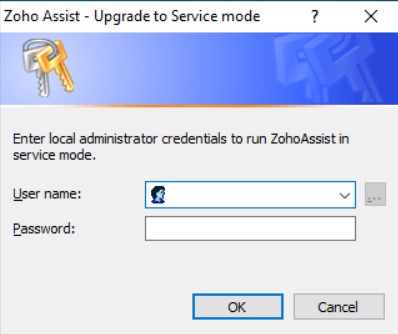
Technicians must select the pre-defined local admin names from the drop-down box or type local administrator credentials into the Assist UAC using the format below:
- <domain>\username
- <machine_name>\username
- username@domain
When accurate credentials are entered, they’re validated with the Windows authentication mechanism.
Why Isn’t the Assist UAC Dialog Displayed?
Reason 1: The remote side of the network is slow, only appearing when the respective cmd reaches the remote machine.
Reason 2: If the desktop has any priority windows or dialogs, Assist UAC could be hidden. Reveal it by minimizing unnecessary app windows and dialog boxes.
Reason 3: If sessions are executed on a desktop with multiple monitors, the Assist UAC may be on one of the secondary monitors. Switch monitors in the viewer section to test this theory.
How to Resolve “Username or Password Is Incorrect ” or “Logon Unsuccessful”?
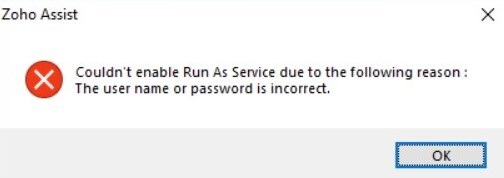
Step 1: The dialog box shown above means that the username or password is incorrect. Login isn’t possible with the provided user credentials.
Step 2: Try logging in with existing (pre-defined) local admin accounts from the username dropdown box.
Step 1: Open the cmd prompt by Start > run > cmd.
Step 2: Enter the following cmd “runas /user:domain\username notepad.exe”.
(I.e, If a user is named “Roger Andrews” the command would look like this:
“runas /user:mydomain\Roger Andrews notepad.exe” (without quotes).
The terminal screen should then display a password prompt. Once users type the password, a notepad instance runs on the user’s desktop.
Try using the same credentials on the Assist UAC.
Azure Admin Credentials Are Not Working in Assist UAC?
One reason is that after the Azure machines were joined, the domain administrator accounts were not pushed as local admins. This issue causes Assist UAC to send the “logon unsuccessful” error message.
Method 1: The Command Line Method on remote machines (Singular):
Step 1: Use the AZURE AD of the desired local administrator to log on to the PC (a GUID is loaded into the computer).
Step 2: As an administrator, open a command line utility instance on the remote machine.
Step 3: Enter the below command to add users to the machine’s Local Admin group. For example, If the user’s name was “Daniel Rogers” the command would be:
net localgroup administrators MyAzureAD\Daniel Rogers /add
Method 2: By Azure refresh policy (Bulk):
Step 1: Restart the machine.
Step 2: Join a new Assist session.
Step 3: Run Zoho Assist once more in service mode (using the Azure Admin credentials that were added as Local Admin).
The “You are unable to view the remote computer’s screen since you have tried to carry out administrative tasks without running in service mode” prompt (shown below) occurs when users attempt to execute any “run as service” operation if the session runs as a standard desktop.
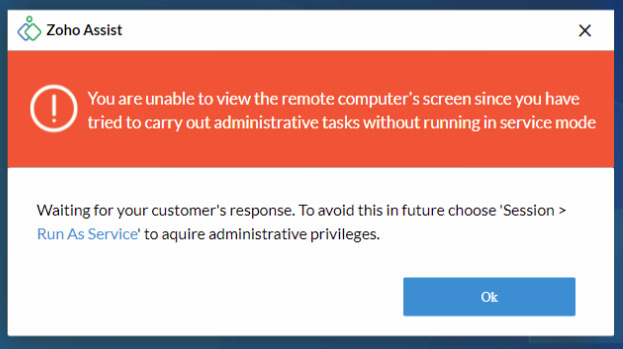
Actions like “Right click on any app > Run as Administrator”—as well as accessing any Windows UAC triggering app—could cause the screen to freeze.
Await the end-user’s (the person on the remote machine) response to the prompt.
Try once more to run Zoho Assist in service mode.
The “A Required Privilege Is Not Held by the Client” or “Access Denied” Issue
This happens when someone with a lack of permissions/privileges tries copying/pasting/modifying something within a Windows folder—but Microsoft doesn’t permit unauthorized access to a Windows installation.
Local administrators lack the required permissions, such as being able to read, write, or modify files within the folders shown below:
- • %programdata%\ZohoMeeting\
- • %localappdata%\ZohoMeeting\ (the currently active user account).
Follow the steps below to provide local administrators with the needed permissions within Windows folders:
Step 1: Open either of the folder paths above.
Step 2: Right-click the folder.
Step 3: Choose “Properties” from the pop-up menu.
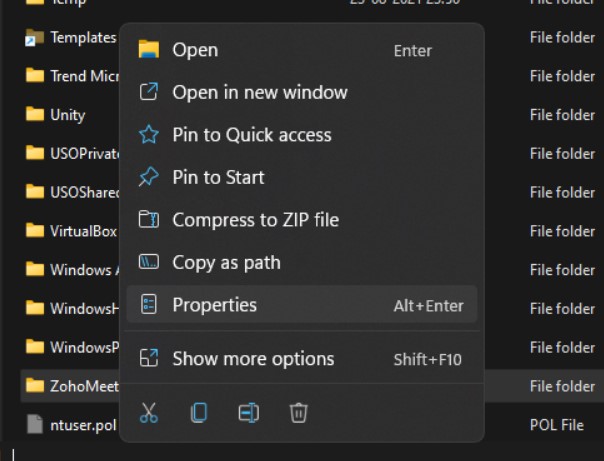
Step 4: Go to the “Security tab”.
Step 5: Hit the “Edit” button.
Step 6: From the list, choose the desired local Admin user you’d like to give permissions to.
Step 6.1: Hit “Add”.
Step 6.2: Then search for their username in the text area (shown below).
Step 6.3: Click “Check names” to view the list of users containing the substring.
Step 6.4: Choose the desired local admin.
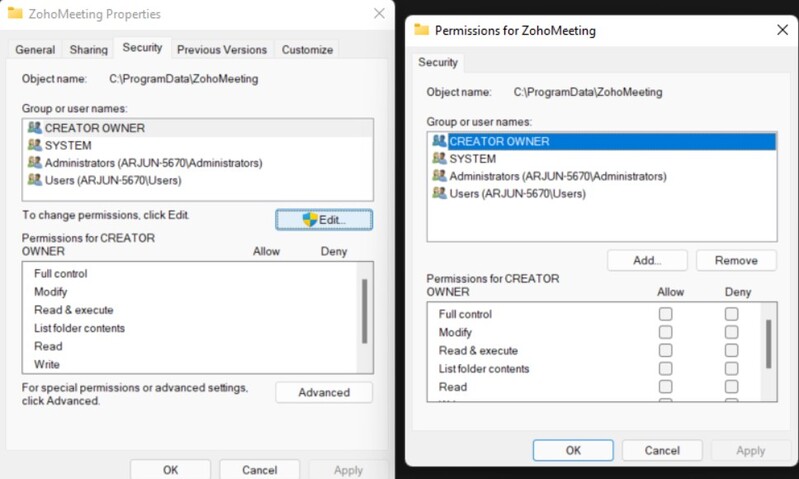
Step 7: Toggle the “Full control” check box to one located below the Allow section.
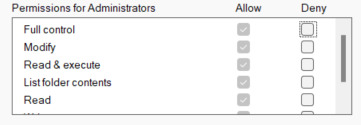
Step 8: Hit the dialogs to apply permission changes on the specified folder.
How to Fix the “The System Cannot Find the File Specified” Failure
This particular issue happens if necessary service files aren’t available/are missing from the Assist Remote Support configuration folder. Follow the steps below to resolve this issue.
Step 1: End the current session and uninstall the existing Remote Support configuration (do this by going to the entry: Control Panel > Uninstall a Program > “Zoho Assist” > Uninstall.
Step 2: Wait for the instance to be removed (this will take a few seconds).
Step 3: Join a new session on the remote machine once removal is complete.
“The Specified Service Does Not Exist as an Installed Service” Error
The error indicates that the running Zoho Assist in service mode was initiated successfully (through validation of admin credentials.) However, the service installation failure occurred during the run time.
Provide the below data if you can’t troubleshoot on your own:
- • Screenshot the error messages received when trying to run Zoho Assist in service mode.
- • Zip the required logs from the remote machine:
- ◦ Start > Run > Type “%localappdata%\ZohoMeeting\
- ◦ Right-click the folder called “log” and select “Compress to zip”
- ◦ Start > Run> Type “%programdata%\ZohoMeeting\
- ◦ Right-click the folder called “log” and select “Compress to zip”.
Zoho Assist Unattended Access Not Working (Mac and Windows)
The below steps work for both Windows and Mac users to add the unattended access installer and configure a device. After devices are correctly configured, users can remotely access and troubleshoot devices. Find out what unattended access is first and all the specifics of using it.
Download the unattended access installer for Zoho Assist (on both Mac and Windows) by following the steps below:
Step 1: Open Zoho Assist and log in.
Step 2: Go to Settings and select Deployment (located beneath Unattended Access).
Step 3: Hit Download Installer (located on the right-hand side).
Step 4: Select the Mac Installer or Windows Installer to download the software.
Step 5: After downloading, install the unattended access installer.
Step 6: Go to Unattended Access.
Step 7: Click Connect (found next to users wish to access).
Zoho Assist Unattended Access Not Working (Linux)
For Linux operating systems like Ubuntu and Debian, installation is performed by running the downloaded file. However, finishing the installation on (Linux) operating systems like Centos, Fedora, and Red Hat requires following the steps listed below:
Step 1: Log in to Zoho Assist.
Step 2: Go to Settings and select Deployment (found beneath Unattended Access).
Step 3: Located on the right-hand side, click on the Download Installer.
Step 4: Select and download the Linux Installer.
Step 5: Once downloading finishes, run the file or use the below steps to install the unattended access installer.
How to Install the Unattended Access Installer in Centos, Fedora, and Red Hat
Step 1: Extract the downloaded file “zohoassist-1.0.0.1-1.*.zip.”
Step 2: Open the terminal.
Step 3: Switch to the download directory by using the command “cd ~/Downloads/zohoassist-1.0.0.1-1.*”
Step 4: Grant permissions to make the file Install.bin runnable by executing the “chmod +x install.bin” command.
Step 5: Run the application via sudo by executing the command “sudo (PWD)/install.bin”
After successful app installation, the “Application installed successfully” prompt will display.
Step 6: Check the system tray for the Zoho Assist icon after rebooting the computer.
Zoho Assist App Not Working on iPhone (IOS)
Restarting the Zoho Assist app on an iPhone can resolve minor glitches caused by the app’s cache. Follow the steps below to learn how to quit and restart Zoho Assist on an iPhone:
Step 1: Swipe up from the bottom until the App Switcher opens.
Step 2: Find your Zoho Assist app.
Step 3: Swipe the Zoho Assist app up to close it.
Step 4: Close all remaining background apps using the same process.
Step 5: Restart the iPhone to apply changes and refresh the system.
Step 6: Update the Zoho Assist app to the latest version for iOS.
How to Fix Zoho Assist Unable to Connect to a Server on the iPhone App
Use the steps below to fix issues having to do with network connectivity in the Zoho Assist iPhone app.
Step 1: Navigate as follows “Settings” > “General” > “Reset” > “Reset Network Settings.”
Step 2: Type the correct password for the device.
Step 3: Tap the option that confirms Reset Network Settings.
Fix Zoho Assist App Not Working on Android
Follow the easy step-by-step guide below to resolve issues around the Zoho Assist Android app failing to open, freezing, and displaying error messages.
Force Stop the Zoho Assist Android app:
Step 1: Open the Android Settings.
Step 2: Find and choose the Zoho Assist app.
Step 3: Tap “Force Stop.”
Confirm Zoho Assist is Updated to the Latest PlayStore Version:
Step 1: While operating the Android device, open the Play Store.
Step 2: Search for the Zoho Assist app.
Step 3: Open the detail page.
Step 4: Hit the Update option if one is displayed.
Clear Zoho Assist App cache and data:
Step 1: Tap the Menu on the device’s home screen.
Step 2: Tap Settings.
Step 3: Tap Apps.
Step 4: Once found, tap Zoho Assist from your list of apps.
Step 5: Tap Storage.
Step 6: Clear the cache and data of the app by tapping the “Clear Data” option located at the bottom of the screen.
Step 7: Restart the Zoho Assist app.
Zoho Assist Internet Connection Errors on Android
This issue often occurs due to a problem with the network used to access the Zoho Assist app. The good news is that the fix could be as simple as correcting the device’s mobile data or your WiFi connection.
Below we’ve outlined the steps to do that:
Step 1: From the device, navigate as follows: “Settings” > “Apps” (or visit the “Manage Apps” tab).
Step 2: Find the Zoho Assist App and tap it.
Step 3: Tap Force Stop.
Step 4: Navigate to Storage and tap “Clear Data”.
Step 5: When prompted, confirm by tapping “OK”.
Step 6: Return to the tab for Zoho Assist app tab.
Step 7: Go to “Mobile Data” > “Allow Background Data Usage.”
Step 8: Return to the phone’s Settings page and tap the “Connections” option.
Step 9: From the “Mobile Network” option, scroll down to “Network Mode”.
Step 10: Add your network to the 4G option. Here’s an example of how that will look: LTE/3G/2G (auto connect).
Step 11: Restart the Zoho Assist app.
Looking for an Alternative?
If you’re experiencing ongoing issues with Zoho Assist, it might be time to consider an alternative.
HelpWire is a free, secure Zoho Assist alternative with:
✅ Cross-platform support – Works on Windows, macOS, and Linux.
✅ Unattended access – Connect without user intervention.
✅ Simple setup – No complex configurations or session codes.
✅ Reliable performance – A smooth, stable alternative for remote support.
For a detailed comparison between Zoho Assist and HelpWire, check out this guide to see which solution best fits your needs.
Zoho Assist is a powerful remote support tool, but connection issues, black screens, and service errors can disrupt productivity. If troubleshooting doesn’t resolve the problem, consider a more reliable alternative like HelpWire for seamless, hassle-free remote access.