If you want to access your computer from anywhere or help someone with theirs, the software must be set up properly. How to do it on Windows, Mac, or Ubuntu will be shown in this guide.
- •How to install TeamViewer on Windows
- •How to install TeamViewer on Mac
- •How to Install TeamViewer on Linux
Select your operating system and follow the steps to set up TeamViewer correctly and prevent common problems.
If TeamViewer seems challenging to use, opting for a different remote access tool could be the answer. HelpWire, a free and extremely simple-to-use alternative to TeamViewer, offers essential functionalities for quick remote assistance on both Macs and PCs, without straining your budget.
How to Install TeamViewer on Windows
Quick Answer: First, download the installer. Then pick One-Time Access or Unattended Access. Follow the instructions shown on the screen after that. The last thing you should do is to make sure your firewall or antivirus software does not affect the program.
Installation Steps:
-
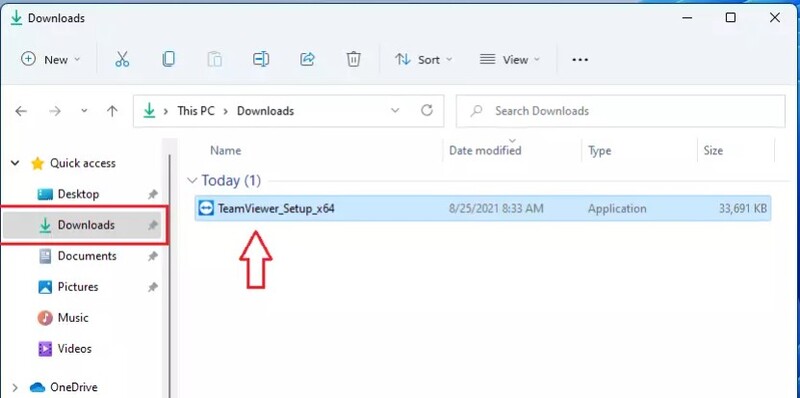
Download the Installer:
• Go to the TeamViewer website. Then, download the right version of the app for your computer.
• The installer already knows if your computer is 32-bit or 64-bit. But you can check it manually if it doesn’t. Go to Start > Settings > System > About and look at your system type.

-
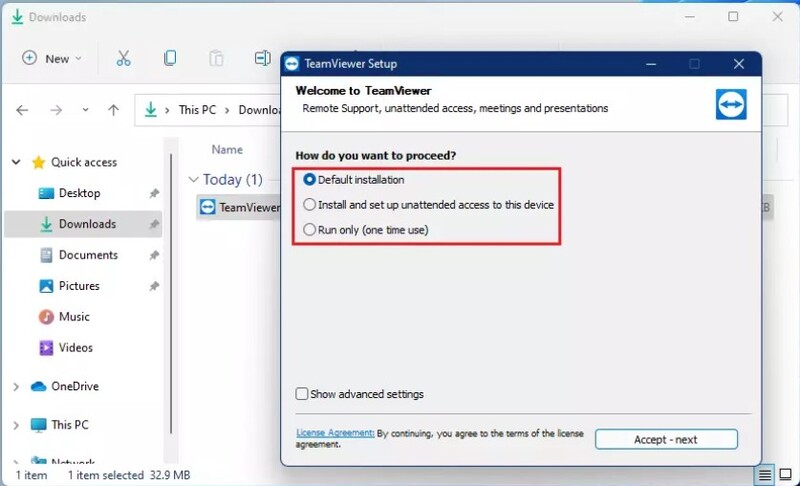
Choose Installation Type:
• Default Installation: Select this if you only need remote support occasionally and want to approve it each time.
• Unattended Access: Choose this if you want remote access to stay on all the time without needing approval.

-
Accept the License Agreement: You need to accept the terms by checking the box.

-
Complete Installation:
• Go through the on-screen steps. For Unattended Access, you’ll need your TeamViewer email and password.
-
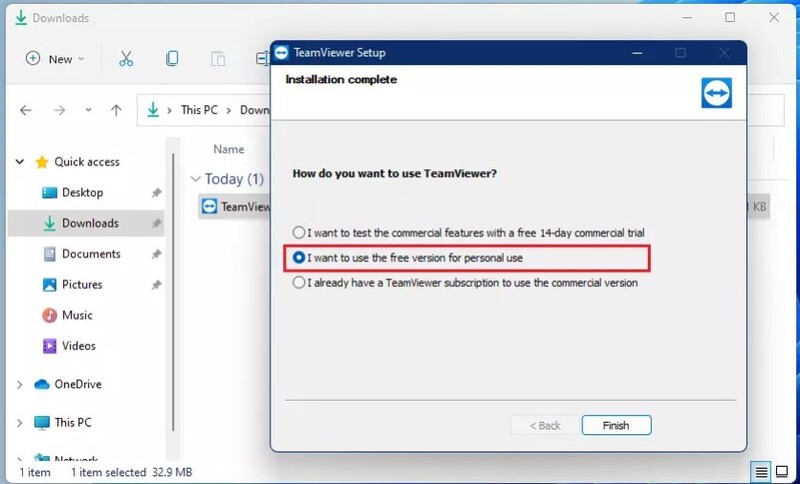
Finish Setup: Click Finish to complete installing the tool.
How to Install TeamViewer on Mac
Quick Answer: Download the TeamViewer.dmg file first. Open it and you’ll find the steps to follow. If needed, adjust System Preferences. Turn on Screen Sharing and allow the app under Accessibility and Screen Recording.
Installation Steps:
-
Download TeamViewer:
• Go to the TeamViewer macOS download page. There, get the TeamViewer.dmg file.
-
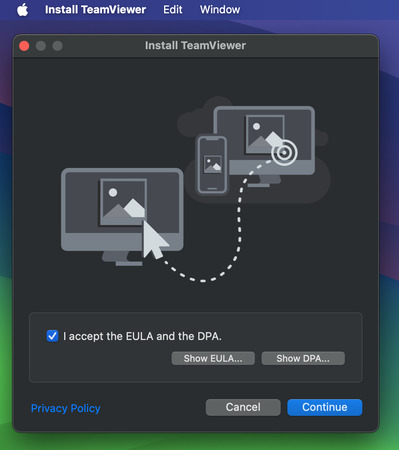
Start the Installer:
• Click the TeamViewer.dmg file twice to open the installer.
• Just follow the steps on screen to finish the setup.

-
Grant Required Permissions:
• Screen Sharing: System Preferences → Sharing → enable Screen Sharing.
• Security & Privacy: System Preferences → Security & Privacy → Privacy tab → allow TeamViewer under Accessibility, Full Disk Access, and Screen Recording (unlock with password if needed).
-
Set Up Unattended Access (Optional):
• To let TeamViewer connect automatically without asking for approval every time, just create a password when it asks during Unattended Access setup.
-
Finish Installation: When the permissions are set, click OK to finish installing the software.

How to Install TeamViewer on Linux
Quick Answer: First, add the repository key to your terminal. You will also add the software’s repository to your system. Then, update your package list and set up TeamViewer. Once it’s set up, be sure to allow Accessibility and Screen Recording so you can control your computer remotely and properly.
System requirements
TeamViewer (Classic) for Linux requires at least Linux 2.6.27 kernel and GLIBC 2.17. The following minimum operating system versions are supported:
• Debian 10 (incl. Raspbian)
• Ubuntu 20.04 and derivatives (e.g. Kubuntu)
• Mint 20
• RHEL 7, CentOS 7, Fedora 33
• SUSE Enterprise 15, openSUSE 15
📌 Note: As of TeamViewer 15.19 Qt is not required to be installed. Below TeamViewer 15.19 Qt 5.6 is recommended for the best experience.
Machine requirements
x86 64 bit: amd64 (Intel 64/EM64T)
x86 32 bit: SSE2
armv7 32 bit: armv7 hardfloat (Raspberry Pi 2+)
Choose your package
For PC: Choose the 64- or 32-bit package according to your system
• If in doubt, run uname
• On a 64-bit system, uname -m will print x86_64.
For Raspberry Pi: Choose the ARM package
The following are steps you must follow to set up the software on Ubuntu or other Debian-based systems:
-
Download and Add the TeamViewer Repository Key
You need to add TeamViewer’s repository key before installing it:
$ cd /tmp
$ wget
https://download.teamviewer.com/download/linux/signature/TeamViewer2017.asc
$ sudo apt-key add TeamViewer2017.asc
$ curl -fsSL
https://download.teamviewer.com/download/linux/signature/TeamViewer2017.asc | gpg –dearmor | sudo tee /etc/apt/trusted.gpg.d/teamviewer.gpg > /dev/null
-
Add the TeamViewer Repository
Put the repository into your system’s package list:
• For Stable version (recommended for most users):
$ sudo sh -c ‘echo “deb http://linux.teamviewer.com/deb stable main” >> /etc/apt/sources.list.d/teamviewer.list’
• For Preview version (for early adopters, not recommended for general users):
$ sudo sh -c ‘echo “deb http://linux.teamviewer.com/deb preview main” >> /etc/apt/sources.list.d/teamviewer.list’
-
Update the Repository Index
Update your system’s package list once the repository is added:
$ sudo apt update
-
Install TeamViewer
Enter this command to set up the software:
$ sudo apt install teamviewer
Type Y and press Enter if you are asked to keep going.
-
Launch TeamViewer
Use this command to open the app:
$ teamviewer
You can open TeamViewer from the Applications menu, instead, if you’re using a GNOME or KDE desktop.
Tips for using Ubuntu 20.04+:
• Security Permissions: Go to System Preferences and make some adjustments in Security and Privacy settings. There, give the app access in Accessibility, Full Disk Access, and Screen Recording. These permissions allow the app to work correctly and let you control screens remotely.
Conclusion
Following these installation steps will help you set up TeamViewer correctly, so you can use it for quick remote help or ongoing support. It will also run smoothly without a common connection or access problems.
If you have any issues during installation, doing the steps again in this guide should help you fix them. You should also try checking your firewall and security settings. And, if needed, visit the official TeamViewer support page for more help in troubleshooting.
FAQ
To use TeamViewer QuickSupport, go to the QuickSupport download page and download the app. You don’t need to install it. Just open the file, and you’ll see your Partner ID and Password.
On Mac, go to System Preferences, then Security and Privacy. Next, find Screen Recording and Accessibility and turn them on. Then, share your Partner ID and Password with the person helping you. QuickSupport works right away and doesn’t need to be installed.
Possible Causes:
- • Old Installations: Old versions leave leftover files that mess things up when you try to install a new one.
- • Antivirus or Firewall: Your antivirus software could get in the way when you’re trying to install it.
- • System Permissions: The program may not be added properly if you don’t have full computer access.
Solutions:
- • Remove Old Versions: Delete any older copies of the app.
- • Pause Security Software: Temporarily turn off antivirus and firewall during installation.
- • Use Admin Rights: Right-click the installer and choose “Run as administrator.”
Yes, but only if you downloaded it from the official site. The app keeps your connection secure and follows common safety rules. And for extra protection, use two-step verification and only let trusted people have access.