The Complete Guide to Disabling Remote Access on Windows 10\11
Windows 10\11 comes packed with remote access functionalities for convenient remote sessions. These features enable users to view, manage, and troubleshoot remote desktops anytime and anywhere.
However, improper use of the remote access feature can put your system at risk. Leaving it enabled when not needed makes it easier for hackers and malicious software to intrude into your system and access sensitive data.
So, if you don’t use this feature frequently, it’s best to turn off remote desktop access. In this article, we’ll guide you on how to disable remote access correctly on Windows 10 and 11 machines.
How To Disable Remote Desktop in Windows 10\11?
When the Remote Desktop feature is activated in Win 10/11, the system uses Remote Desktop Protocol (RDP) to connect the host machine to another computer. The established connection enables access and transfer of files between the computers.
Unfortunately, RDP is highly vulnerable to cyberattacks. So, to ensure your privacy and safety, it’s crucial to fully disable Remote Desktop after using it. Here are some methods on how to disable RDP and the Remote Desktop feature.
Method 1: Use System Settings To Disable Remote Desktop
This method is ideal for those who use Remote Desktop regularly. The system settings offer a simple and reversible way to disable remote access on Windows 11\10. It’s like a “switch button” that lets you turn the feature on or off the feature quickly without additional steps.
- Go to your computer’s “Control Panel”.
- Then, head to System & Security > System > Remote Settings.
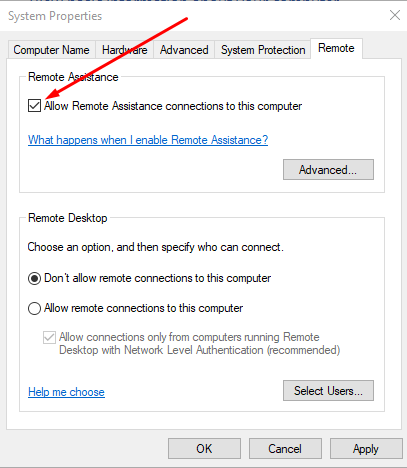
- Uncheck “Allow Remote Assistance connections to this computer.”
-
Select “Don’t allow remote connections to this computer.”
- Click Apply and Ok to save changes.
That’s it, the remote access feature is now disabled in your operating system.
Method 2: Modify Windows Registry
Modification in the Windows registry can completely disable Remote Desktop at a system level so no one can intrude on your system. However, this method is not beginner-friendly and can lead to system instability if performed incorrectly.
It’s advisable to back up your registry before making changes that allow you to revert to the original state. If you opt for this method, ask for the help of an IT professional.
Follow these steps to modify the Windows registry for permanent disabling of the Remote Desktop.
-
Open the Windows Run app and type
REGEDITto launch the registry editing tool. -
Navigate to:
HKEY_LOCAL_MACHINE\SYSTEM\CurrentControlSet\Control\Terminal Server. -
Select
fDenyTSConnections. -
Change the Data Value from
0to1and select OK.
Method 3: Edit Group Policy To Disable Remote Desktop (Pro & Enterprise Editions Only)
If you’re using Windows 10/11 Pro and Enterprise, you can apply this method to disable Remote Desktop. This method is currently unavailable for Windows Home users.
Follow these steps to modify Group Policy and deactivate remote access in your system:
-
Press
Windows + Ron your keyboard, typegpedit.msc, and hit Enter. -
Proceed to:
Computer Configuration > Administrative Templates > Windows Components > Remote Desktop Services > Remote Desktop Session Host > Connections - Look for Allow users to connect remotely using Remote Desktop Services.
- Double-click the setting and select Disabled.
- Click Apply, then OK to save changes.
Method 4: Apply Quick Command Method in PowerShell To Disable Remote Desktop
A single command line in PowerShell can quickly disable Remote Desktop in your system. This works perfectly for IT administrators who want to manage multiple systems.
-
Open PowerShell as an Administrator (
Windows + X→ Windows Terminal (Admin)). -
Run the command below:
Set-ItemProperty -Path 'HKLM:\System\CurrentControlSet\Control\Terminal Server' -Name "fDenyTSConnections" -Value 1 - Restart your computer to apply the changes.
Method 5: Disable Remote Desktop Services via Windows Services to Prevent Reactivation Upon System Restart
Some background Windows services can automatically restart and reactivate Remote Desktop even after disabling it using the methods above. So, it’s important to terminate these background services to ensure that remote access to your desktop remains permanently disabled.
Here are the steps to end processes that can re-enable the Remote Desktop feature.
-
With your keyboard, press
Windows + Rand typeservices.msc. Then, press Enter. - Look for Remote Desktop Services. Right-click it and select Properties.
- Set Startup type to Disabled.
- Click Apply and OK.
- Restart your computer. All background processes that may reactivate remote access have been terminated upon restart.
Method 6: Block Remote Desktop at the Firewall Level (Remotely Disable Windows Firewall)
Even with the Remote Desktop feature disabled, there’s still a workaround that hackers can use to compromise your system – an open RDP port 3389.
To fix this vulnerability, you need to block the RD feature via the Windows Firewall as an additional layer of security.
-
Go to Windows Defender Firewall (
Windows + R→ typefirewall.cpl). - Click Advanced settings.
- Proceed to Inbound Rules and find Remote Desktop (TCP-In) and Remote Desktop – User Mode (UDP-In).
- Right-click both entries and select Disable Rule.
- Repeat the process for Outbound Rules if needed.
Method 7: Establish Network-Level Protection And Block Remote Desktop via Router
Many routers automatically allow remote access via external network connections. So, disabling the remote desktop feature using the previous methods becomes useless if the router continues to enable remote access.
The fix is a bit straightforward. Simply block port 3389 at the router level and the router stops enabling remote access. Here are the steps to do so:
-
Log into your router’s admin panel (usually
192.168.1.1or192.168.0.1). - Find Port Forwarding (or Firewall Settings).
- Locate port 3389 (Remote Desktop Protocol – RDP). Then, select Block / Disable / Close the port.
- Save the changes and restart the router.
How to Disable Remote Assistance in Windows 10\11?
Another Windows feature commonly used for remote sessions is Remote Assistance. This allows trusted users (like IT support teams) to access a system remotely for troubleshooting.
But as with the Remote Desktop feature, leaving Remote Assistance open when not in use can increase the risk of unauthorized remote access. So, it’s crucial to properly disable this feature.
Here are some effective methods to consider.
Method 1: Disable Remote Assistance via System Settings and Firewall
Microsoft recommends using its system settings as a security measure for remote sessions. Users can easily block remote assistance requests using system settings without the need for complicated configurations.
Here’s how to disable Remote Assistance via System Settings:
-
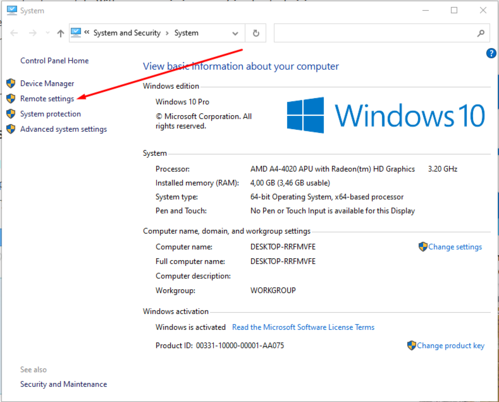
Hit Win+Pause to invoke the system tab and click ‘Remote settings’on the left-hand pane:
-
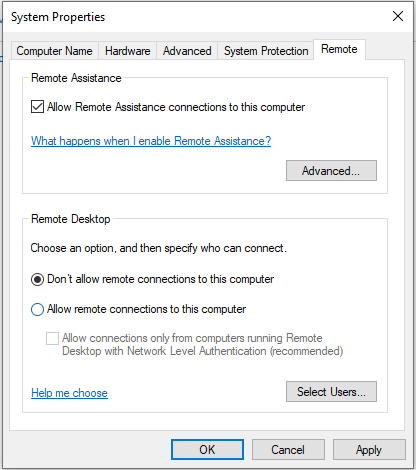
Untick the ‘Allow Remote Assistance…’ box, then make sure that radio button on the RDC pane below is set to ‘Don’t allow remote…’:
- Click Apply, then OK.
-
After that, type ‘firewall’ into the Cortana search box and pick ‘Allow an app through Windows Firewall’ from the results. Than untick both Private and Publick boxes next to Remote Assistance:
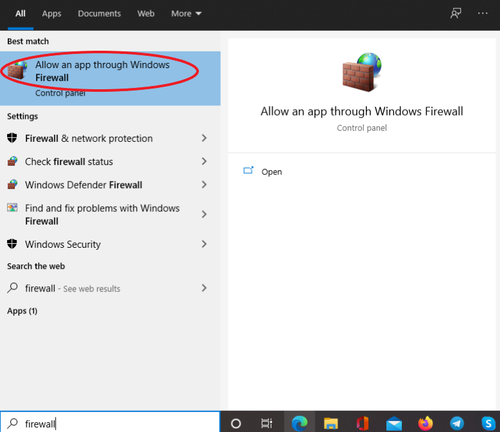
- Click OK.
- Repeat on all the other PCs you own or use.
Method 2: Create a Batch Script To Disable Remote Assistance via Registry and Firewall
If you want to block all Remote Assistance requests (to ensure zero possibility of inbound remote connection occurrence), you can create a batch script that terminates this process.
This option is more secure than the system settings method but requires firewall rule management, which can be technical for some users. Moreover, blocking Remote Assistance through the firewall may interfere with other remote support tools that require access.
Follow the steps below:
-
Create a .bat file with this text:
REG ADD “HKLM\SYSTEM\CurrentControlSet\Control\Remote Assistance” /v fAllowToGetHelp /t REG_DWORD /d 0 /f
netsh advfirewall firewall set rule group=”Remote Assistance” new enable=noNote: This file modifies the Registry, so you’ll need administrator rights to execute it.
-
Save the file on your desktop, open its properties and tick the Unblock box, then click Apply and OK.
Alternatively, open Command Prompt and run:
unblock-file -path “paste the full path to your .bat file here” -
Right-click the file and choose Run as administrator.
Or search for cmd, open Command Prompt, and enter:
"C:\Users\thera\OneDrive\Desktop\YourFile’sName.bat"
Method 3: Use Powershell To Turn Off Remote Assistance
You can also disable the quick assist feature using Windows PowerShell. This is highly suggested if you prefer an automated way to turn off all incoming remote assistance requests.
- Launch PowerShell as Administrator.
-
Run this command:
Set-ItemProperty -Path 'HKLM:\System\CurrentControlSet\Control\Remote Assistance' -Name "fAllowToGetHelp" -Value 0 - Hit Enter and restart your computer.
Method 4: Stop Background Services To Fully Disable Remote Assistance.
Oftentimes, background processes remain running even after disabling Windows Remote Assistance. If this issue persists, it can reactivate Remote Assistance and allow hackers to gain unauthorized support access to your computer.
These are the steps to disable all background services of Windows Remote Assistance:
-
Press
Windows + R, typeservices.msc, and press Enter. - Locate Remote Assistance Service (may be named RasMan). Right-click it and select Properties.
- Set Startup type to Disabled.
- Click Apply and OK.
- Restart your computer.
Method 5: Block Remote Assistance via Firewall
Even when disabled, some Windows services can still attempt outbound connections to your sessions. One option to completely disable solicited remote assistance is to make some slight modifications in your system’s firewall.
-
Open Windows Defender Firewall (
Windows + R→ typefirewall.cpl) and click Advanced settings. - Select Inbound Rules and look for Remote Assistance (RA Server TCP-In). Right-click it and choose Disable Rule.
- Repeat the process above for Outbound Rules if needed.
Conclusion
It sounds trivial, but many are still unaware of the dangers of leaving Remote Desktop and Remote Assistance open when not needed. It increases the risks of unauthorized remote access and breach of important personal or business data.
Hence, it’s crucial to correctly disable these features for enhanced cyber protection. For non-tech savvy, the Windows built-in system settings is a handy and straightforward way to turn off these remote tools.
For IT professionals and corporate employees you can use PowerShell commands, Registry edits, or Group Policy modification to block all unwanted remote access requests.