categories
Updated on in

How to Fix TeamViewer “WaitForConnectFailed” Error

Author: Emma Collins
Emma Collins Article author

TeamViewer is a robust and versatile tool for remote access, but it is not flawless. A common issue, known as the “WaitForConnectFailed” error, can interrupt your work and productivity. Fortunately, this problem is easily solvable once the common issues are determined. 

In this article, we share foolproof methods to fix the Teamviewer WaitForConnectFailed error and help you promptly restore your connection.

Common Causes of the "WaitForConnectFailed" Error

When this common TeamViewer error waitforconnectfailed appears, some potential culprits are as follows:

  1. Network Issues – Slow or unstable connections, high latency, or lost data packets can interrupt remote sessions, especially if one computer uses a poor network.
  2. Firewall or Antivirus Block – Security tools may stop TeamViewer from working by blocking important ports.
  3. Outdated TeamViewer Version – Using different or old versions of TeamViewer on the devices can prevent connections. Always update both devices.
  4. Incorrect Login Information – Entering the wrong TeamViewer ID or password will stop the connection. Double-check all login details.
  5. Router or Port Blocks – Incorrect router settings or blocked ports (such as TCP 5938, 443, or 80) can prevent TeamViewer from working.
  6. TeamViewer Server Trouble – If the server is down or under maintenance, it may temporarily interrupt the remote sessions. 
  7. Proxy Server Blocks – Proxies in offices or strict networks may block TeamViewer if not set up correctly.
  8. IP Address Problems – Changes in network addresses or conflicts with other devices can stop TeamViewer connections from working.
  9. LAN-Only Mode – Remote connections from outside the local network might malfunction if the TeamViewer is set to local network mode only.
  10. Unresponsive Remote Computer – If the remote computer is not working, frozen, or is too busy, the connection will not go through.

Best Solutions to Fix the "WaitForConnectFailed" Error

To fix the “WaitForConnectFailed” error, follow these effective step-by-step instructions:

1. Deactivate the Computer’s Firewalls or Antivirus Software Temporarily

Since Firewalls or Antivirus can block TeamViewer’s traffic, these protective programs can also lead to failed connections.

Perform these steps on both devices:

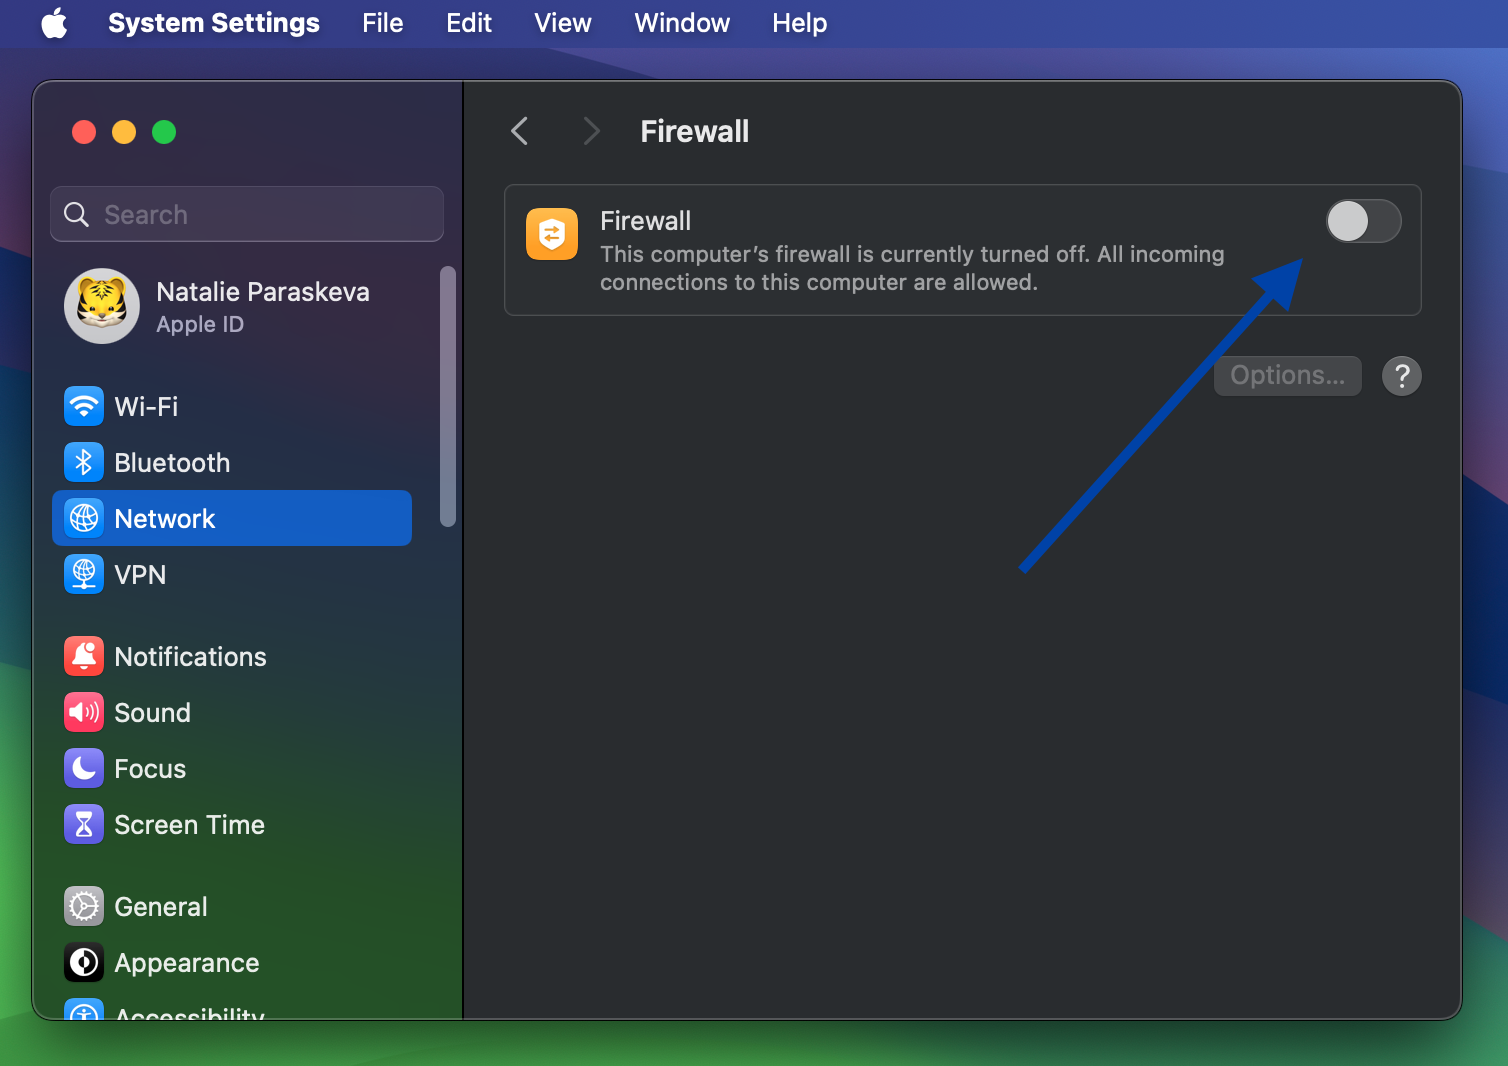
  1. Proceed to the Firewall settings or launch the Antivirus software:

    • In Windows: Control Panel > System and Security > Windows Defender Firewall.

    • In macOS: System Settings > Network > Firewall.

    macOS Firewall settings

  2. To verify if the Firewall or Antivirus program causes the problem, temporarily disable them.

  3. Open TeamViewer on both devices and reconnect to the remote device.

If the connection is successful upon disabling the firewall, add TeamViewer to the exceptions list in the firewall or antivirus software to prevent future blocks.

2. Update TeamViewer to the Latest Version

Using an outdated TeamViewer application often causes compatibility issues with newer operating systems or other devices.

Resolve the problem with these steps:

Check for Updates in TeamViewer:

  1. On the local device, open TeamViewer

  2. Visit Help. Then, press Check for new version in the menu bar.

  3. Follow the prompts to install the latest version (only if a new version is available)

  4. Repeat this process again on the remote device to see if both devices have up-to-date TeamViewer versions.

    check for updates TeamViewer

3. Disable IPV6 on Both Computers

Sometimes, IPv6 causes TeamViewer error code: waitforconnectfailed, especially when the network primarily operates using IPv4. You can turn off IPv6 to fix this issue.

Deactivate IPv6 on Windows

  1. Open the computer’s Control Panel and select Network and Sharing Center.

  2. Click Change Adapter Settings.

  3. Right-click your active network connection (Wi-Fi or Ethernet) and choose Properties.

  4. Remove the check from Internet Protocol Version 6 (TCP/IPv6).

  5. Click OK and restart your computer.

Turn off IPv6 on macOS

  1. Launch System Settings and go to Network.

  2. Choose the network connection in use.

  3. Click Advanced, then open the TCP/IP tab.

  4. Set Configure IPv6 to Link-local only.

  5. Click OK and restart the device.

    Advanced WiFi Settings TeamViewer

4. Allow Full Access Control to TeamViewer

TeamViewer may fail to connect if it does not have full access permissions on the remote device. You need to enable “Full Access” in two key areas of the app:

  1. Connections to this computer, and
  2. Connections to other computers

You must allow “Full Access” in both sections to ensure smooth Easy Access. Issues may arise if only one or neither of the sections is enabled. 

To enable “Full Access” in both sections, follow these steps:

  1. On the remote device, launch TeamViewer.

  2. Open Settings > Options > Advanced.

  3. Press “Full Access” in both settings, “Connections to this computer” and “Connections to other computers.”

    Advanced Settings TeamViewer
  4. Press “OK” to save changes.

5. Flush the DNS Configuration

DNS problems can interfere with proper name resolution, which leads to connections failing. Removing the DNS cache clears any outdated or incorrect DNS entries that may be causing the issues.

Flush DNS on Windows:

  1. Open Command Prompt as an administrator.

  2. Type ipconfig /flushdns and press Enter.

  3. This will clear the DNS cache.

Flush DNS on macOS:

  1. Open Terminal.

  2. Type sudo killall -HUP mDNSResponder and press Enter.

  3. Enter your password if prompted. This clears the DNS cache on macOS.

6. Adjust Router and Port Settings

TeamViewer needs to use the internet through a few specific “doors” (called ports). Most home networks already allow this, but if yours doesn’t, here’s what to do:

Make Sure TeamViewer Can Use the Internet

  1. Open your web browser and type 192.168.1.1 or 192.168.0.1 into the address bar to open your router’s settings page.

  2. Log in using your router’s username and password (often written on a sticker on the router).
  3. Look for a section called “Firewall,” “Port Filtering,” or “Security Settings.”

  4. Make sure these three outbound connections are allowed (don’t worry about “port forwarding”):

    • TCP 5938 – (main one TeamViewer uses)

    • TCP 443 – (also used for websites)

    • TCP 80 – (backup if others don’t work)

  5. Save any changes and restart your router.

Check for Proxy Settings

Some internet setups (especially in offices or schools) use a “proxy,” which can block TeamViewer.

  1. Open TeamViewer.

  2. Go to Settings > Network.

  3. If you see “Proxy Settings,” choose “No Proxy” (unless your internet provider told you otherwise).

    Network Settings TeamViewer
  4. Close TeamViewer, reopen it, and try to connect again.

You don’t need to disable anything like NAT or do complicated port forwarding, TeamViewer usually works fine without that on home networks.

7. TeamViewer Fails in Corporate Networks with Proxy Servers

Proxy servers in corporate networks often block TeamViewer’s communication. Adjust your settings to ensure TeamViewer can work within the network.

Configure Proxy Settings in TeamViewer

  1. Open TeamViewer.

  2. Go to Settings. Under the General tab, find the section called Network settings.

  3. In the Proxy settings area:

    • If your company uses a proxy, select “Use manual proxy” and enter the details provided by your IT team.

    • If no proxy is required, select “No proxy.”

Check Firewall/Proxy Access

Ask your IT department or network administrator to:

  1. Allow outbound traffic on the following ports:

    • TCP 5938 (preferred)

    • TCP 443 (HTTPS fallback)

    • TCP 80 (backup)

  2. Ensure that TeamViewer.com domains aren’t blocked by web filtering or proxy rules.

8. TeamViewer Misconfigured to Use LAN-Only Mode

If TeamViewer is set in LAN-only mode, it may restrict connections to local networks.

To resolve this issue, do the following:

Adjust LAN Settings in TeamViewer:

  1. On both devices, open TeamViewer.

  2. Proceed to Settings > Network.
  3. Change the Incoming LAN Connections setting to Deny.

    Network Settings TeamViewer

9. Considering Alternative: Why HelpWire Stands Out

If the issues in TeamViewer’s unattended access keep showing and are slowing you down, you may want to consider switching to HelpWire, a modern remote desktop platform designed for simplicity and modern IT support in mind.

TeamViewer became a popular choice for remote access and support, but the large number of recurring issues have prompted many users to search for a better alternative. HelpWire is a well-regarded, completely free remote desktop solution that supports both on-demand and unattended access with minimal setup.

One important feature of HelpWire is starting both on-demand and unattended remote access sessions with very little setup. This unsupervised process removes the need to deal with complex settings.

Why Choose HelpWire?

  • Unattended access
    Securely control remote devices anytime.
  • No complex setup
    Quick installation and simple interface.
  • Easy file transfer
    Drag and drop files with ease.
  • Cross-platform support
    Connect across Windows, macOS, and Linux.
  • Client & team management
    Simplify client and team workflows.

For more information, read our detailed comparison of HelpWire vs. TeamViewer for a smooth, hassle-free remote support experience.

Wrap Up

The TeamViewer error code waitforconnectfailedare can arise from various issues, including network interruptions, firewall settings, or incorrect settings. By following the steps in this guide, most users can fix the issues and restore the connection. For complex environments like corporate networks, additional adjustments may be necessary. If the issue persists, check for TeamViewer server outages or contact TeamViewer support for further assistance.