The Most Common TeamViewer Issues and How to Solve Them
Some of the most commonly experienced issues when using TeamViewer include a black screen, or failure to connect messages. These are more often than not related to installation and setting configuration mismatches.
Before we start looking at certain problems and learn how to fix them, there are four simple things that can help you when TeamViewer is not connecting:
- • check the Internet connection on both computers
- • check if TeamViewer is running on the remote computer
- • the monitor must be enabled on the remote computer
- • Is TeamViewer down? Check it out.
We have summarized the most common TeamViewer problems and their solutions in one concise spreadsheet. The case when a connection is blocked after a timeout TeamViewer problem is the topic of a separate article.
The issues chart will help you understand the specific problem you are facing. Every issue has step-by-step instructions for resolving it.
Each row of the table shows one of the problems of TeamViewer and the appropriate solutions for it are noted with X. Click on the X to see a detailed answer for each solution.
If you want to see a detailed description of the problem, you can click on its name directly in the table or in the content block.
TeamViewer Issues
Issues Chart | ||||||||||||
Now let’s delve into each of these problems more comprehensively.
TeamViewer Not Ready, Please Check Your Connection
In case TeamViewer does not connect and you notice a red dot at the bottom of the TeamViewer window with an error message “Not ready. Please check your connection,” then read on for possible causes and solutions for this problem.
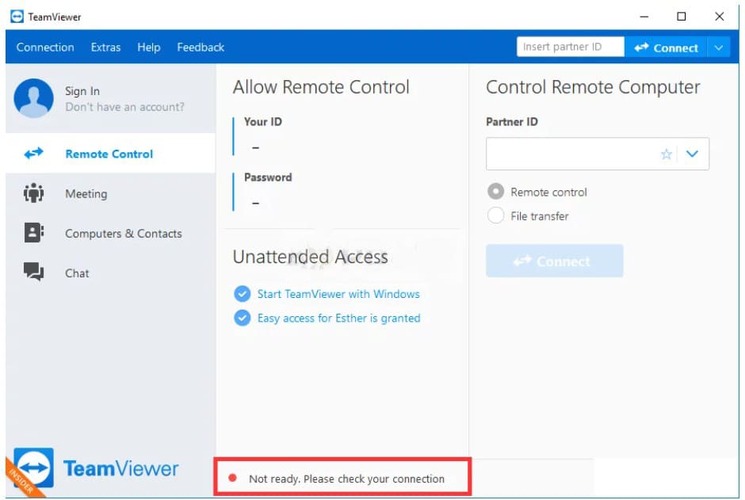
There are a number of reasons why you may encounter this problem. We’ve listed them below for your convenience.
- • Hosts file setting: The hosts file contains important information about the apps that are connecting to the Internet. If this file becomes corrupted, it could result in a connection error. To eliminate this as a cause, you can simply delete this file, and Windows will recreate it.
- • Your Firewall or Antivirus security software can be restricting Internet access for TeamViewer. Make sure you add TeamViewer to your security software’s exclusion list.
- • Try changing your DNS address or resetting your Windows Socket API (Winsock) as this may be causing your connection issue.
- • TeamViewer may not work on IPv6, so disable it and try connecting TeamViewer again.
- • While it’s unlikely that the interface can cause a connection problem, some users found that reverting to the old interface helped to resolve the problem. If all else fails, it’s worth trying this.
- • Solution 1: Restart the Network Connection on both computers
- • Solution 2: Update TeamViewer
- • Solution 3: Allow TeamViewer in Windows Defender Firewall
- • Solution 4: Add an Exception for the TeamViewer_Service.exe File
- • Solution 5: Disable IPv6 on Both Computer
- • Solution 6: Change Your DNS Address
- • Solution 7: Remove TeamViewer from the Hosts File
- • Solution 8: Flush DNS your TCP/IP and Reset Winsock
- • Solution 9: TeamViewer new user interface issue
- • Solution 10: Restart the TeamViewer Service
- • Solution 11: Reinstall TeamViewer
Return to Issues Chart.
TeamViewer Partner Did Not Connect To Router
If your partner’s computer is not connected to the network, you may see this error message. If you have confirmed that both computers are connected, follow the steps below to try to resolve this issue.
- • Solution 1: Restart the Network Connection on both computers
- • Solution 2: Update TeamViewer
- • Solution 3: Allow Full Access To TeamViewer
- • Solution 4: Flush DNS your TCP/IP and Reset Winsock
- • Solution 5: Reinstall TeamViewer
Return to Issues Chart.
TeamViewer Issue: “The Screen Cannot Be Captured at the Moment”
“The screen cannot be captured at the moment” error will be experienced by the user who is trying to connect to the TeamViewer session. The reason for this is that TeamViewer has not been installed as a service.

There are two possible solutions to this.
- You can easily set up TeamViewer as a service without having to reinstall it. Select “Options” from the “Extras” menu. In the “General” tab, make sure “Start TeamViewer with Windows” is selected. Make sure you have a secure password set in the “Security” tab. Click “OK” to save your changes.
- If you don’t want to install TeamViewer as a service, make sure that you don’t launch TeamViewer from a RDP session. If you do, any time you minimize the RDP window, or it loses focus, users connecting to your computer will see the error message. Other considerations to bear in mind: do not allow your computer to sleep or timeout, and if you have no other options but to use RDP, do not minimize or allow the RDP session to lose focus while someone is connecting to your session.
- • Solution 1: Restart the remote PC
- • Solution 2: Update TeamViewer
- • Solution 3: Restart the TeamViewer Service
- • Solution 4: Disable Fast User Switching
Return to Issues Chart.
How to Solve TeamViewer Connection Failed No Route
- • Solution 1: Restart the Network Connection on both computers
- • Solution 2: Update TeamViewer
- • Solution 3: Allow Full Access To TeamViewer
- • Solution 4: Disable IPv6 on Both Computer
- • Solution 5: Flush DNS your TCP/IP and Reset Winsock
- • Solution 6: Reinstall TeamViewer
Return to Issues Chart.
How to Fix TeamViewer Protocol Negotiation Failed
If you encounter this error when trying to connect to another TeamViewer user, consider the following:
- • Windows Firewall: Windows Firewall might be blocking the incoming or outgoing request sent by TeamViewer.
- • Third-party Antivirus: Your antivirus software may interrupt and restrict the connectivity process of TeamViewer, resulting in the error message.
- • Malware on the System: Malware on your computer may cause TeamViewer not to work as expected. Update your antivirus software, clean all malware from your system, and try again.
- • Different Versions of TeamViewer: Conflicting versions of TeamViewer can also create problems. Make sure both computers are running the same major version of TeamViewer to avoid unnecessary issues.
- • Solution 1: Update TeamViewer
- • Solution 2: Allow TeamViewer in Windows Defender Firewall
- • Solution 3: Select a Simple Alternative to TeamViewer
- • Solution 4: Add an Exception for the TeamViewer_Service.exe File
- • Solution 5: Scan your PC with Windows Defender or a third-party antivirus program to search for malware
Return to Issues Chart.
TeamViewer: Unable To Connect, Reason Unknown
If you get a “Unable to connect – Reason unknown” error, check your version and update to the latest available stable version.
- • Solution 1: Restart the Network Connection on both computers
- • Solution 2: Update TeamViewer
- • Solution 3: Reinstall TeamViewer
Return to Issues Chart.
TeamViewer Partner Could Not Be Contacted at the Given Network Address
This error usually occurs if the partner computer is not connected to a network. However, it can also be triggered by faulty installation and incompatible TeamViewer versions installed on both computers.
Follow the steps below to rectify this problem.
-
Solution 1: Update TeamViewer
-
Solution 2: Disable IPv6 on Both Computers
-
Solution 3: Flush DNS your TCP/IP and Reset Winsock
-
Solution 4: Fix Fast User Switching
-
Solution 5: Allow Full Access To TeamViewer
Return to Issues Chart.
TeamViewer Is Not Running on Partner's Computer
This error usually occurs when the partner that you want to connect to is experiencing connectivity issues or you have input the incorrect access code.
- • Solution 1: Restart the Network Connection on both computers
- • Solution 2: Update TeamViewer
- • Solution 3: Restart the TeamViewer Service
- • Solution 4: Reinstall TeamViewer
Return to Issues Chart.
TeamViewer Wake on LAN Not Working
TeamViewer includes a feature that allows you to turn on a remote computer that’s on the LAN. You can usually do this by simply moving the mouse or pressing a key on the keyboard. You can sometimes also wake the remote computer on a Wi-Fi network from a mobile phone. You need to be able to wake or turn on the remote computer before you can connect to it.
All modern PCs should have the Wake on LAN capability. In order to set it up, you need to access the Basic Input/Output Settings (BIOS).
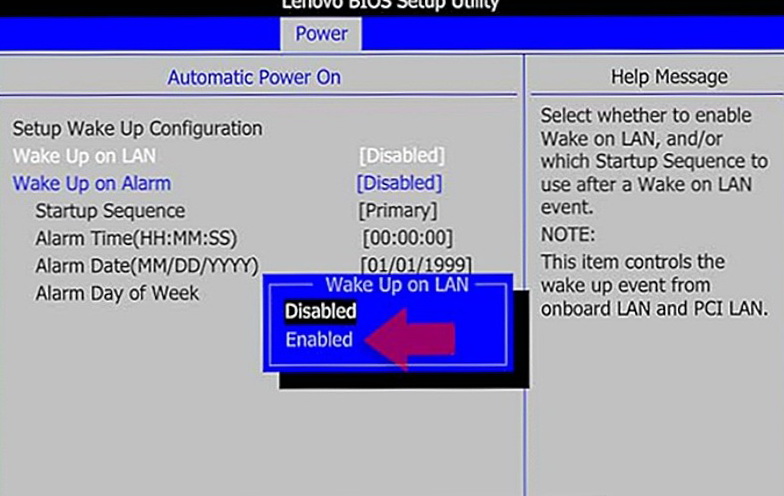
If you are struggling to use the Wake on LAN feature, check the Power options in your BIOS. Look for the Wake Up on LAN option and enable it. The name of this feature can vary slightly depending on your particular motherboard and BIOS. Remember to save your changes.
Now open your Control Panel (Windows PC) by pressing Windows and X keys. Then locate Device or peripheral manager > Network Cards. Locate your LAN card, whether Wi-Fi or Ethernet, and make sure it’s enabled. Look for the Advanced options and find the additional Wake On Magic Packet options. If you cannot see these options, then your network adapter does not support remote Wake Up, nor can it receive Magic Packets. All LAN cards support this, but with Wi-Fi, it’s not always supported.
If the remote computer is in sleep or hibernation mode, then it can be turned on remotely. It can not be turned off completely. With laptops, there must be sufficient charge on the battery or the laptop must be connected to the AC power. The LAN must also be managed by a router, this feature is not available on ad hoc or virtual networks. On Windows 8 and Windows 10, the Fast Startup feature must be disabled.
If all the above conditions are met, the computer is now ready to receive the Magic Packet from any other computer within the same LAN that will initiate the wake process.
You can use the command line to send the Magic Packet with a DOS prompt like path / Wol.exe “mac address” “IP address” (exclude the quotes). There are also applications with a more user-friendly GUI, like WOL Magic Packet Sender. To use this, simply provide the network parameters like Subnet Mask, IP address and MAC address.
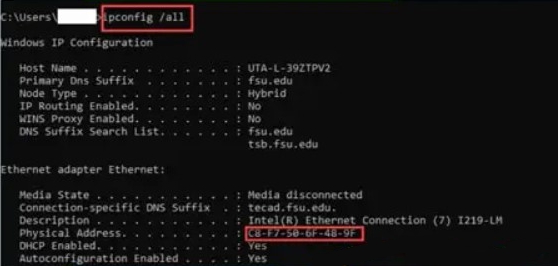
The Mac Address is the physical address of a network card (eg: 00-30-05-2B-BE-22). If you do not know the Mac Address you can find it in the Control Panel > Network and Internet > Network. Locate your active LAN and right-click to view Status and then Detail. There are also many tools available to retrieve your MAC address.
You can now download the free WOL app from your app store. This app will allow you to wake your computer on the Wireless Network.
Configure the app by providing the network name of the computer you want to turn on. Enter the MAC address and the SSID (name) of the wireless network. The security information is not mandatory. You can now test the process by putting your computer to sleep and attempting to wake it with your phone.
If this doesn’t work, recheck your configurations and make sure the PC in question supports waking up over LAN on Wi-Fi.
You can also configure PC Auto Waker, which will turn the connected computer on as soon as the Android smartphone connects to the Wi-Fi network. Most computers can accept the magic packet to initiate the wake-up, you just need to configure it accordingly. This process can be a little tricky, especially if it’s the first time you’re doing this. It’s advisable to print this guide and work through each step carefully.
Return to Issues Chart.
“The Application TeamViewer Is Not Open Anymore” Mac Error

Mac users may encounter an error message that says that an application is “not open anymore”. When you see this error, it means that the app that is mentioned is hanging and has become unresponsive. The app will still be open and show in the dock, but you will not be able to access it.
This is not a serious error and we’ll explain how you can kill the application or process to continue.
Fixing “Application Is Not Open Anymore” by Quitting the Associated Process
One quick fix is to use the force quit option. Access this from the Apple menu or press Option Cmd and Esc. Locate the problematic app from the list and click Force Quit.
If you don’t see the app in the list, then use the Activity Monitor. You can find this in Applications/Utilities/. Once you find this, kill the process directly from there.
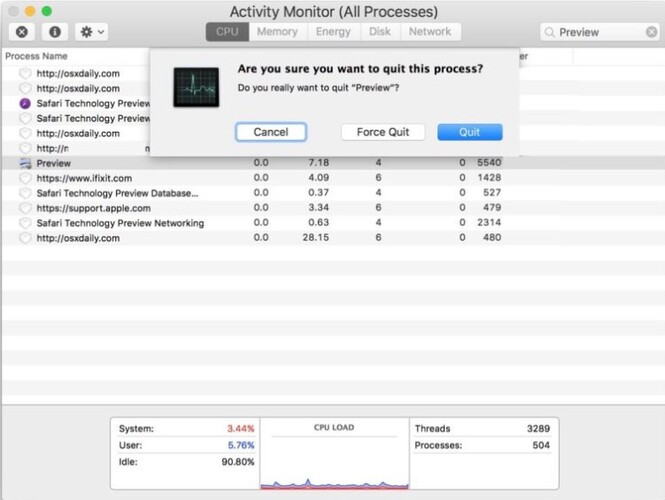
The above steps should resolve the problem without requiring any further intervention. However, at the rate that this is not the case, you may have to reboot your Mac. This will be the case if there are associated processes that have not been able to be terminated. Why this happens isn’t entirely clear, but it appears that the application that claims to no longer be open, yet appears to be open, is simply stuck in some sort of crash or unresponsive loop.
Return to Issues Chart.
How to Fix TeamViewer Issues
Restart Your Network
TeamViewer’s no connection to partner error can be caused by an unstable connection. You need to restart your network if this happens, as you and your partner’s computers may not be able to connect to the network for shared access.
- Turn off your device.
- Unplug both your modem and router and wait 30 seconds.
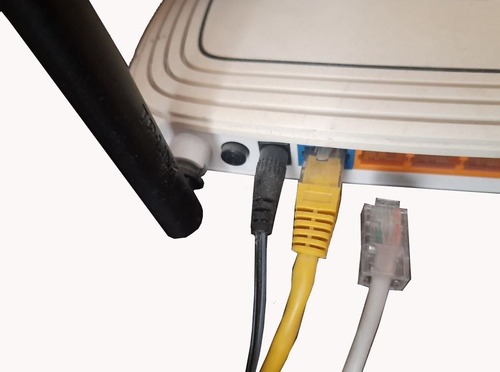
3. Now plug in your modem and router one by one, and wait for them to load up.
4. Log into your ISP terminal if there is an option for the same, and then turn on your device.
Return to Issues Chart.
Update TeamViewer and Windows
When you see a pop-up notifying you of update options, check the version of the TeamViewer software you are currently using, and immediately update to the latest version of TeamViewer.
Check TeamViewer version
- • Windows: TeamViewer –> Help –> About TeamViewer –> Version.
- • macOS: TeamViewer –> About TeamViewer –> Version.
- • Linux: TeamViewer –> Help –> About TeamViewer –> Version.
- • Android: TeamViewer –> Settings –> Version.
- • iOS: TeamViewer –> Settings –> Advanced Settings –> Version Information.
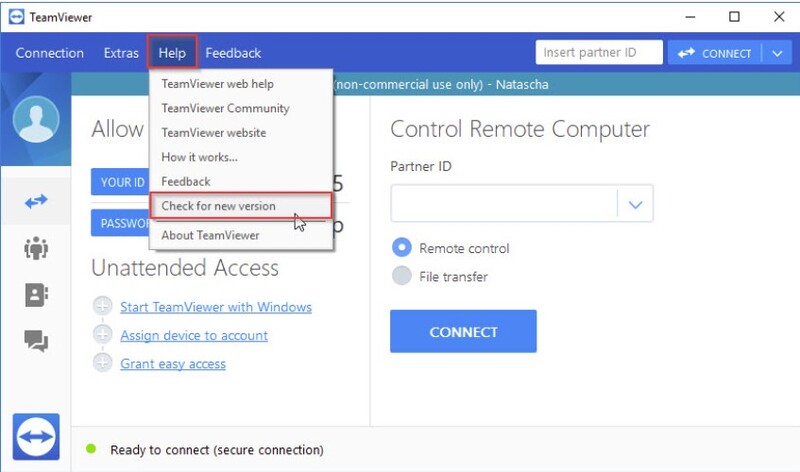
Also check Windows for any available updates. An outdated version of Windows 10 may lack the latest drivers that allow TeamViewer to detect other computers on the network.
Return to Issues Chart.
Allow Full Access to TeamViewer
Windows may impose restrictions on the TeamViewer client, making it impossible to connect to your machine from another machine. Make sure that TeamViewer has full access on both computers.
To give Full Access to TeamViewer, follow these steps:
- Open the TeamViewer client software on both your computers.
- Click on the Extras tab, and click on Options from the drop-down menu.
- In the TeamViewer Options window that opens next, go to the Advanced tab from the left pane menu.
- Locate the Advanced settings for connections to this computer.
- Click on the drop-down menu next to Access Control.
- Change the value to Full Access.
- Click on the OK button to save the settings.
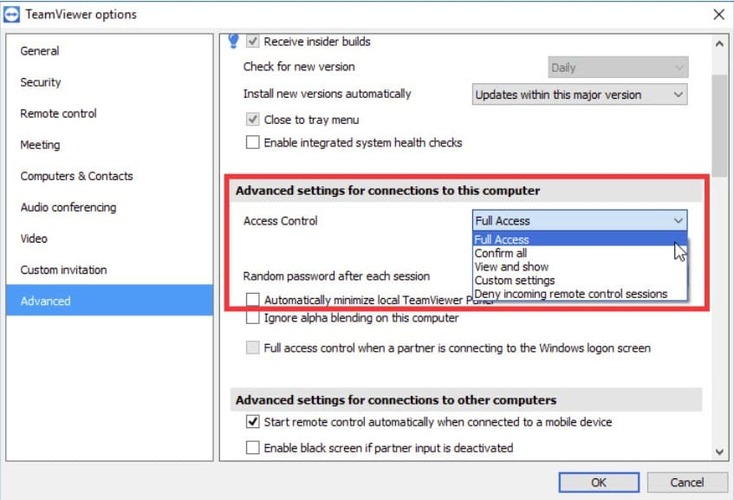
8. Restart the TeamViewer client software on both computers to check if the error is solved.
If the issues you were experiencing were a result of restricted permissions, you should now be able to connect without any issues. To configure TeamViewer security properly, find out the 10 Steps for Better TeamViewer Security.
Return to Issues Chart.
Allow TeamViewer in Windows Defender Firewall
TeamViewer and all its related features require full and uninterrupted access to the internet in order to work. Windows Defender Firewall often blocks TeamViewer. To overcome this, add TeamViewer_Service.exe. You can do this in a few easy steps:
- Open up the Control Panel by searching for the utility in the Start button or by clicking the Search button or the Cortana button on the left part of your taskbar (bottom left part of your screen).
- Change the view to Large or Small icons if necessary and navigate to the bottom to open the Windows Defender Firewall option.
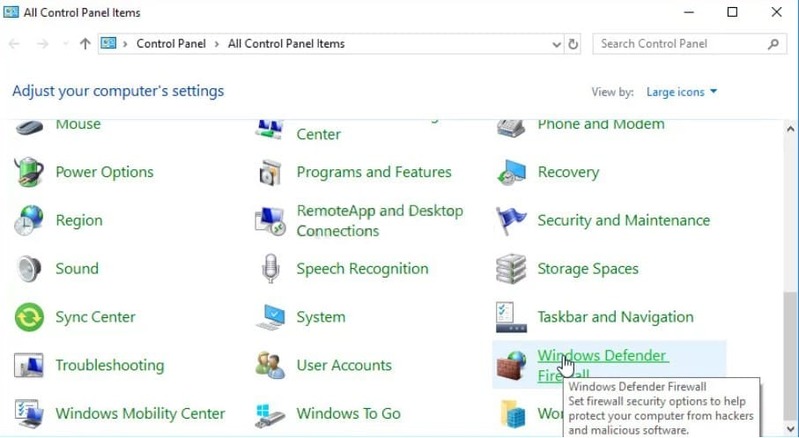
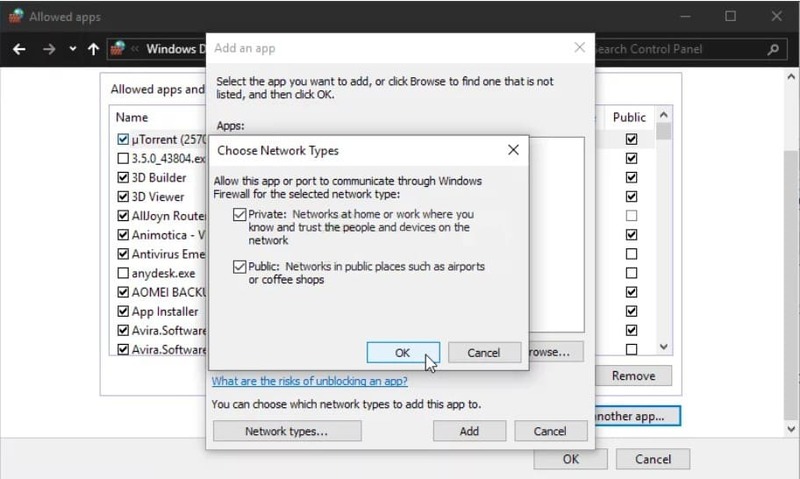
3. Click on Windows Defender Firewall and click on the Allow an app or feature through Windows Firewall option from the options on the left side list. A list of installed apps will be displayed. Click the Change settings button at the top of the screen and provide administrator permissions. Try locating the executable inside. If it’s not there, click the Allow another app button below.
4. Navigate to where you installed TeamViewer (C:\Program Files (x86)\TeamViewer by default) and choose the TeamViewer_Service.exe file.
5. Next, click the Network types button at the top and make sure you check the boxes next to both Private and Public entries before clicking OK >> Add.
6. Click OK and restart your computer before checking whether the TeamViewer is “Not ready. Check your connection” error message still appears on your computer.
When you make changes to your security settings, you put yourself at risk, so we strongly advise you to first learn how to reduce TeamViewer security risks.
Return to Issues Chart.
Choose a Reliable TeamViewer Alternative
TeamViewer has long been a popular choice for remote access and support, but the growing number of issues users encounter has caused many to search for a better alternative. One standout option is HelpWire – a highly regarded, completely free remote desktop solution.
Among the key HelpWire features are the ability to initiate both on-demand and unattended remote access sessions with minimal setup, removing the need to navigate complicated settings.
Why choose HelpWire?
✅ No complex setup – Quick installation and simple interface.
✅ Effortless file transfer – Drag and drop files with ease.
✅ Cross-platform support – Connect across Windows, macOS, and Linux.
✅ Unattended access – Securely control remote devices anytime.
✅ Client & team management – Simplify client and team workflows.
Be sure to check out the dedicated page for a detailed comparison between HelpWire and TeamViewer.
Add an Exception for the TeamViewer_Service.exe File
It is possible that your TeamViewer is not working if it has been blocked by the system’s antivirus software, thereby preventing it from connecting to the Internet. In order to overcome this, add TeamViewer_Service.exe to your antivirus’s exceptions / exclusion list.
- Open your antivirus software, either from the Start menu or by clicking on the icon in your taskbar (depending on your personal settings).
- The exclusion / exceptions list will be located at different places depending on your specific application – here are some locations for the most common antivirus software to help you.
Kaspersky Internet Security: Home >> Settings >> Additional >> Threats and Exclusions >> Exclusions >> Specify Trusted Applications >> Add.
AVG: Home >> Settings >> Components >> Web Shield >> Exceptions.
Avast: Home >> Settings >> General >> Exclusions.
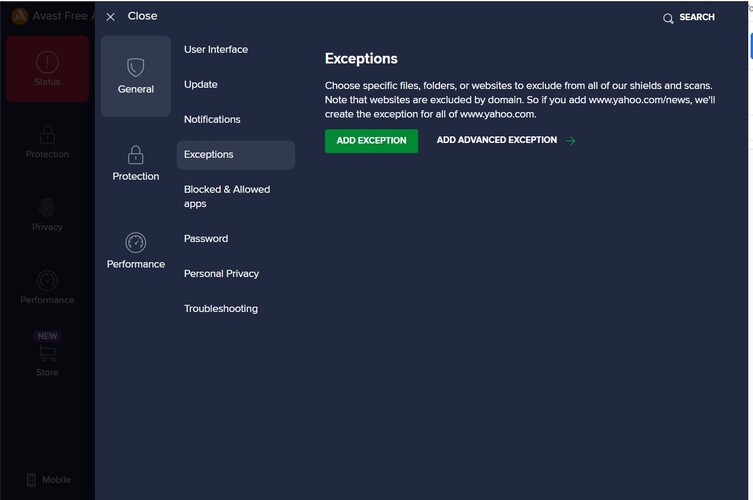
- Navigate to the TeamViewer_Service.exe executable when prompted to do so. It should be in the same folder where you installed TeamViewer. By default, it’s: C:\Program Files (x86)\TeamViewer.
- Check to see if you are now able to use TeamViewer without receiving the error message. If it still won’t work, try restarting your computer and try again. The last step would be to uninstall the antivirus and try a different one if the problem persists.
Return to Issues Chart.
Disable IPv6
Many users have found that disabling IPv6 can resolve the problems with TeamViewer connectivity. It’s worth trying this by following these steps:
- Press the Windows key + S and type “control” to locate the Control Panel.
- Click to open it.
- Go to Network and Internet > Network and Sharing Center.
- From the left pane, click on Change adapter settings.
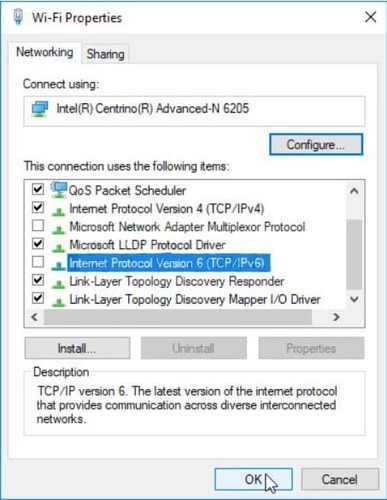
- Right-click on your currently active network adapter.
- Select Properties.
- In the Properties window, uncheck the Internet Protocol Version 6 (TCP/IPv6) option.
- Click OK to apply the changes.
Return to Issues Chart.
Change Your DNS Address
If you still experience issues, try changing your DNS. Your DNS is provided by your ISP, but many users report being able to simply use the Google DNS and this resolved their problem.
You can use the following steps:
- Press Windows + R to open the Run utility box. Type ncpa.cpl and click OK. This will open the Internet Connection Settings.
- Alternatively, open the Control Panel and switch to the Network and Internet settings. Go to the Change adapter settings button on the menu on the left.
- Double-click your active network adapter (the one you are using to connect to the Internet) and click on the Properties button below if you have admin permissions for the current user account.
- Locate the Internet Protocol Version 4 (TCP/IPv4) item on the list. Click on it to select it and click the Properties button below.

5. From the General tab, change the radio button in the Properties window to “Use the following DNS server addresses” if it was set to the other option.
6. Either way, set the Preferred DNS server to be 8.8.8.8 and the Alternate DNS server to be 8.8.4.4.
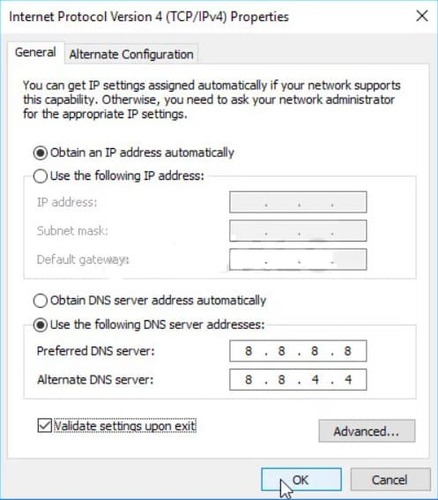
7. Keep the “Validate settings upon exit” option checked and click OK to apply the changes immediately.
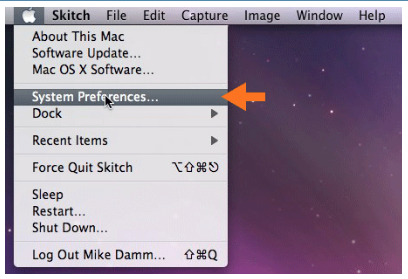
How to Setup OpenDNS or Google Public DNS in Macos?
- Open System Preferences from your
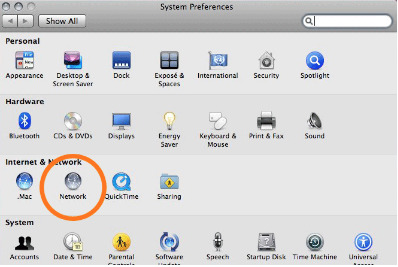
2. Click the Network option
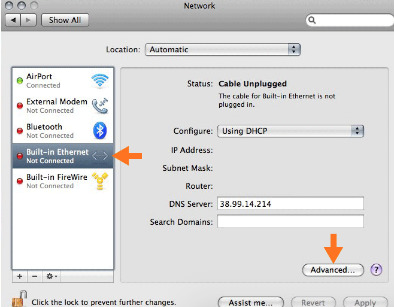
3. Select your active network connection and click the Advanced button
4. Click the DNS tab and enter 208.67.222.222 and 208.67.220.220 for OpenDNS or Enter 8.8.8.8 and 8.8.4.4 For Google Public DNS to the list of DNS servers.
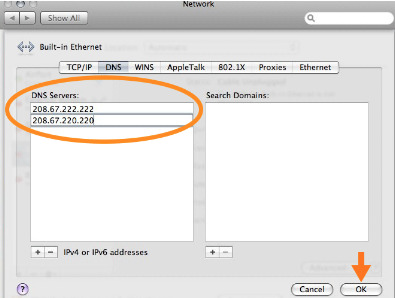
5. Click OK to continue.
Return to Issues Chart.
Remove TeamViewer From the Hosts File
A corrupted ‘hosts’ file may show incorrect addresses and data which could cause your TeamViewer can’t connect. Delete the entry. When you reopen it, the entry will be recreated. This should resolve the problem. To delete your hosts files, follow these steps:
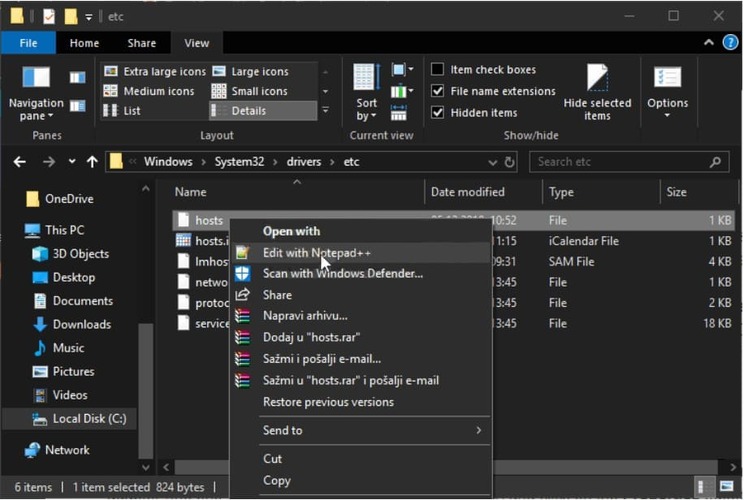
- Navigate to the location C:\ Windows\System32\Drivers\Etc
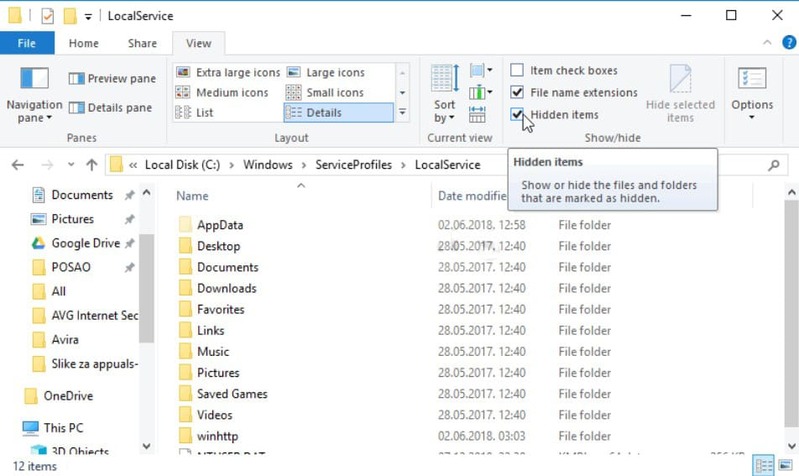
Alternatively, Click This PC or My Computer from the left side pane to locate and open your Local Disk C. If you are unable to see the Windows folder, you may need to turn on the option that enables you to see hidden files and folders. Click the “View” tab in File Explorer’s top menu and click the “Hidden items” checkbox in the Show/hide File Explorer will show the hidden files and will remember this setting until you change it again.
2. Locate the host file in the Etc folder, right-click on it, and choose to Open with Notepad. Use the Ctrl + F key to find any instances of ‘teamviewer’ in the file.
3. Locate the TeamViewer section in the file. It should start with “#TeamViewer” and make sure you select everything that belongs to it, right-click the selection, and choose the Delete button from the context menu.
4. Click File > Save to save the changes or use the Ctrl + S key combination. Exit Notepad and restart your computer.
Return to Issues Chart.
Flush Dns Cache (Windows, Linux, MAC)
Flush DNS, TCP/IP and Reset Winsock on Windows
On nearly every kind of network, there is a timeout period, after which the connectivity throttles upon continued usage. On Windows, you can try clearing the DNS cache as well. To do that:
- Open an elevated Command Prompt. To do this, open a Run window by pressing Win + R. Type cmd and press Ctrl + Shift + Enter to launch Command Prompt with administrative privileges.
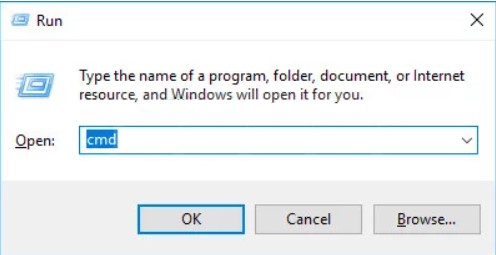
2. Type the following commands in order to flush your DNS cache and reset TCP/IP:
ipconfig /release
ipconfig /flushdns
ipconfig /renew
nbtstat –r
netsh int ip reset resetlog.txt
netsh winsock reset
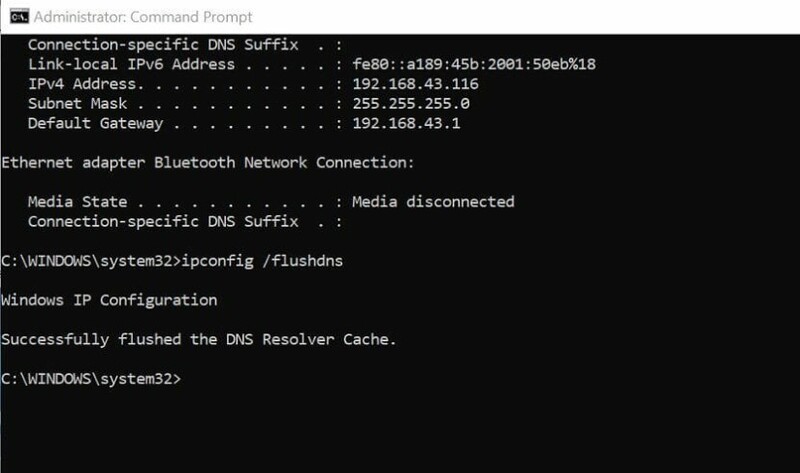
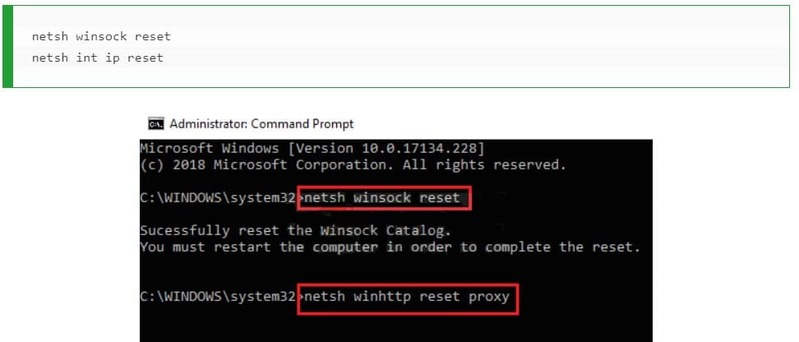
Wait for the confirmation message, and then reboot your device.
Flush DNS Cache In Linux
Linux uses the nscd daemon to manage the client DNS cache. In order to flush your DNS, you simply need to restart the nscd daemon.
Use the following command in your terminalsudo /etc/init.d/nscd restart and press enter
Alternatively, use the service nscd restart
The DNS will be flushed once the nscd restarts.
Flush DNS Cache In Mac
For OS X Lion (10.7) and OS X Mountain Lion (10.8)
Type the following command in your Terminalsudo killall -HUP mDNSResponder
For OS X 10.5 and OS X 10.6 use this command insteaddscacheutil -flushcache
In OS X 10.4 Tigerlookupd -flushcache
Return to Issues Chart.
TeamViewer New User Interface Issue
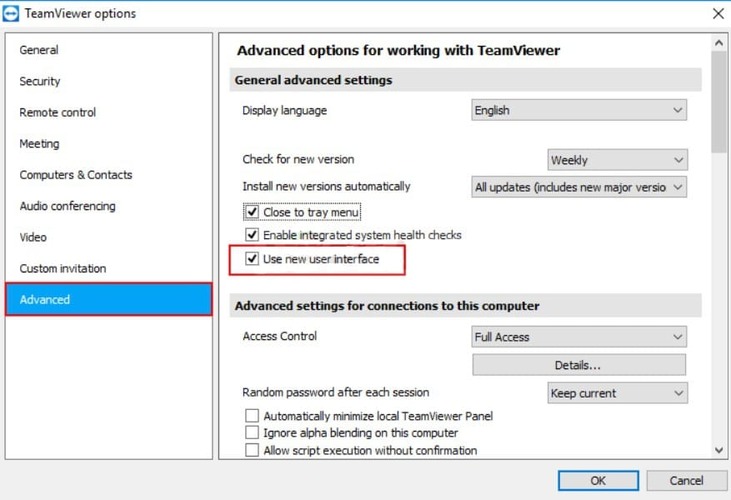
While it seems odd that an application’s interface would affect internet connectivity, some users have reported that by reverting to TeamViewer’s earlier user interface, they were able to resolve any connectivity issues experienced. To do that, follow the steps below:
- Open the TeamViewer application.
- Click on ‘Extras’ from the application menu bar. Select the ‘Options’ from the submenu.
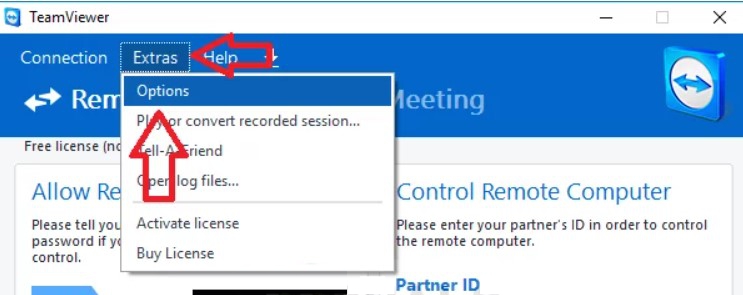
3. Select the Advanced option from the side menu. Locate the General Advanced Settings options in the right pane. Uncheck the “Use new user interface” option. Click ‘OK’ to save your changes and continue.
Return to Issues Chart.
Disable Fast User Switching
If faced with the “Screen cannot be captured at the moment due to fast user switching” error message, this can be resolved by installing TeamViewer as a service. This means that TeamViewer can be started on bootup, thus also allowing unattended access. As a service, TeamViewer can latch on to the depths of the operating system.
Common causes of this error message include:
- The remote computer has minimized the RDP session or closed it
- The user who opened TeamViewer has logged out
- The PC has gone into sleep mode or been turned off
Fast switching is a useful feature that allows users to sign into a computer while others are signed in. The downside of this is that you have to share resources with other logged in users, and you can’t restart or turn the computer off without all other users first logging off.
It is possible to disable Fast switching by editing the Windows Registry or Local Group Policy Editor. This simply hides any options to switch users while logged in.
To edit the Registry, press Win+R, type “regedit” in the search field. Once open, use the left menu to navigate to the following key:HKEY_LOCAL_MACHINE\SOFTWARE\Microsoft\Windows\CurrentVersion\Policies\System
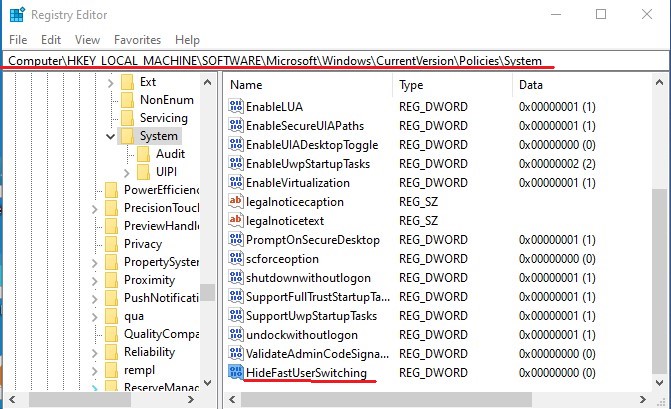
Create a new value inside the System key by right-clicking the System Key and choosing New > DWORD (32-bit) Value. Input ‘HideFastUserSwitching’.
Access the new value’s properties by double-clicking. Change the value of 0 to 1 in the ‘Value data’ field.
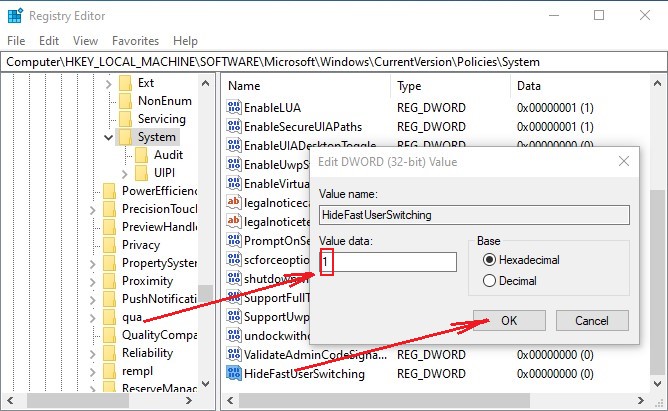
Click Ok to save your changes. You will need to log off or reboot your machine for the changes to take effect.
When using TeamViewer on Windows Server, make sure you enable Enhanced multi-user support. In versions of TeamViewer 11 and later, it is enabled by default. Multi-user support assigns a TeamViewer ID for every user connecting to the server via RDP, which means concurrent user sessions are possible. Do not make sure of the QuickSupport module when using multi-user mode. QuickSupport cannot run as part of an installed service, and it is geared towards customers who only require one-time support or who have no admin rights on their respective computers.
Return to Issues Chart.
Restart the TeamViewer Service
Before you stop the TeamViewer service, make sure TeamViewer is closed.
- Use Windows + R to open the Run window. Type ‘services.msc’ and click OK to open the Services utility.
- Locate the Administrative Tools in the window, and click on the Services shortcut.
- Right-click the TeamViewer Service on the list. Select Properties from the context menu that appears.
- You can now toggle the service On and Off by selecting Start or Stop. Leave it On stopped for now.
- From the Startup type options, select Automatic. Click to confirm changes when prompted.
- Now start the service. The service will now start automatically everytime the computer is turned on.
Return to Issues Chart.
Reinstall TeamViewer
If you’ve tried all the various solutions suggested in this article, but you still encounter problems with TeamViewer, you may need to reinstall TeamViewer. Follow these steps for a painless and effective way to uninstall TeamViewer completely. Also, make sure you download the latest TeamViewer to ensure you have all the latest patches and fixes.
Open the Control Panel from the Start menu. In Windows 10 you can also click on the cog icon in the Start menu.
- Using the View as: Category option, locate the Programs section and click on the Uninstall a Program option.
- If you’re using the Settings app instead, wait while a list of installed apps is generated.
- Locate TeamViewer and click on the Uninstall/Repair option. Follow the onscreen instructions to uninstall TeamViewer.
- Now download the latest TeamViewer. Double-click the downloaded install file and follow the installation wizard. Once installation is complete, restart TeamViewer and check if the problem still persists. Learn how to install and set up TeamViewer correctly to avoid many problems.
Return to Issues Chart.
FAQ
Sometimes when trying to connect with TeamViewer, you may encounter a black screen. This can be due to a number of things.
- • the connection is to a computer with no monitor
- • the TeamViewer service is not running correctly
- • the communication of TeamViewer has encountered an interference/block
- • an active RDP (Windows Remote Desktop) is running on the remote side
If there is an active RDP session on the remote computer, but that RDP window is minimized, you will see a black screen. This is because while the RDP window is minimized, so is the entire desktop. This makes it impossible for TeamViewer to grab the remote computer screen. To fix this, the remote desktop window on the remote computer needs to simply be maximized and made active or RDP needs to be desaibled before you start the session.
- Solution 1: Make sure the monitor on the remote PC is working
- Solution 2: Restart the remote PC
- Solution 3: Update TeamViewer
- Solution 4: Restart the TeamViewer Service
- Solution 5: Disable Fast User Switching
When there is no monitor connected, the graphics card will not output any video. This means TeamViewer can not capture and stream any video output. The graphics card needs the attached display to know what resolution is required. Without this, it outputs a black screen.