How to Allow Remote Desktop on Windows 11
- HelpWire
- →
- Blog
- →
- Definitive Guide to using Microsoft Remote Desktop
- →
- Allow Remote Desktop on Windows 11
Enabling Remote Desktop on Windows 11 allows you to access and control your PC from virtually any location, making it an essential tool for remote work or technical support. To use Remote Desktop Connection (RDP), your Windows 11 device must be running a supported edition: Pro, Enterprise, or Education. If you’re using the Home edition, unfortunately, you cannot set up your PC as a remote host.
In this step-by-step guide, we’ll walk you through the process of enabling Remote Desktop on Windows 11, including methods via the Settings app, Control Panel, and Command Prompt.
If you’re looking for an easier, more streamlined solution, consider HelpWire. This third-party tool offers a simple one-link method for remote access, providing a hassle-free option for users who want a straightforward setup without technical complexity.
What to consider:
To change the system setting, it is imperative to be a member of the Administrators’ group or have administrative privileges.
In addition, the following requirements must be satisfied:
- • Windows Edition Compatibility: Remote Desktop is only supported on Windows 11 Pro, Enterprise, or Education editions. To use this feature, you’ll need to upgrade from Windows 11 Home.
- • Administrator Account Permissions: You must have administrative privileges on the PC to enable Remote Desktop and make system-level changes.
- • A powered-on remote desktop that is connected to a stable and high-speed network.
- • The remote PC has an active Remote Desktop Connection.
- • You have network access to the remote PC (via LAN or Internet).
- • Your user account has permission to connect (i.e., the account is in the list of allowed users).
- • Remote Desktop connections are permitted through the remote computer’s firewall.
Enable RDP via System Settings in Windows 11
The Standard Settings application in Windows makes it quick and easy to activate RDP on Windows 11. Here are the steps to follow:
-
Step 1: Open Start → Settings.
-
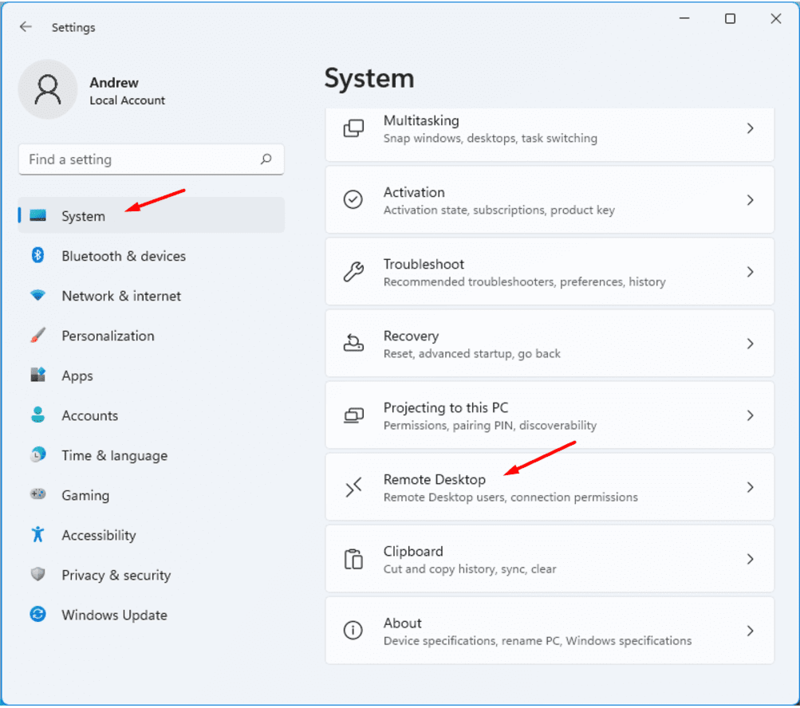
Step 2: In the Settings window, select “System.” Scroll down and click “Remote Desktop” on the right pane.
-
Step 3: Toggle the switch to turn on Remote Desktop on your Windows 11 device. Use the pop-up Window prompt to confirm your action.

After completing these steps, your computer is now ready to connect via RDP. You can use the classic Remote Desktop Connection to launch a network-based connection to the remote device.
Now, to allow other users remote access, go to Remote Desktop settings, and select Add under Select users. Enter the username, then click OK. Here, you can add multiple accounts at once.

Configuring Remote Desktop Access
- • Network Level Authentication (NLA):
By default, NLA is enabled for improved security. This feature requires users to authenticate before a remote session begins, helping protect your PC from unauthorized access. - • External Access:
To establish remote access from outside your local network, you will need to forward port 3389 on your router. This is the standard communication channel for Remote Desktop Protocol (RDP).
- • Firewall:
Ensure that Remote Desktop is allowed through the firewall by checking the Windows Security settings, where it is typically enabled by default.
Enable Remote Desktop on Windows 11 via Control Panel
The Settings app is indeed the easier option to activate remote access, but you can also use the Control Panel to allow remote connection on your PC.
Follow the instructions below to enable remote desktop on Win 11 via the Control Panel:
-
Step 1: Open Control Panel by typing it into the taskbar search and selecting it from the results.

-
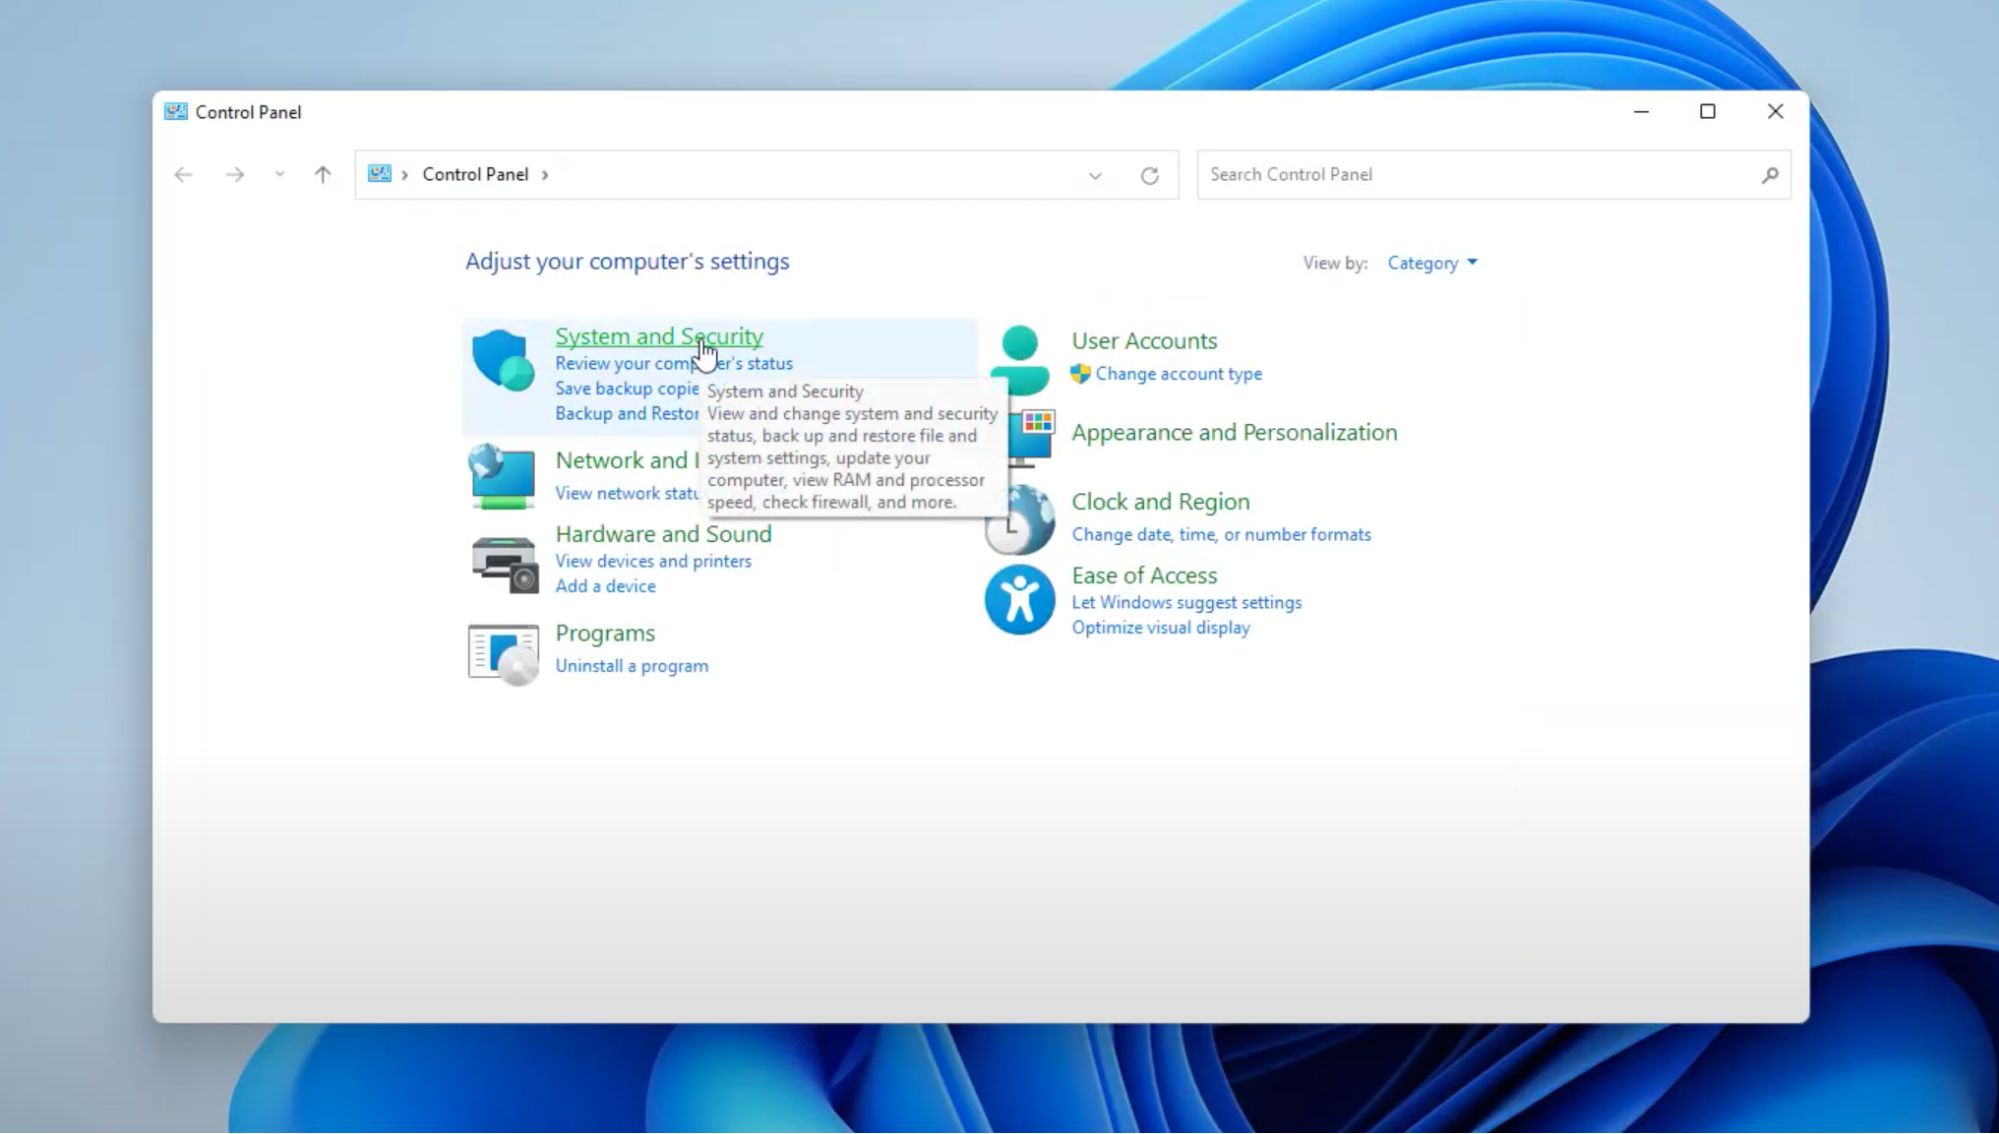
Step 2: Select “System and Security.”
-
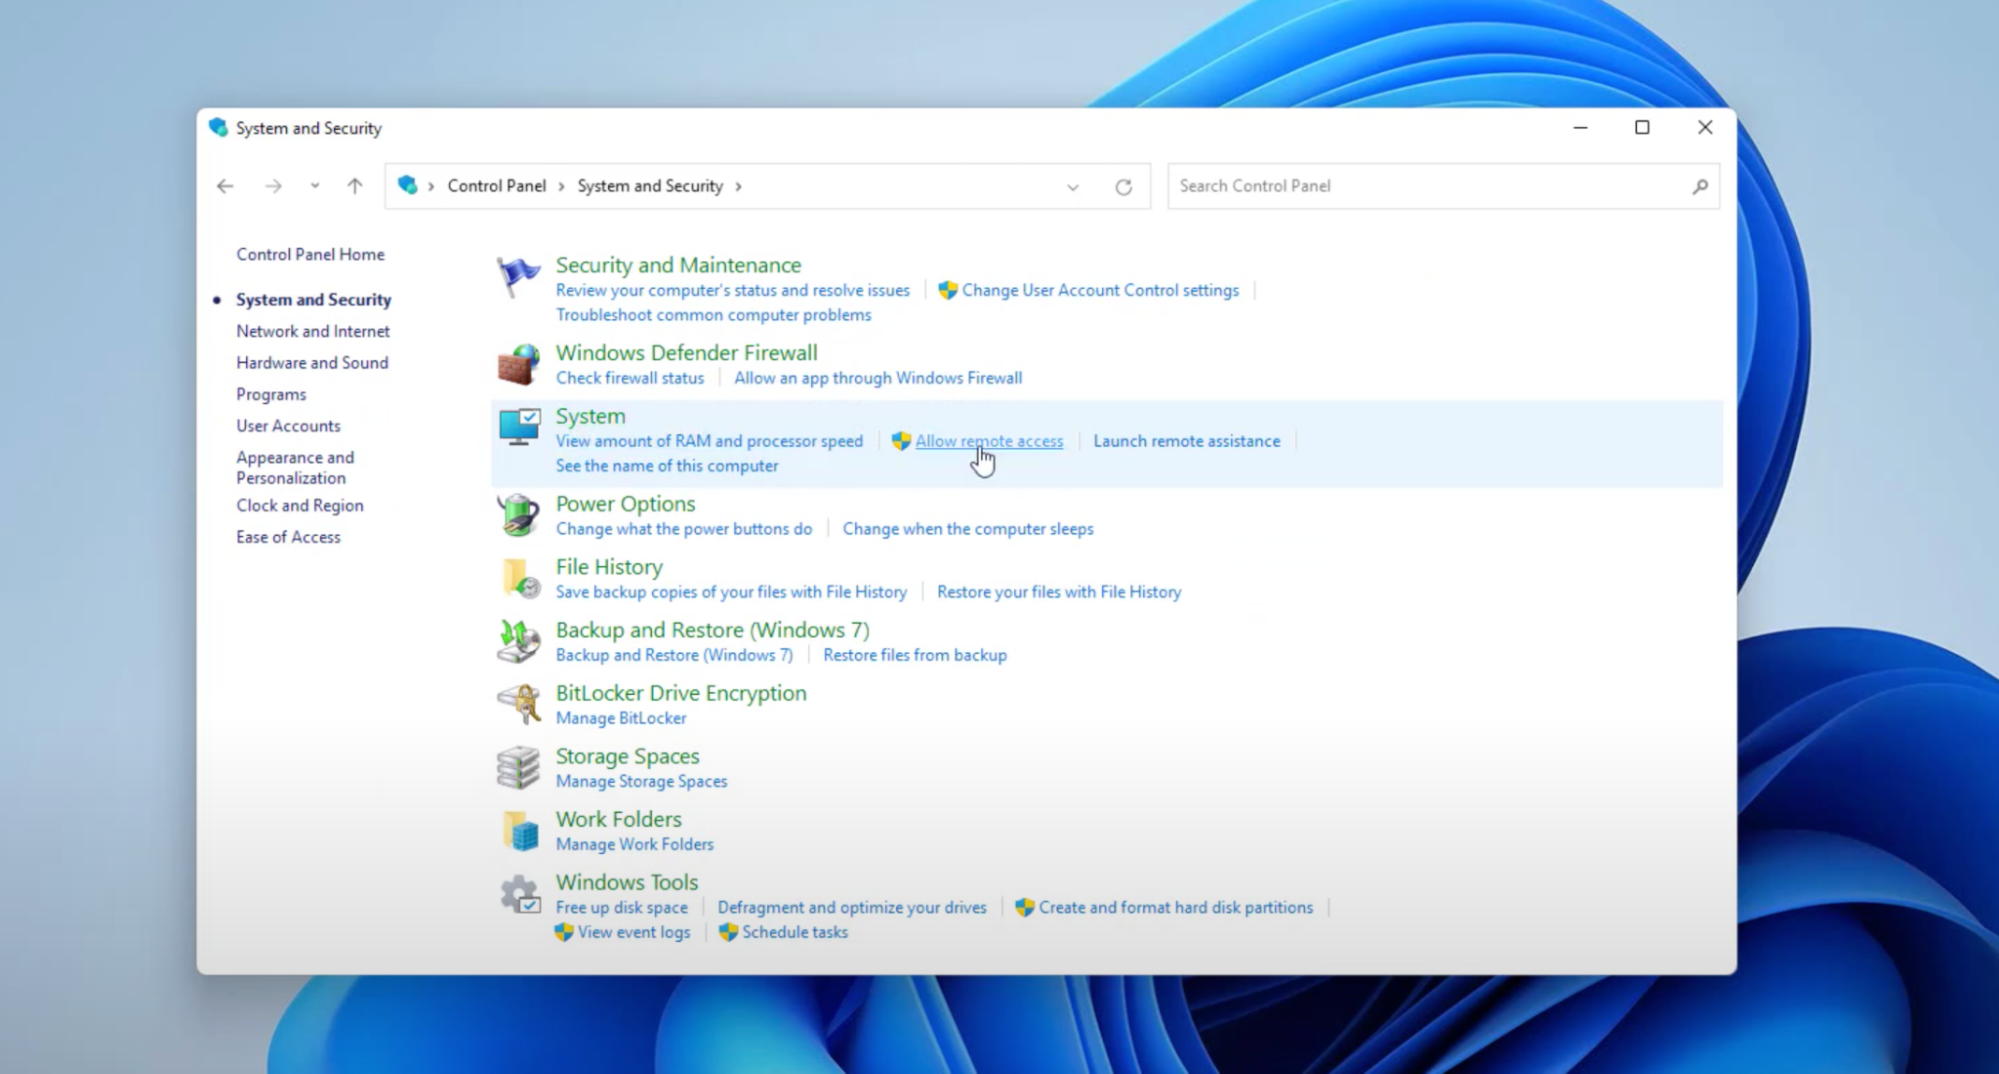
Step 3: In the “System” section, click “Allow remote access”.
-
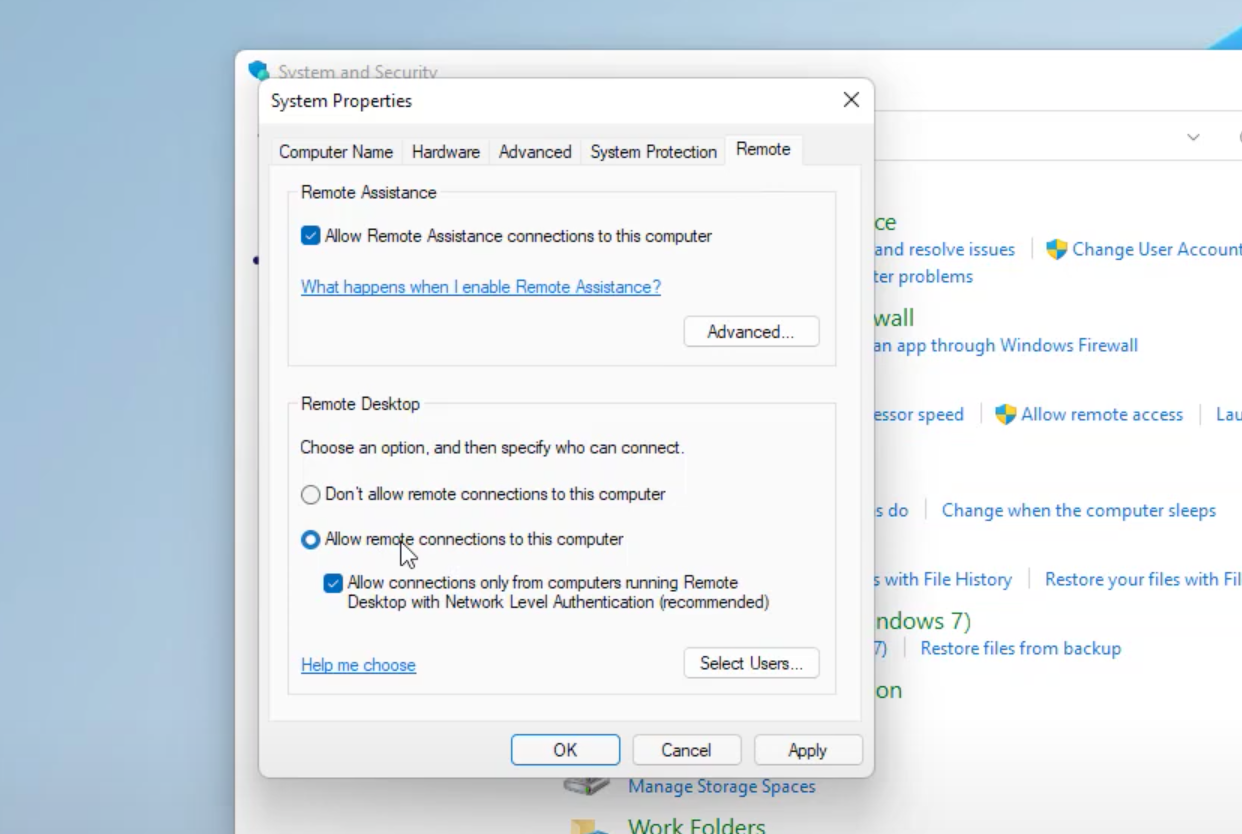
Step 4: The System Properties on-screen window will appear. Go to the “Remote” tab, then select “Allow remote connections to this computer” under Remote Desktop.
-
Step 5: Hit “Apply” and then “OK.”
That’s it! You are now set to connect from a remote machine over RDP.
Upon activation of the remote desktop on Windows 11, you can start connecting to the remote computer using the built-in Remote Desktop Connection (RDC) utility available on Windows 11, Windows 10, and other versions.
Note that you might need to disable Remote Desktop access to your Windows 10/11 device should you experience any issues. Another suggested solution is to reverse the steps mentioned in this guide.
To create a remote desktop connection from Windows 10 to Windows 7, you can use the Control Panel to enable RDP access, especially on previous Windows versions. Note that the Settings application is only available in Win 10 and 11.
Enable Remote Desktop via Command Prompt
With your Win 11 system’s Command Prompt, you can enable remote desktop protocol with the following steps:
-
Step 1: Open “Start.”
-
Step 2: Search for Command Prompt, right-click the top result, and select the “Run as administrator” option.
-
Step 3: Type the following command to enable the remote desktop protocol and press Enter:
reg add "HKEY_LOCAL_MACHINE\SYSTEM\CurrentControlSet\Control\Terminal Server" /v fDenyTSConnections /t REG_DWORD /d 0 /f -
Step 4: Type the following command to enable remote desktop through the Windows Firewall and press Enter:
netsh advfirewall firewall set rule group="remote desktop" new enable=Yes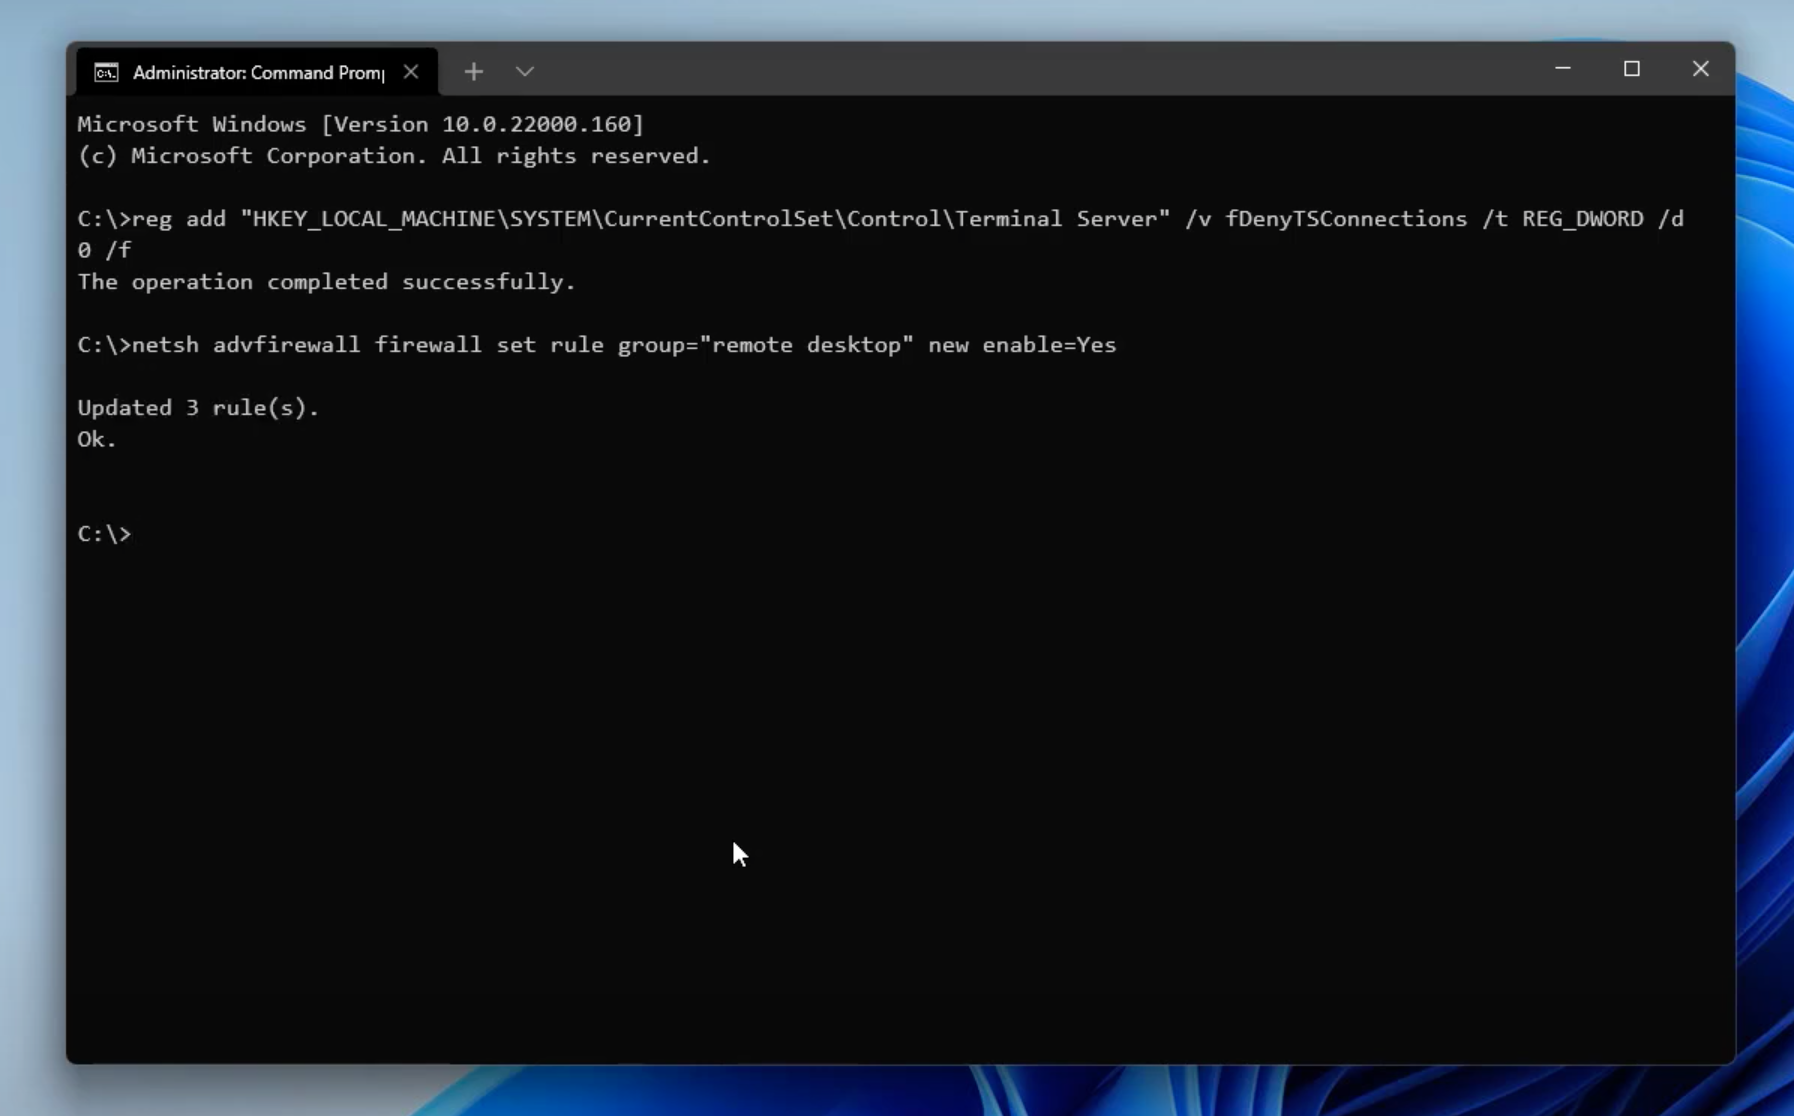
Once you complete the steps, Remote Desktop will be enabled and the firewall configured, allowing you to access the computer remotely.
Easier Way to Enable Remote Desktop on Windows 11: HelpWire
While enabling RDP through System Settings is effective, HelpWire offers an even more streamlined solution. For those looking to reduce technical complexity while maximizing ease of use, HelpWire provides a one-link method to access and control remote PCs effortlessly. Best of all, it’s completely free for both personal and commercial use! It’s a perfect solution for both tech-savvy users and beginners looking to manage remote devices with ease.
How to Access a Remote Desktop on Windows 11 with HelpWire:
-
Select “Add New Client”:
In the HelpWire app, choose the option to add a new client.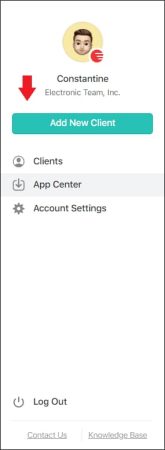
-
Share the Remote Connection Link:
A unique remote connection link will be generated automatically. Share this link with your client, and it will prompt them to download the HelpWire Client application.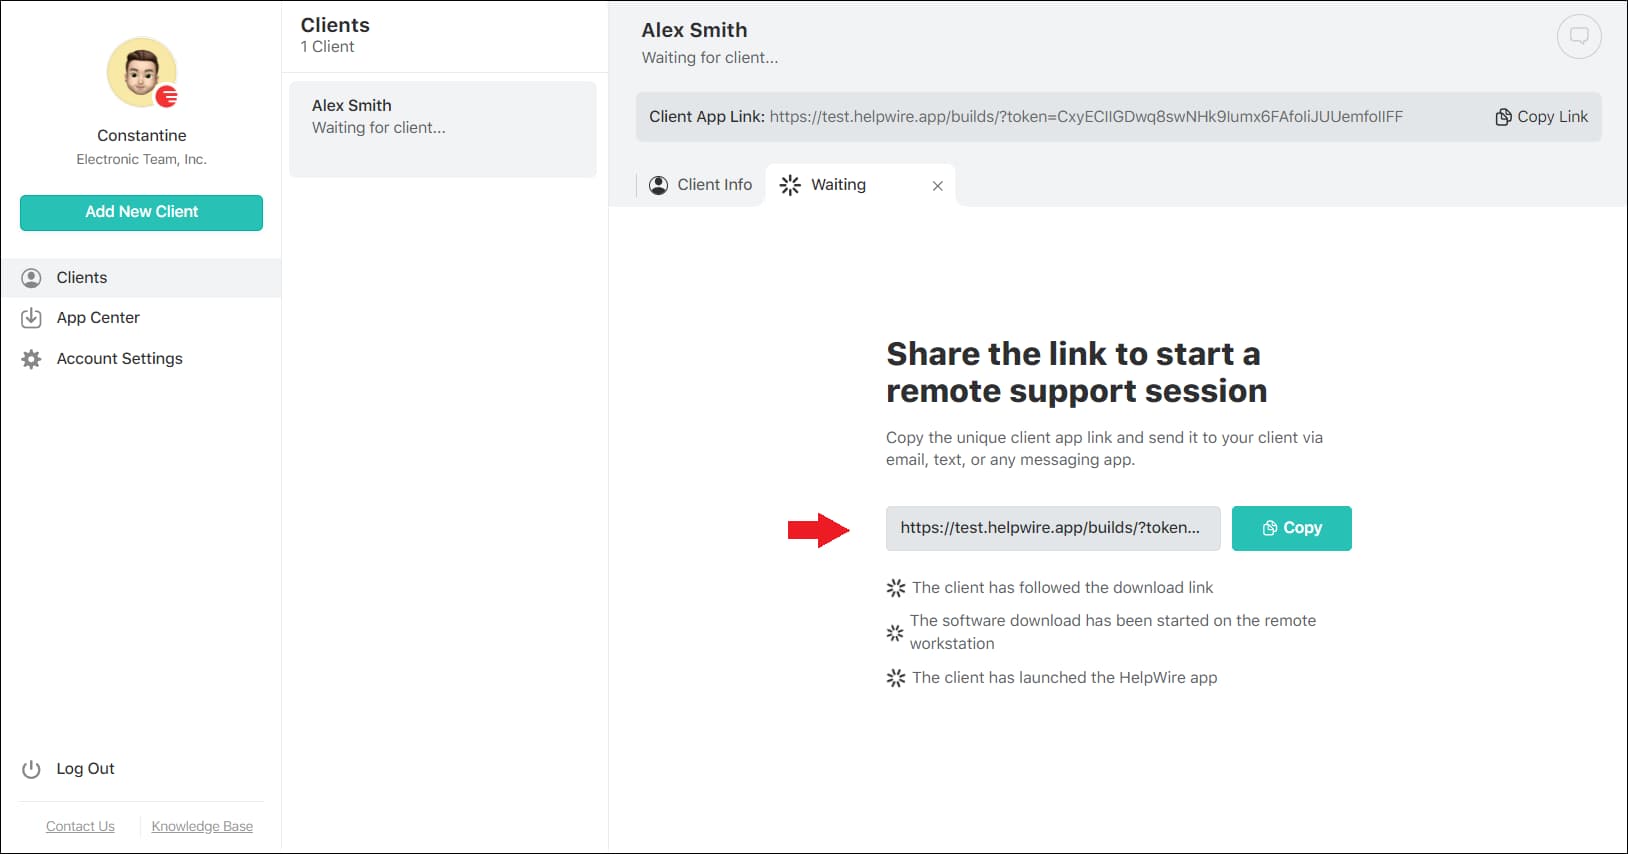
-
Client Requests Access:
Once the client opens the application, they will click Request Access.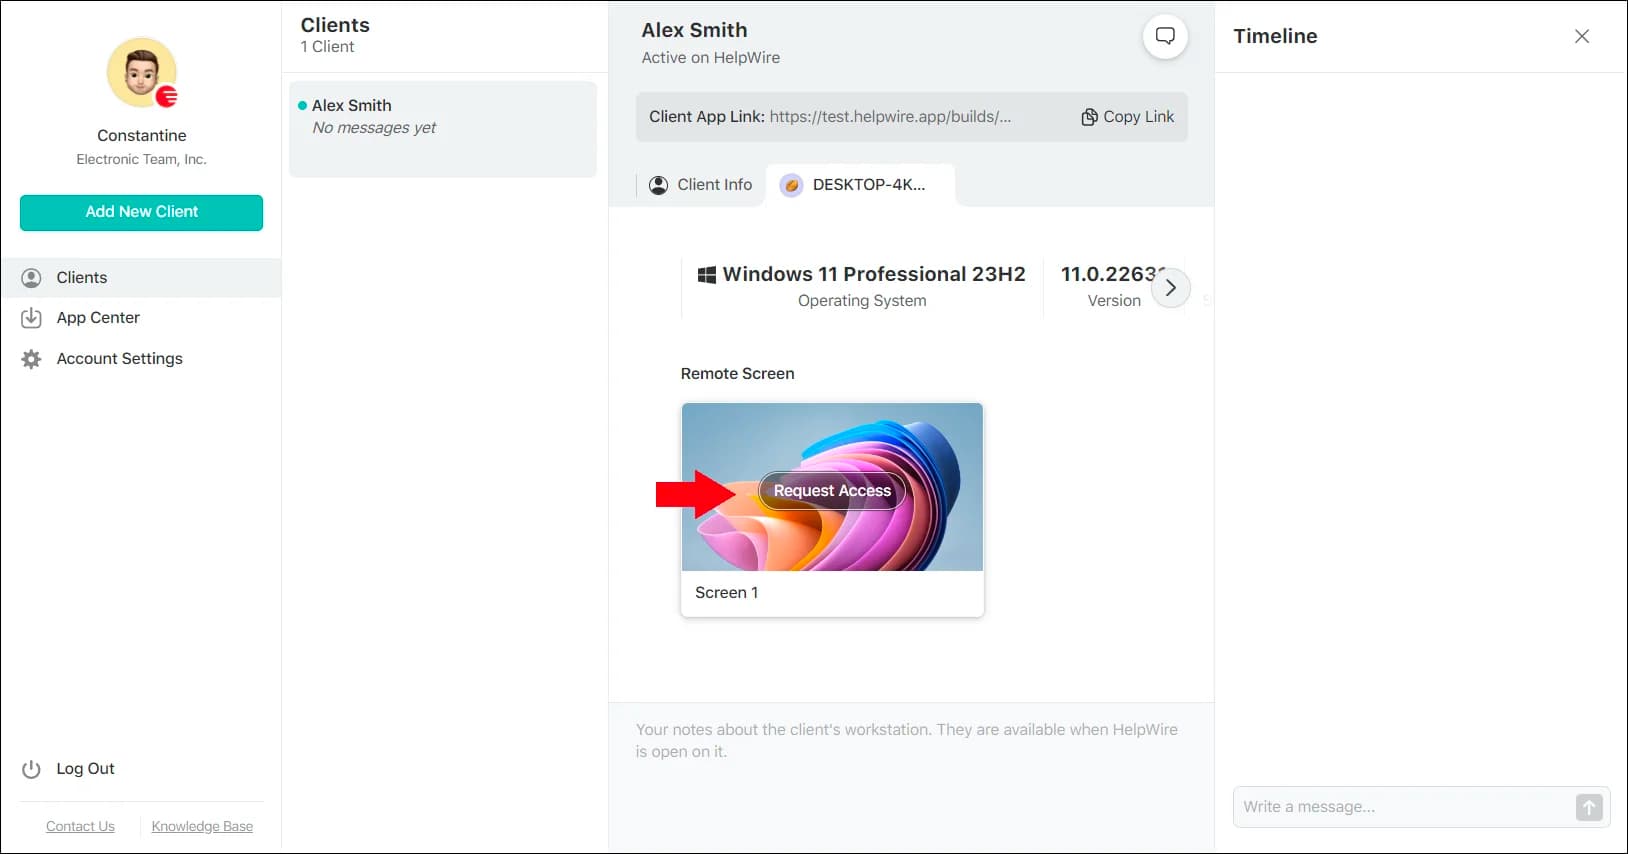
-
Grant Access and Connect:
After the client grants permission, click Connect to establish a remote control session.
Final Words
This guide has provided a step-by-step process to enable Remote Desktop Protocol (RDP) on Windows 11, giving you a clear path to accessing your PC remotely.
Whether you prefer the traditional approach through System Settings or Control Panel, or you opt for the simplicity of HelpWire, the key is to choose the method that best suits your technical comfort and requirements. Remote Desktop is all about convenience and efficiency, and with these tools, you’re well-prepared to manage your devices remotely with ease.
FAQ
No, Remote Desktop is not supported on Windows 11 Home Edition. However, you can use third-party solutions like HelpWire or Chrome Remote Desktop to enable remote access.
Yes, Network Level Authentication (NLA) is crucial for security. It requires users to authenticate before starting a remote desktop session, adding an extra layer of protection against unauthorized access.