How to use PowerShell to enable Remote Desktop Connection
Remote Desktop allows you to connect to a remote computer and gain access to the programs and files on that computer as if you were physically logged in. In order to make use of Remote Desktop (RDP) in Windows 10, the feature must be enabled. You can do this via Windows Settings, or if you prefer, you can use PowerShell.
The benefit of using PowerShell over the Settings app is that it allows you to enable Remote Desktop remotely or to create a configuration script that can be quickly executed across multiple terminals. You can also easily share the script with other users, allowing them to execute the necessary commands without having to know what to do or how to do it.
This article will guide you through the steps required to enable or disable Remote Desktop using PowerShell. It will also cover any additional required configurations such as opening firewall ports in order for a successful remote connection.
Please Note: Remote Desktop is a feature of Windows 10 Pro only. Also, this process requires modification of your computer registry. It is advisable to create a backup of your computer before proceeding with this task, especially if you are uncertain about using commands in PowerShell.
How to enable Remote Desktop using PowerShell
- Launch PowerShell. There are a number of ways you can do this. You can search for it in the Start Menu, or press the Windows and X keys to select from the power users menu, or press Windows and R to open the ‘Run’ dialog box. Simply type “powershell” in the “Open” field.
- Always select the “Run as administrator” or Windows PowerShell(Admin) option.
-
Enter the following command into PowerShell:
Set-ItemProperty -Path 'HKLM:\System\CurrentControlSet\Control\Terminal Server' -name "fDenyTSConnections" -value 0
-
This is optional, but if you want to enable Remote Desktop through your Firewall, enter the following command and press Enter.
Enable-NetFirewallRule -DisplayGroup "Remote Desktop"
As a result, you’ll still be able to use the good old Remote Desktop Connection or the new Remote Desktop app to connect to and use your machine remotely even if the firewall is turned on.
How to disable Remote Desktop using PowerShell
Likewise, PowerShell can be used to disable the remote desktop. Here is how you can do it:
- Search for PowerShell.
- From the context menu, select Run as administrator.
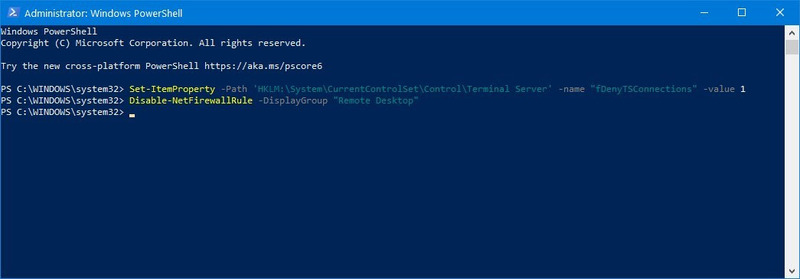
- Execute the following command to disable the remote desktop:
Set-ItemProperty -Path 'HKLM:\System\CurrentControlSet\Control\Terminal Server' -name "fDenyTSConnections" -value 1
- To disable the remote desktop option using Windows Firewall, run the following command:
Disable-NetFirewallRule -DisplayGroup "Remote Desktop"
These steps will disable the Remote Desktop feature on your machine and it also closes your
Firewall port.
It’s worth noting that while this article describes the steps specific to PowerShell, you can also enable RDP with the help of the command line. Use the Run as administrator option as well.