TeamViewer “Connection Failed: No Route”: 8 Ways to Fix
- HelpWire
- →
- Blog
- →
- TeamViewer Issues How to Solve Them
- →
- TeamViewer No Route Issue
TeamViewer “Connection Failed: No Route” error is a common issue you may face when trying to connect to a remote computer from a local computer. It occurs when the application fails to establish a route to the remote computer.
If you’re also facing this issue in TeamViewer, let’s understand the reasons behind it in detail and scenarios when it’s likely to happen. This article also guides you through various steps to fix this issue, so you can enjoy smooth remote desktop connections.
Quick Troubleshooting Checklist
- • Update TeamViewer: Ensure both remote and local computers have the latest version of TeamViewer. Update if needed to fix compatibility issues.
- • Check Network Components: Restart your router and modem to resolve IP conflicts and network glitches.
- • Modify Network Restrictions: Firewalls or proxies on corporate/public networks may block TeamViewer. Contact the network administrator to lift restrictions.
- • Access Restrictions: Enable Full Access in TeamViewer’s advanced settings to fix connection failures due to access permissions.
- • Reset Firewall: Ensure antivirus or system firewalls aren’t blocking TeamViewer’s network services or ports.
- • Turn Off IPv6: Disable IPv6 in incompatible network environments to force TeamViewer to use IPv4.
- • Clear DNS Cache: Clear outdated DNS records after network changes to avoid resolution failures.
- • Reinstall TeamViewer: Restart TeamViewer or reinstall it to resolve issues caused by misconfigurations or corrupted files.
- • Switch to Alternative: If problems persist, consider using a more reliable remote desktop solution like HelpWire.
How to Fix the TeamViewer “No Route” Error
Now, we’ll provide detailed guides on how to resolve the TeamViewer “No Route” error. Follow the steps below to troubleshoot and fix the issue effectively.
1. Restart Your Network
The “TeamViewer No Route” error can occur due to an IP conflict or a temporary network failure. Restarting your router and computer may resolve the issue.
-
Turn off your local machine, then unplug the router and modem for 30-60 seconds.
-
Reconnect the modem, wait for it to boot, then connect the router and let it stabilize.
-
Restart your computer and try connecting via TeamViewer.
2. Update OS and TeamViewer
Older or mismatched software versions on the local and remote devices can lead to connection issues in TeamViewer.
-
Open TeamViewer on both local and remote computers.
-
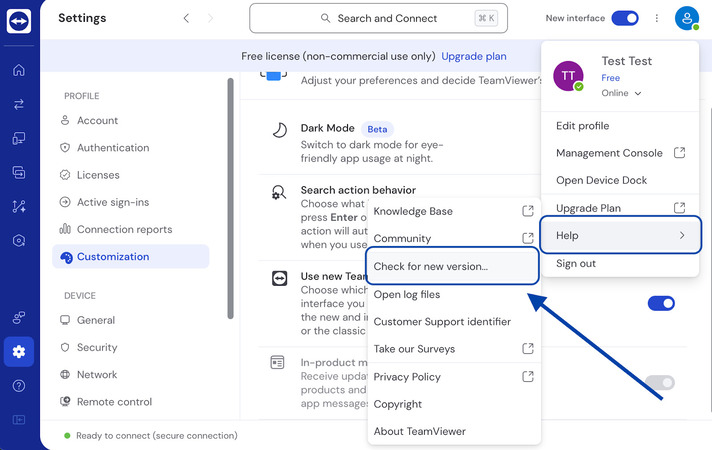
Click “Help” in the menu bar and select “Check for new version.”
-
If an update is available, follow the on-screen instructions to install it.
3. Enable Full Access
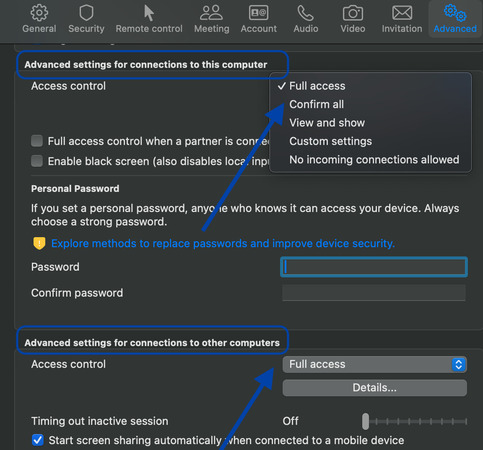
Connecting a local and a remote machine becomes difficult due to the permission restrictions on Windows for the TeamViewer client. For smooth connections, allow TeamViewer with full access controls on both computers.
The steps to enable Full Access to TeamViewer:
-
Open TeamViewer on both local and remote machines.
-
Navigate to Settings > Options > Advanced.
-
Press “Full Access” in both settings, “Connections to this computer” and “Connections to other computers.”
-
Save the latest settings by clicking OK.
-
Verify if the error is fixed by restarting the TeamViewer client software on both your local and remote computers.
4. Turn Off IPv6
Although IPv6 is more prevalent, it’s not compatible in some network environments. It can be due to older hardware, a lack of ISP support, or issues with specific services or applications.
IPv4, on the other hand, is universally compatible. To resolve the TeamViewer no route issues, try disabling IPv6. It will force TeamViewer to switch to IPv4.
Let’s find out how to disable IPv6:
-
Press Windows key + S and type “Control Panel”, then press Enter to open it.
-
In Control Panel, go to:
Network and Internet > Network and Sharing Center -
In the left pane, click “Change adapter settings”.
-
Locate your active network adapter (e.g., Ethernet or Wi-Fi).
-
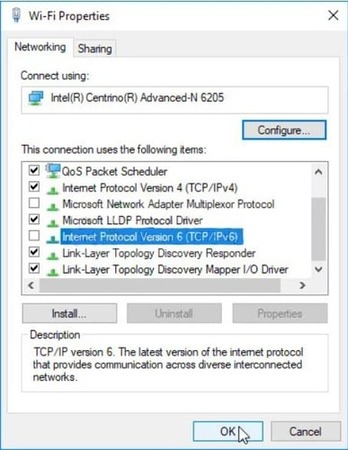
Right-click the adapter and select “Properties”.
-
In the Networking tab, uncheck “Internet Protocol Version 6 (TCP/IPv6)”.
-
Click OK to apply the changes.
5. Clear DNS Cache
Outdated DNS records are one of the reasons for failed remote connections on TeamViewer. That’s why flushing the DNS cache is important on all platforms – Windows, Linux, and Mac. Let’s understand how to do it for each platform separately.
How to Flush DNS Cache on Windows
Every network has a timeout period. Continued usage beyond this period causes the connectivity to slow down. On Windows, flush the DNS cache and reset TCP/IP to resolve the connectivity issue. Here are the steps to do that:
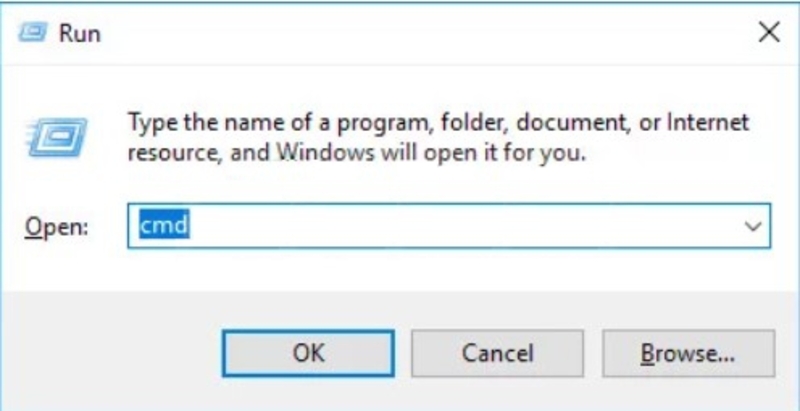
- • Launch the Command Prompt with administrative privileges. Press Win + R to open a Run window and then type cmd and press Ctrl + Shift + Enter.
- • To flush your DNS cache and reset TCP/IP, type these commands:
ipconfig /release
ipconfig /flushdns
ipconfig /renew
nbtstat –r
netsh int ip reset resetlog.txt
netsh winsock rese- • Wait till you receive the confirmation message. Once you do, reboot the device.
How to Flush DNS Cache on Linux
- On Linux, the Name Service Cache Daemon (nscd daemon) is used to manage the client DNS cache. Flushing the DNS cache on Linux requires you to restart the nscd daemon.
- • In your terminal, type this command:
sudo /etc/init.d/nscd restart- • Press enter
Alternatively, you can use this:
service nscd restart
Once the nscd restarts, the DNS cache will clear out.
How to Flush DNS Cache on Mac
- • If you’re using OS X Lion (10.7) and OS X Mountain Lion (10.8), type this command in your Terminal:
sudo killall -HUP mDNSResponder
- • If you’re using OS X 10.5 and OS X 10.6, enter this command:
dscacheutil -flushcache
- • For OS X 10.4 Tiger, use this command:
lookupd -flushcache
6. Modify Firewall Settings
If the firewall you use has settings that block TeamViewer’s incoming and outgoing traffic, you won’t be able to connect two computers remotely via the app. To resolve it, modify the firewall settings and allow TeamViewer to pass through.
Let’s understand how to do this on Windows and macOS.
On Windows:
Follow these steps:
- • Open the Control Panel and go to Windows Defender Firewall.
- • Via Windows Defender Firewall, choose Allow an app or feature
- • Click on Change settings.
Select Allow another app if the list doesn’t have TeamViewer. In this case, go to:
C:\Program Files\TeamViewer\TeamViewer.exe
- • Enable Private and Public.
- • Confirm changes. Restart TeamViewer.
On macOS:
-
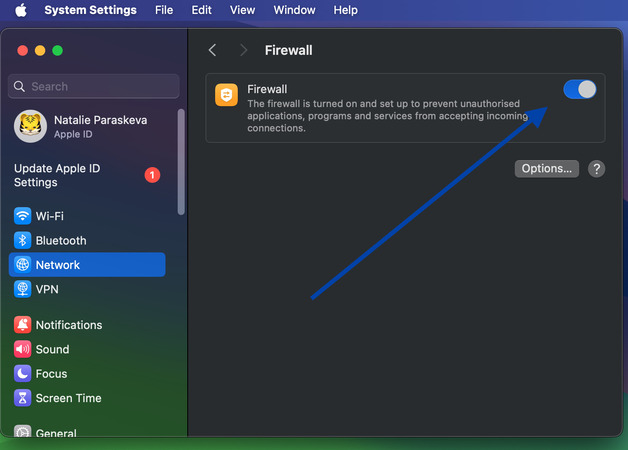
Navigate through this path: System Settings → Network → Firewall or Security & Privacy → Firewall
-
Apply changes by unlocking the padlock.
-
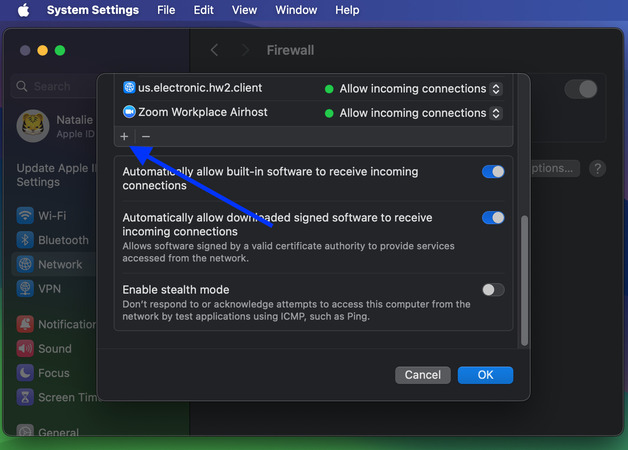
Choose Firewall Options.
-
If the list doesn’t have TeamViewer, click + and add the TeamViewer application to the list.
-
Enable Allow incoming connections.
-
Apply the latest changes. Restart the app.
7. Reinstall TeamViewer Application
If the TeamViewer no route error still occurs even after applying other changes, uninstalling TeamViewer on both devices can help resolve underlying issues. A fresh installation ensures updated files and settings, which often fixes persistent connection problems.
8. Reliable TeamViewer Alternative: HelpWire
TeamViewer is a popular remote access and support solution, but it comes with certain limitations. Users frequently face the “TeamViewer Connection Failed No Route” and limited functionalities with the free license.
These issues have prompted many to look for a better alternative to TeamViewer. HelpWire is one of the best remote desktop solutions to connect your local and remote computers smoothly without glitches. This free remote access software is highly regarded for its ease of use, advanced functionalities, and cross-platform support, among others.
Why Choose HelpWire?
Here are some of the striking Helpwire features that set it apart:
- • Effortless setup: HelpWire requires minimal setup to get started. It offers a simple and intuitive user interface that facilitates a quick installation process.
- • On-demand/unattended access: You can initiate both on-demand and unattended remote access sessions with HelpWire and control devices securely.
- • Client and team management: HelpWire simplifies workflows and so you can manage your clients and teams easily.
- • Faster and secure file transfer: You can copy files from one computer and paste them into another with speed. HelpWire secures your connections and protects files in transit.
- • Cross-platform support: HelpWire supports multiple platforms – Windows, macOS, and Linux, instead of relying on a single one.
Check out our detailed comparison between HelpWire and TeamViewer to explore the differences in detail.