7 Ways to Fix the TeamViewer Not Connecting to Partner Issue
- HelpWire
- →
- Blog
- →
- TeamViewer Issues How to Solve Them
- →
- TeamViewer Not Connecting to Partner
Users face a common error message with TeamViewer: “TeamViewer partner did not connect to router”.
The reason behind this could be outdated software, network instability, or incorrect settings. In the end, it’s users who face trouble in their workflows.
If you’re in the same boat, let’s discuss some practical solutions to fix this issue and get you back online faster.
Solution 1. Turn Off IPv6
Connectivity failure can happen due to multiple factors, such as an instability with the ISPs. The best and quickest way to solve this issue is by turning off IPv6 for the remote connection. Let’s understand how to disable IPv6 on Windows, macOS, and Linux step by step:
Disabling IPv6 on Windows
On your Windows computer, follow the instructions below:
-
Press
Windows key + R, typencpa.cpl, and hit Enter. This opens the Network Connections window directly. -
Right-click the available network ( Ethernet or Wi-Fi). Click Properties.
-
Look for Internet Protocol Version 6 (TCP/IPv6). Uncheck this option. Next, save the settings by clicking OK.
-
Once you complete the above steps, please restart TeamViewer services. Try reconnecting to check if the problem is solved.
Disabling IPv6 on macOS
On your macOS machine,
-
Go to System Settings ➜ Network
-
On the left panel, select the network adapter the machine is using (Wi-Fi or Ethernet). Look for the Advanced button and click it.
-
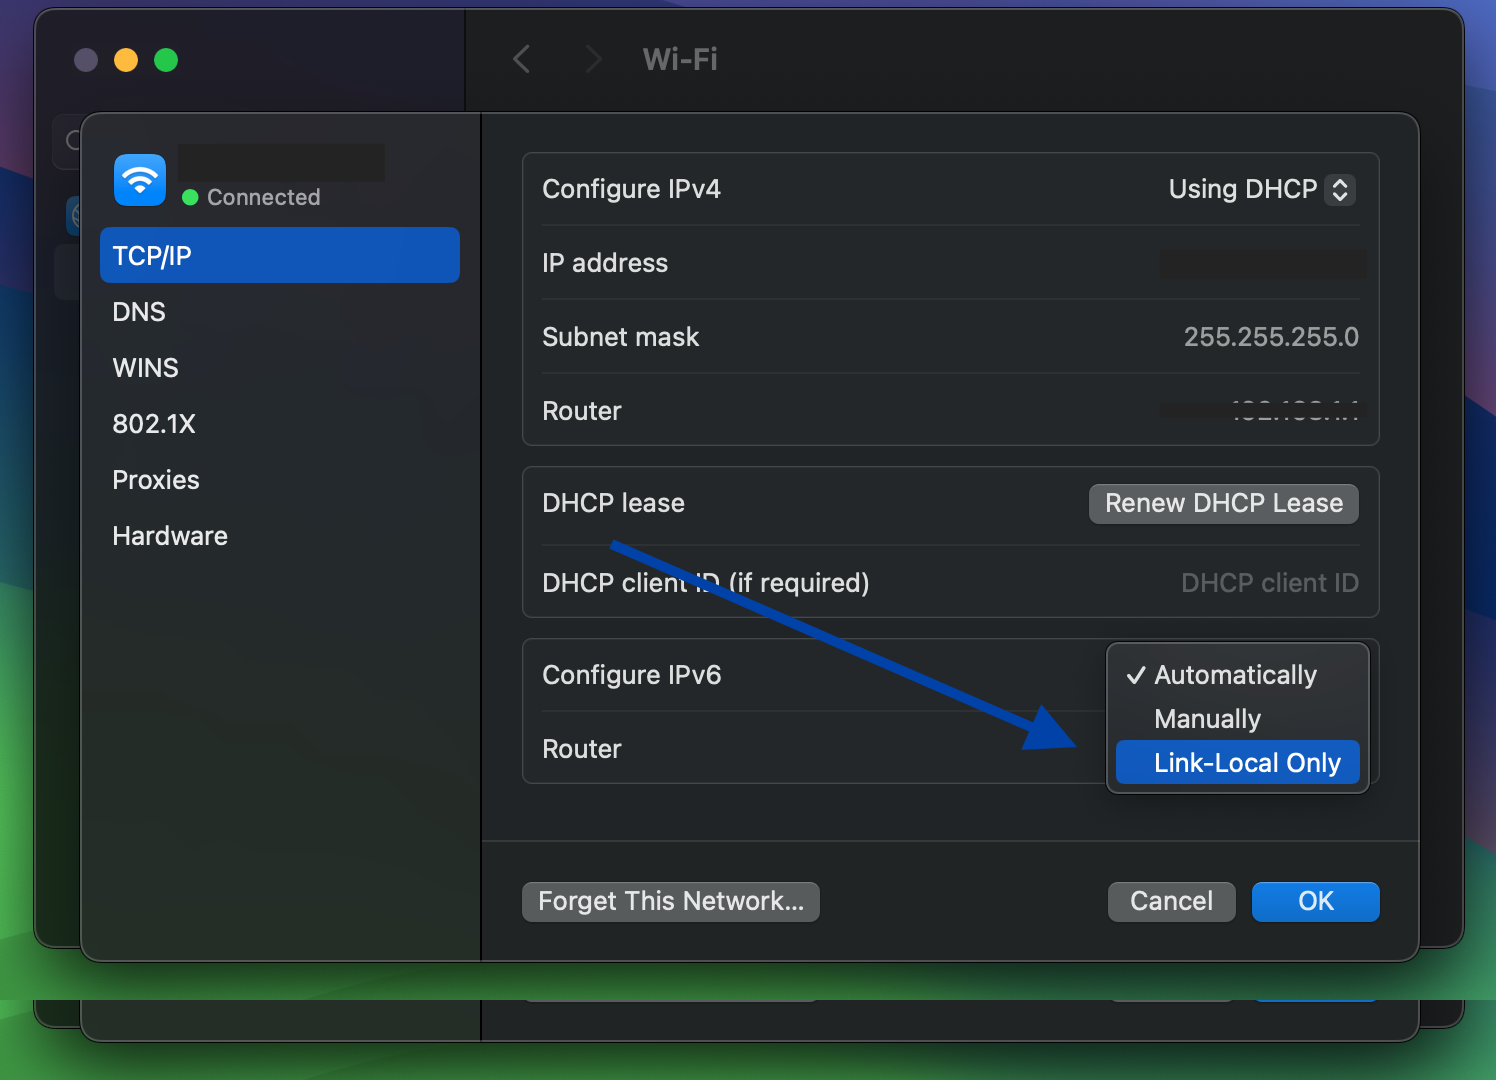
Go to the TCP/IP tab. In Configure IPv6, choose Link-local only.

-
Restart your computer once you complete the above steps. Now, try to reconnect with TeamViewer (Classic).
Disabling Linux on IPv6
Check if IPv6 is Enabled:
Run:
ip a | grep inet6
If you see output, IPv6 is active.
Temporarily Disable IPv6:
sudo sysctl -w net.ipv6.conf.all.disable_ipv6=1
sudo sysctl -w net.ipv6.conf.default.disable_ipv6=1
This lasts until the next reboot.
Permanently Disable IPv6:
-
Open the sysctl config:
sudo nano /etc/sysctl.conf -
Add:
net.ipv6.conf.all.disable_ipv6 = 1net.ipv6.conf.default.disable_ipv6 = 1 -
Save and apply:
sudo sysctl -p
Solution 2. Enable Full Access for TeamViewer
You may not be able to connect to one machine from another because of certain restrictions on the TeamViewer client by Windows.
In this case, check if TeamViewer has full access on both remote and local computers.
These are the steps you should follow to enable TeamViewer full access:
-
On both computers, launch the TeamViewer client software.
-
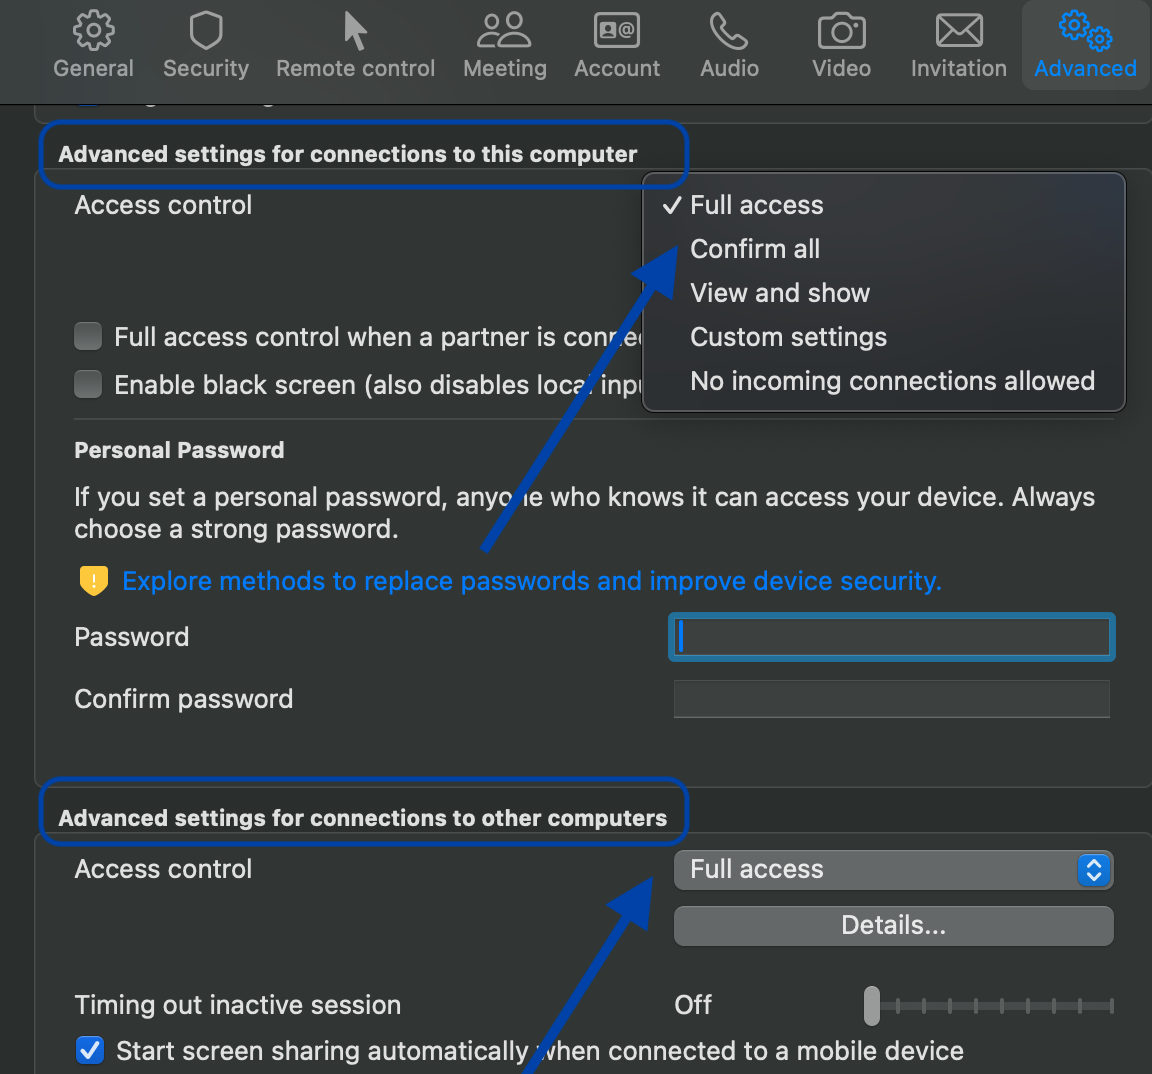
Open Settings > Options > Advanced.
-
Press “Full Access” in both settings, “Connections to this computer” and “Connections to other computers.”

-
Press “OK” to save changes.
-
To check if the error is fixed, restart TeamViewer on both local and remote machines.
Solution 3. Restart the Internet Connection
You may face the “TeamViewer not connecting to partner” issue if your internet connection is inconsistent or unstable. This frequently happens with machines using an ISP that assigns dynamic IPs.
The simplest way to resolve this issue is to restart all your network connections. Turn your router/modem on and off multiple times. Now, wait and try connecting machines with TeamViewer again.
Solution 4. Update TeamViewer
If you use an outdated version of the TeamViewer software, you may face connection issues.
So, always use the latest version of TeamViewer.
You can look for the newest software version from TeamViewer’s menu page. If you are running an older version, download and install the recent one on both your local and remote computers.
Steps to Check and Install:
-
Launch the TeamViewer software on local and remote computers.
Note: On mobile devices (iPhone or Android), you can directly go to the App Store or Play Store to check for software updates.
-
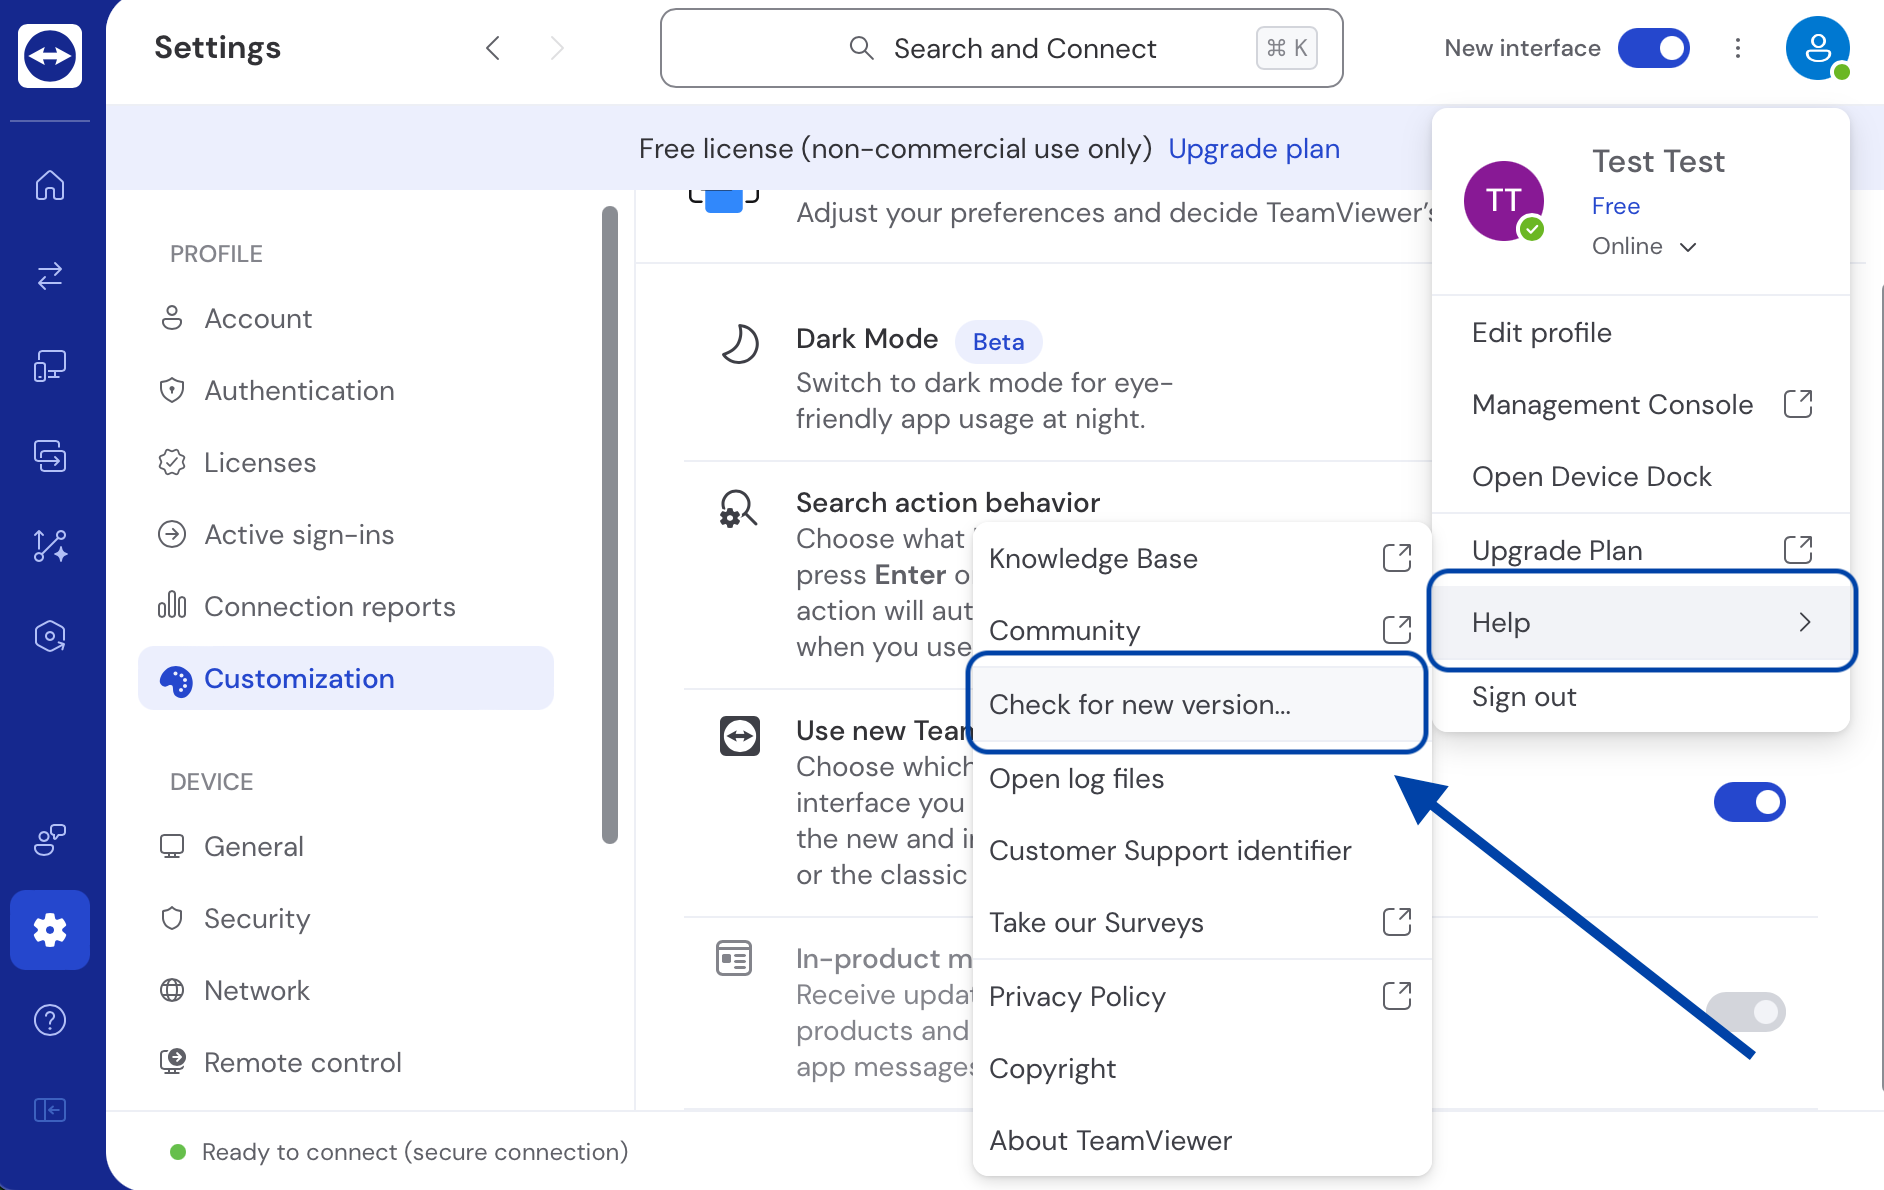
From the menu bar, locate “Help” and click it.
-
A new list of options will open. Click the third option – “Check for new version.“
-
If a fresh update is available, install it by following the on-screen instructions.

Solution 5. Clear DNS Cache and Reset TCP/IP
Every network has a timeout period. If you continue using it beyond the period, the connectivity throttles. As a result, you may face issues, such as “TeamViewer could not connect to partner”.
To resolve this, clear the DNS cache on your Windows system. Here are the steps to follow:
-
Launch the Command Prompt with admin privileges. This requires you to press the Win + R keys to open the Run window. Now, type cmd and press Ctrl + Shift + Enter.
-
To clear your DNS cache and reset TCP/IP configurations, enter the following commands:
ipconfig /release
ipconfig /flushdns
ipconfig /renew
nbtstat –r
netsh int ip reset resetlog.txt
netsh winsock resetWait till you receive the confirmation message. Once it shows, reboot your computer.
How to Flush DNS Cache on Mac
Different Mac OS versions have different ways to flush the DNS cache.
• For macOS 10.15 (Catalina) and newer:
sudo dscacheutil -flushcache; sudo killall -HUP mDNSResponder• For macOS 10.10 to 10.14:
sudo killall -HUP mDNSResponder
• For OS X Lion (10.7) and OS X Mountain Lion (10.8), use this command in your Terminal:sudo killall -HUP mDNSResponder• For OS X 10.5 and OS X 10.6, use this command:
dscacheutil -flushcache• For OS X 10.4 Tiger, use this:
lookupd -flushcache
Solution 6. Reinstall the TeamViewer Software
Issues during installation could trigger the “TeamViewer cannot connect to partner” error.
If nothing works out, uninstall TeamViewer from both remote and local systems. And then, install it again. Let’s understand how to do this:
- • Go to Control Panel > Programs and Features.
- • Right-click TeamViewer and then click Uninstall. This will remove the application from your device.
To uninstall TeamViewer on macOS:
-
Open Finder and go to the Applications folder.
-
Locate TeamViewer, then drag it to the Trash.
-
Empty the Trash to fully remove the app.
Optional cleanup: You can also remove leftover files by deleting this folder:
~/Library/Preferences/com.teamviewer.teamviewer.plistTo reinstall TeamViewer:
Visit the official website of TeamViewer. Download and install the most recent version of the software on your device.
Solution 7. HelpWire: Alternative Solution
Despite trying all the above methods, if you still face the “TeamViewer not connecting to partner” issue?
You’re not alone.
TeamViewer is undoubtedly a popular remote access and support solution. But many users are facing issues with TeamViewer and are searching for a better alternative.
If you’re facing frequent issues with TeamViewer that have taken a toll on your productivity and customer experience, consider switching to a more reliable solution, such as HelpWire.
HelpWire is a highly regarded and free remote desktop software that offers an effortless way to access and use remote machines without interruptions.
Get a hassle-free remote experience with HelpWire and enjoy features that avoid glitches common in TeamViewer.
One of the best features of HelpWire is that it supports on-demand as well as unattended remote access sessions. Say no to complex configuration, as HelpWire needs minimal setup.
What Makes HelpWire the Best TeamViewer Alternative?
-
Free tool:HelpWire is a free remote desktop solution. This means you can use it for personal and business purposes (like troubleshooting and support), all for free.
-
Basic setup:You can install HelpWire in seconds, as it requires minimal setup. Plus, its simple user interface allows you to launch remote sessions easily.
-
Unattended access:You can remotely control devices anytime and anywhere, even when no one is present on the remote end to accept the requests.
-
Quick client and team management:Use HelpWire’s client and team management feature to simplify workflows and collaborate hassle-free.
-
Effortless file transfer:Use HelpWire’s drag-and-drop feature to transfer files to your clients easily and with security.
-
Multi-platform support:HelpWire is not limited to one platform; it connects across Linux, Windows, and macOS systems.
If you want to explore why you should switch to HelpWire, check out the detailed comparison between HelpWire and TeamViewer.