Enabling RDP Connections Between Windows 10 and Windows 7
- HelpWire
- →
- Blog
- →
- Definitive Guide to using Microsoft Remote Desktop
- →
- Connect from Windows 10 to Windows 7 with RDP
As you are well aware, working from home has become a new normal with the global pandemic spreading all over the world. This has triggered more demand for software applications that allow easy access and control of remote desktops.
It would be no exaggeration to say that the Microsoft Remote Desktop app is one of the major solutions out there to solve the problem of remote connection to both personal and corporate devices.
In today’s article, you’ll find simple instructions on how to use this remote desktop tool on Windows 10 to connect to Windows 7 and the other way around.
How to Enable Remote Desktop Connections Between Win 10 and Win 7
Step 1. Enable the Remote Desktop Connection on Windows 10
As you already know the Remote Desktop solution provided by Microsoft is what will help you if you decide to utilize one (or several) of your remote Windows computers remotely.
A connection to the remote PC is most commonly created over LAN or the internet. The required settings will depend on which network you use.
If the local area network is your choice, it will only be necessary to check whether the Remote Desktop Connection is allowed on the computer you are going to access.
To enable the RDP option on Windows 10, follow these instructions:
-
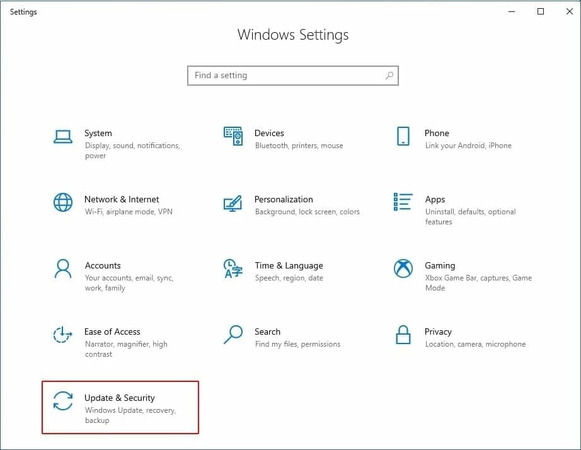
Go to Windows Settings and select Update & Security > For developers.

-
Enable the option Change settings to allow remote connections to this computer. Once done, click Show settings next to this option.

-
In the window that will appear, select the tab named Remote.

-
In the Remote Assistance section, check the box to allow remote access to your computer.
-
In the Remote Desktop section, enable the recommended option to allow access only from PCs running Remote Desktop with Network Level Authentication.
-
Hit Ok, then Apply, and again Ok.
-
That’s it. Your Windows 10 machine has become accessible to remote devices over RDP.
To learn more about setting up RDP on Windows 10 read our complete guide.
1. The standard desktop utility coming with the Windows operating system.
2. The dedicated Remote Desktop app that you can get from the Microsoft Store. It’s compatible with a wider range of platforms and works well with Android and iOS.
3. A third-party tool like TeamViewer, AnyDesk, Dameware Remote Everywhere, etc.
Step 2. Allow RDP access on Windows 7
Now that the RDP settings are configured on your Windows 10 machine, it’s time to enable the RDP feature on the Windows 7 PC.
Note: You should do this, if you want to establish a remote desktop connection from Windows 10 to Windows 7 and in the opposite direction.
By default, the RDP option is disabled on Windows 7 systems. Here’s what you need to do to enable it:
-
Open the Start menu and select Computer > Properties.

-
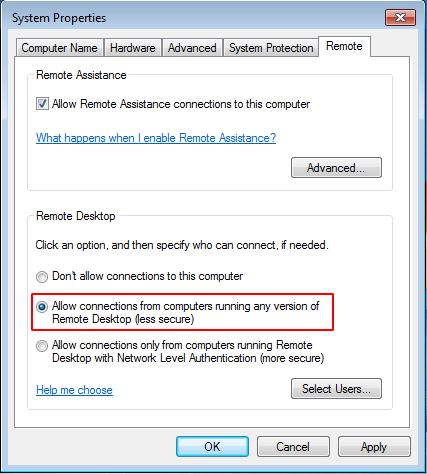
In the window that shows up find Remote Settings. Click it.

-
In the Remote Desktop section, put a tick next to Allow connections from machines running any version of Remote Desktop (less secure). This option will allow communications with older RDP versions of other Windows platforms.

Step 3. How to establish a Remote Desktop Connection from Windows 10 to 7 over a network
People still use Windows XP and Windows 7 even though Microsoft has discontinued support for those OS versions. In this regard, an RDP connection between the newer and older Windows editions like Win10 and 7 isn’t something uncommon.
How to connect from Windows 10 to Windows 7 remote desktop
-
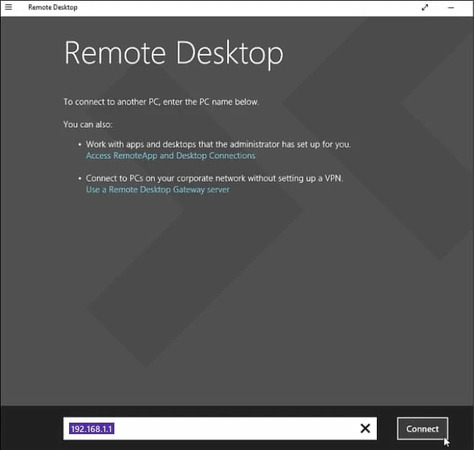
Start the Remote desktop application on your local PC and enter the hostname or IP address of the computer you are going to access remotely.
-
Click the Connect button.

-
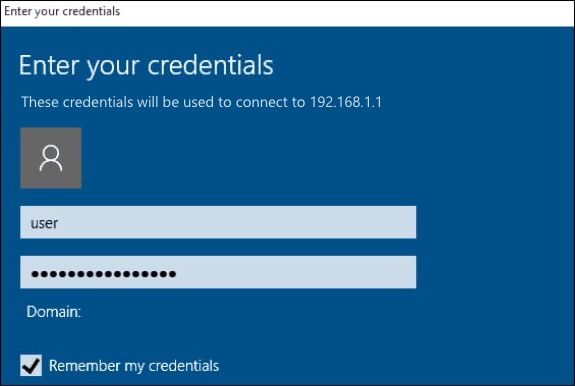
Typing your login credentials for authentication on the remote machine will be the next step.

Here you go! The remote PC is at your disposal with all of its applications and any folder available on click
Some of the reasons why your Remote Desktop Connection might not be working
Having taken the abovementioned steps to create an RDP connection, you should be able to get access to the remote PC and use it with no hassle.
If you have some difficulties setting up your RDP connection, check the following:
- • Your Firewall and antivirus software should be set to allow RDP connection to your computer.
- • There may be some system configurations that do not allow the RDP client to work on your system, try using a VPN to solve the issue.
- • Sometimes problems with Remote Desktop arise after the installation of a Windows update. Removal of the update should help you.
7 Tips to Secure Your Remote Desktop Connections
While getting Remote Desktop working between Windows 7 and Windows 10 is important, it’s equally crucial to think about security. RDP has long been a popular target for attackers, so leaving the default configuration untouched can expose your system to unnecessary risks. Below are several best practices to help you keep your remote sessions as secure as possible.
- Enable Network Level Authentication (NLA)
Whenever possible, configure both systems to require NLA. This ensures the user is authenticated before a full remote session is created, which reduces the chance of unauthorized access. - Use strong login credentials
Avoid simple or short passwords and don’t allow blank ones. Strong, unique credentials (or domain-based accounts if available) make brute-force attacks far more difficult. Adding multi-factor authentication at the VPN or gateway level provides even stronger protection. - Keep RDP traffic off the open internet
Directly exposing TCP port 3389 is one of the biggest mistakes users make. Instead, run RDP sessions through a secure channel such as a VPN or SSH tunnel. This way, only trusted users on your private network can even attempt to connect. - Stay up to date with patches
Make sure both Windows 7 and Windows 10 are fully patched, especially for RDP and CredSSP vulnerabilities. Since Windows 7 is out of mainstream support, extended security updates or carefully applied hotfixes are essential if you plan to keep using it. - Restrict who can connect
Only allow accounts that actually need remote access. On Windows 7, you can do this via the “Select Users” option in Remote Settings. On Windows 10, security groups and policy rules make the process more flexible. - Monitor and limit failed login attempts
Set lockout policies to block repeated failed login attempts, and review event logs for unusual activity. Even simple monitoring can alert you to someone trying to break in. - Consider additional hardening
Changing the default RDP port, enforcing TLS, and configuring firewall rules are extra steps that don’t replace the essentials above, but they can help reduce noise from automated attacks.