How to Install and Use Xrdp
- HelpWire
- →
- Blog
- →
- Linux Remote Desktop
- →
- Remote Desktop Client Linux
- →
- Xrdp Linux
Xrdp is an open-source implementation of the Remote Desktop Protocol (RDP) that enables remote access to Linux systems. It allows users to connect from Windows, macOS, or other RDP clients to a Linux machine with a graphical desktop environment. Xrdp is compatible with RDP tools such as the Microsoft Remote Desktop client, rdesktop, and FreeRDP.
Xrdp offers a rich feature set that includes:
- • TLS encryption to protect your data with secure connections;
- • Seamless file transfer between remote and local machines;
- • Audio streaming to redirect sound from the remote client.
To use Xrdp, you need to open TCP port 3389 in your firewall and install the xrdp and xorgxrdp. This article discusses using a Ubuntu system as an Xrdp server to provide remote access and management capabilities.
Setting Up an Xrdp Server on a Ubuntu System
Use the following steps to install and configure Xrdp on Ubuntu.
-
Update the software repository
Update the system packages to verify you work with the most current software versions.sudo apt update && sudo apt upgrade -y -
Install a desktop environment
Install the XFCE desktop environment, which is more suitable for Xrdp than Ubuntu’s default GNOME desktop.sudo apt install xfce4 xfce4-goodies -y -
Install Xrdp package
sudo apt install xrdp -yEnable and start the Xrdp service to run when the system restarts.
sudo systemctl enable xrdpsudo systemctl start xrdp -
Configure Xrdp to use XFCE
Create a .xsession file in your home directory to force Xrdp to use the XFCE desktop.echo xfce4-session > ~/.xsessionProvide Xrdp with the required permissions by adding the XDRP user to the ssl-cert group.
sudo adduser xrdp ssl-cert -
Configure the firewall
Allow incoming connections on Xrdp’s default port 3389 with one of the following commands.
General but less secure access:sudo ufw allow 3389Restricted and more secure access:
sudo ufw allow from xxx.xxx.xxx.x/xx to any port 3389
Replace xxx.xxx.xxx.x/xx with values for your trusted network or IP range. -
Restart Xrdp
Apply all updates by restarting the Xrdp service.sudo systemctl restart xrdp -
Find the server’s IP address
You need the server’s IP address to connect to it from a remote system. Find the IP address with one of these commands:ifconfig
orhostname -I -
Test connectivity
A remote RDP client can now access the Ubuntu system. Test connecting from a Windows machine with the following procedure.
Connecting to Linux from Windows with Xrdp
-
Open the Remote Desktop Client on your Windows system.
Press Win + R, type mstsc, and hit Enter.
-
Connect to the Linux server
• Enter the Linux server’s IP address and click Connect.
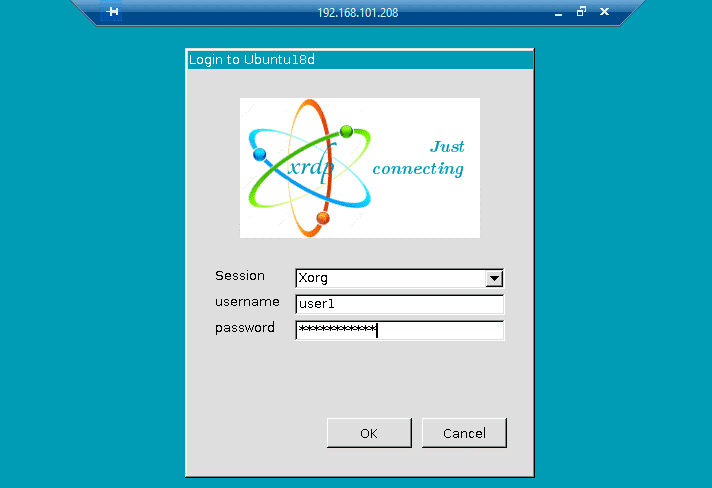
• Select xorg as the session type in the Xrdp login window.
• Enter your username and password.
• Click OK.
-
Addressing the empty blue screen problem
Compatibility issues between Xrdp and Ubuntu defaults may result in an empty blue screen when logging in to the server. The following procedure can resolve this problem.Install the correct version of xorgxrdp with these commands on the Linux server:
sudo apt install xorgxrdp-hwe-18.04sudo systemctl restart xrdpReconnect using the remote desktop client.• Restart the remote desktop on Windows (mstsc /v:<IP_ADDRESS>).
• Select xorg in the Xrdp login window.
• Enter your login credentials to complete the connection. -
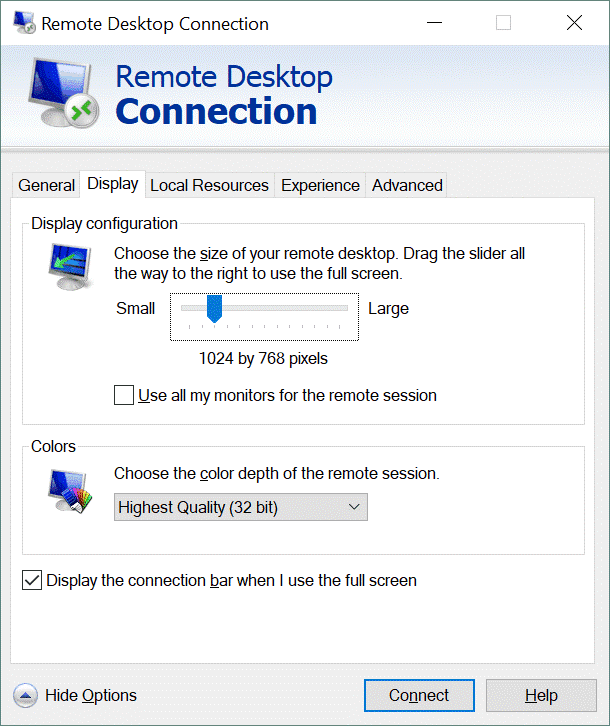
Adjust Screen Resolution
You can configure the display settings for the remote desktop client.
• Run the mstsc command on the Windows system.
• Click Show Options and open the Display tab.
• Adjust the resolution slider.
• Save the configuration and reconnect to the Linux server.
You are now ready to connect to the Ubuntu server from a remote Windows system with RDP and modify the screen resolution as you desire. Check out this page for more information about fixing problems with Xrdp.
Best Xrdp Alternative for Linux - HelpWire
Xrdp is a popular open-source solution for Linux remote access via the Remote Desktop Protocol (RDP). However, the software can be challenging to set up and configure. Additional security, such as a VPN or SSH, is necessary to safeguard remote connections. The tool may also demonstrate degraded performance in internet connections in low-bandwidth environments. HelpWire offers a user-friendly remote access solution that provides security and reliable performance.
HelpWire is a free remote desktop for Linux solution developed by Electronic Team, Inc. The software supports remote access for desktops, laptops, and workstations running the Windows, Linux, or macOS operating systems. HelpWire provides instant connectivity to client machines to improve the productivity of remote technical support teams.
Key HelpWire Features
• Remote desktop support: Technical support personnel can quickly initiate high-speed and stable connections to client Linux machines to streamline problem resolution.
• Cross-platform compatibility: HelpWire runs on Windows, Linux, and macOS systems to provide secure connections to remote computers running Linux or other supported operating systems.
• File transfer: File transfer with remote machines is simplified by enabling users to drag and drop files directly onto the HelpWire window.
• Built-in chat: Users can communicate in real time with HelpWire’s native chat feature or more productive remote client support.
• Client and team management: HelpWire provides teams with tools such as role hierarchies and workstation grouping to manage support more efficiently.
• Multi-monitor support: HelpWire lets teams view and manage multiple screens at once to improve team productivity.
• Security: HelpWire secures your remote connections with industry-standard security protocols. Security includes AES-256 encryption and the TLS/SSL cryptographic protocols to ensure the privacy of your sensitive data transfers. The software prioritizes direct connections over routing to external servers, and employs trusted authentication and hosting services to protect your data.
Getting Started Linux Remote Access with HelpWire
To start using HelpWire, download the app from the official website, launch it, and share the connection link with your client. The client then downloads and opens the HelpWire client app on their workstation to initiate the remote connection.
HelpWire stands out as a reliable and user-friendly remote support solution, providing secure Linux remote desktop access along with seamless control over other remote devices.