
rdesktop Linux Commands: How to Use RDP on Linux with Syntax and Examples
- HelpWire
- →
- Blog
- →
- Remote Desktop Connection Linux
- →
- Remote Desktop Client For Linux
- →
- rdesktop on Linux Machine
rdesktop is an open-source Linux RDP client that allows you to connect with Windows systems from the command line. It is quite popular for quick connections, legacy systems, and scripting. However, newer tools like xfreerdp are now commonly used in modern Windows server environments.
In this guide, we will cover every detail, including the full rdesktop syntax, real-time examples for common use cases, how to fix common issues, and a comparison of rdesktop with modern alternatives.
What is rdesktop in Linux?
rdesktop is a Linux RDP client command-line designed for older RDP 4/5 protocols. It is compatible with legacy Windows environments, such as XP, Server 2003, and Server 2008. Also, it runs exclusively from the command line, without using a Graphical User Interface (GUI).
Features of rdesktop
- • Supports local disk, printer, and sound devices redirection
- • Supplies credentials in scripts for automation
- • Option to adjust display resolution, color depth, and keyboard layout settings
- • Connects to the console session using –0 mode
- • Allows switching between full-screen and windowed mode
rdesktop and NLA
rdesktop does not support Network Level Authentication (NLA), which is by default required on modern Windows versions, such as Windows 10/11 and Server 2012+.
To overcome this, you need to follow one of these options:
• Disable NLA in settings: For this, go to Settings, followed by Remote Desktop, then go to Advanced settings to disable NLA. This step is not recommended for production.
• Launch using the -E flag for partial fix.
• Replace NLA with xfreerdp using xfreerdp /v:IP /u:user /p:pass /cert:ignore.
Installing rdesktop on Linux: Step-by-Step Guide
Ubuntu / Debian
sudo apt updatesudo apt install rdesktopFedora, RHEL, or CentOS
sudo dnf install rdesktopKali Linux
To install rdesktop on Kali Linux, update your package list and install the tool using a single command:
sudo apt update && sudo apt install rdesktop
Arch Linux
To install rdesktop on Arch Linux, use the pacman package manager with the following command:
sudo pacman -S rdesktop
Verify installation
After installing Linux rdesktop, confirm that it is installed correctly by checking the version via the command:
rdesktop --version
Complete rdesktop Command Syntax Reference
The basic rdesktop command in Linux is:
rdesktop [options] <server[:port]>
By default, rdesktop connects over port 3389 (the standard RDP port). Below is a complete reference of available options and flags.
| Flag | Description | Example |
|---|---|---|
| -u <username> | To define a username during authentication | -u administrator |
| -p <password> | To define a password for login (use quotes for special characters) | -p ‘MyP@ss!’ |
| -d <domain> | To define the domain name for Windows during login | -d CORP |
| -g <geometry> | To define window size, either W x H or a percentage | -g 1920×1080 or -g 85% |
| -f | To display in full-screen mode | -f |
| -F | To display in full-screen mode without a title bar | -F |
| -a <depth> | To specify the color depth: 8, 15, 16, 24, or 32 bit | -a 16 |
| -r disk:name=/path | To redirect a local folder as a network drive | -r disk:share=/home/user/files |
| -r sound:local | To redirect an audio file to a local computer | -r sound:local |
| -r clipboard:PRIMARYCLIPBOARD | To allow copy-paste (clipboard sharing) between a local and a remote system | -r clipboard:PRIMARYCLIPBOARD |
| -r printer:name | To redirect a local printer | -r printer:myprinter |
| -T <title> | To set a custom window title | -T ‘Work Server’ |
| -N | To turn off numlock sync | -N |
| -m | To disable motion events to reduce bandwidth usage | -m |
| -b | To trigger bitmap updates, which is useful for slow connections | -b |
| -e | To turn off encryption (use on private or trusted networks only) | -e |
| -E | To enable SSL encryption in a remote session | -E |
| -x <experience> | To specify connection speed preset from options like m, b, l, w, or s | -x l (LAN) |
| -z | To turn on RDP compression | -z |
| -P | To activate persistent bitmap caching | -P |
| -0 | To connect directly to the console session | -0 |
| -5 | To connect using RDP v5 (default is v4) | -5 |
| -4 | To set the RDP version to 4 (v4) | -4 |
| -k <layout> | To define keyboard layout (e.g., en-US, de) | -k en-us |
| -n <hostname> | To override the local hostname sent to the server for the connection | -n mylinux |
| -l <level> | To specify license level (default: user) | -l user |
| -t <port> | To set up a connection using an alternative RDP port | -t 3390 |
| -o <file> | To log an output to a file | -o /tmp/rdp.log |
| -c <directory> | To define a working directory for a remote session | -c C:\Users |
| -s <shell> | To use a different shell for the remote session | -s cmd.exe |
Real World rdesktop Examples with Commands
- • Basic RDP connection: Make a simple RDP connection to a Windows machine using only the IP address and username.
rdesktop 192.168.1.100 -u administrator
- • Non-interactive connection using a password: This is commonly used in scripts. For security, don’t store passwords in shell history. Instead, use environments wherever possible.
rdesktop 192.168.1.100 -u administrator -p 'P@ssword123'
- • Authenticate with a Windows domain account: This allows centralized login and access control across networked systems.
rdesktop 192.168.1.100 -u john.doe -p 'Secret' -d CORP
- • Run in full-screen at a defined resolution: Run the remote session in full-screen mode while setting a specific display resolution.
rdesktop -f -g 1920x1080 192.168.1.100 -u administrator
- • Open in a window mode using 85% of the screen: Run the remote session in a window that occupies 85% of your screen area.
rdesktop -g 85% 192.168.1.100 -u administrator
- • Specify a non-standard port when connecting: Connect to a remote system using a port other than the RDP port.
rdesktop 192.168.1.100:3390 -u administrator
- • Activate clipboard sharing: Allow copy-and-paste between your local machine and the remote session.
rdesktop -r clipboard:PRIMARYCLIPBOARD 192.168.1.100 -u administrator
- • Map a local directory as a network drive: This allows your Linux folder to show up as a drive on the Windows desktop.
rdesktop -r disk:linuxfiles=/home/user/Documents 192.168.1.100 -u administrator
- • Forward remote audio to the local device: Redirect audio from the remote session so it plays through your local speakers.
rdesktop -r sound:local 192.168.1.100 -u administrator
- • High-quality connection optimized for LAN use: It uses settings optimized for local area networks to deliver the best possible performance and display quality.
rdesktop -x l -a 24 -P -z 192.168.1.100 -u administrator
- • Optimized for use over slow or WAN connections: Uses reduced quality settings optimized for slow or wide-area network (WAN) connections.
rdesktop -x m -a 8 -b -m -z 192.168.1.100 -u administrator
- • Connect directly to the console session: Allows access to the server’s physical console session (session 0), typically for admin tasks.
rdesktop -0 192.168.1.100 -u administrator
- • Use a custom keyboard mapping: Allows you to define a specific keyboard layout for the remote session.
rdesktop -k de 192.168.1.100 -u administrator
- • Start a single application instead of the full desktop session: Starts a specific application directly on the remote system instead of loading the full desktop environment.
rdesktop -s 'notepad.exe' 192.168.1.100 -u administrator
- • Production-ready command with all standard options: Shows a complete rdesktop command line using commonly used options for real-world scenarios.
rdesktop -u administrator -p 'P@ssword' -d CORP -g 1920x1080 -a 24 -r clipboard:PRIMARYCLIPBOARD -r sound:local -r disk:share=/home/user/shared -P -z -T 'Production Server' 192.168.1.50How to Start an rdesktop Session with Windows 11
-
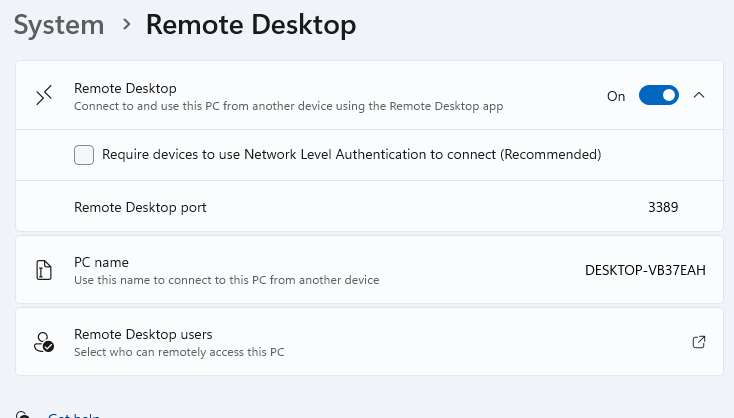
On Windows, go to Settings > System > Remote Desktop. Here, you can enable RDP. NLA needs to be disabled for rdesktop. You can also see your RDP port here.
-
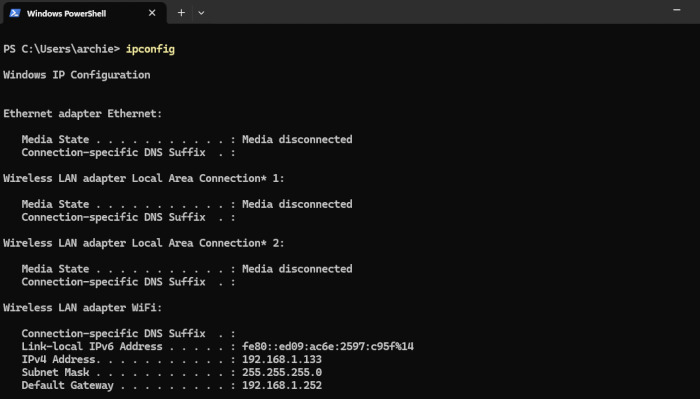
Run ipconfig in CMD or PowerShell (can be opened from the Win+X menu) to see your PC’s IP on the local network.
-
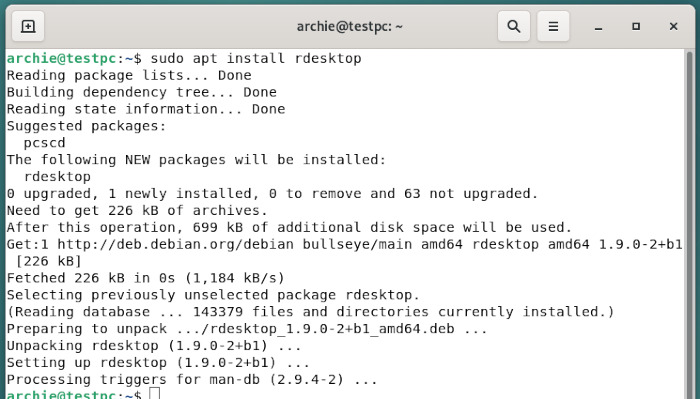
On linux, install rdesktop. In this example, we’re using the apt package manager.
-
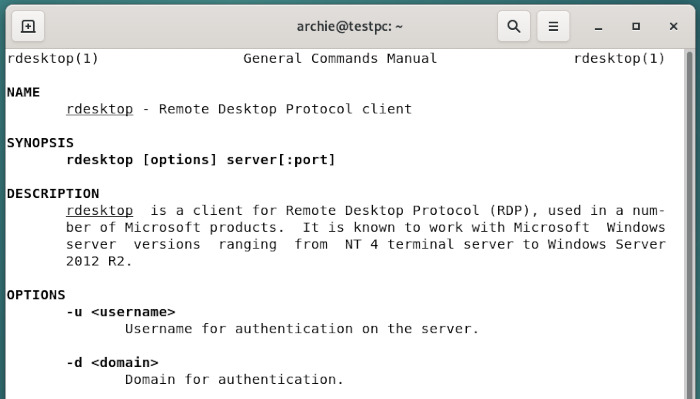
Since rdesktop has a console-based interface, you may find the “man rdesktop” command useful.
-
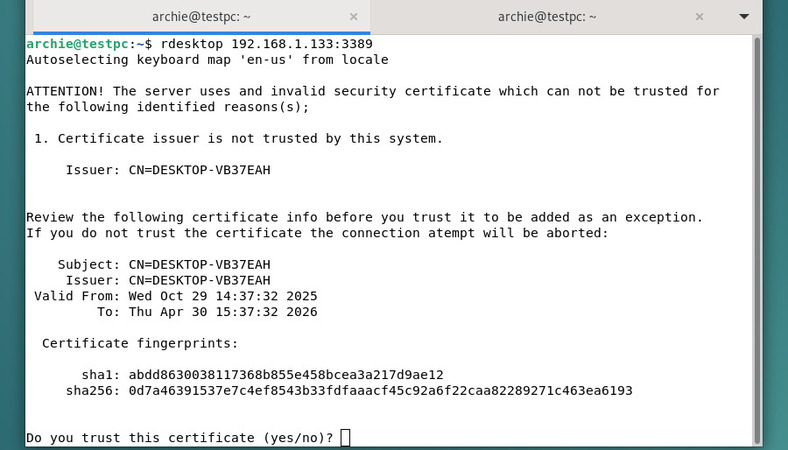
When connecting, you need to confirm that you trust the session host.
-
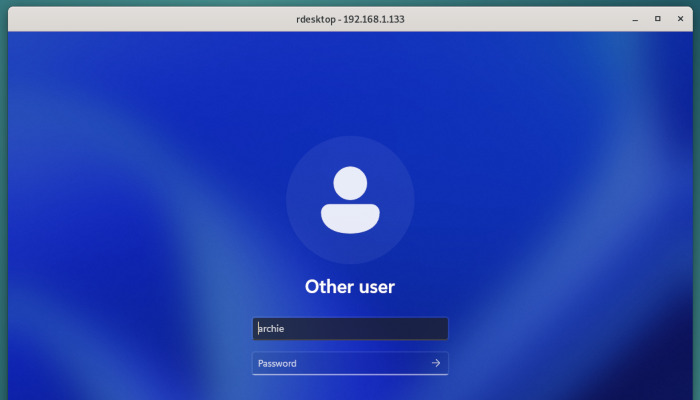
You can now log in.
HelpWire as a Modern Replacement for rdesktop
rdesktop doesn’t support NLA, which means it won’t connect to Windows 10/11 or Server 2012+ out of the box. Workarounds exist — disabling NLA or switching to xfreerdp — but both add friction. HelpWire connects to any modern Windows system from Linux without any of that.
HelpWire is a remote support tool with direct, NAT-friendly connections — no server to configure, no VPN, no open ports. The operator signs up with an email; the client just opens a shareable link to connect — no account needed. Free for personal and commercial use, no credit card required.
Why Teams Replace rdesktop with HelpWire:
-
Works with modern Windows
no NLA issues, no compatibility workarounds needed for Windows 10/11 or Server 2016+.
-
Graphical interface
see the remote desktop visually, control it with mouse and keyboard. No flags or syntax to remember.
-
Native Linux support
the operator app runs natively on Linux. No third-party compatibility layers needed.
-
Actively maintained
unlike rdesktop, HelpWire receives regular updates with full vendor support.
Frequently Asked Questions
You can use Ctrl + Alt + Enter to alternate between full-screen and windowed mode. If the session becomes unresponsive, go to your terminal and press Ctrl + C to stop the process.
RDP uses the default port 3389. If you want to connect to a specific port, include the custom port number in the IP address using a colon. For eg, rdesktop 192.168.1.100:3390. Also, you can use the -t flag to do the same.
The error “CredSSP required by server” occurred because rdesktop does not support NLA, but Windows 11 requires it for security reasons. To resolve the issue, you need to either disable NLA on your Windows machine or use an alternative tool, xfreerdp, with the /cert:ignore flag.