How To Fix Microsoft Teams Microphone Not Working
When using Microsoft Teams, you may experience issues using your Teams microphone not working. There are several reasons for this. In this guide, we’ll provide different troubleshooting methods you can use to resolve these issues.
Option 1: Configure Microsoft Teams Settings
Often, when your microphone stops working on your Microsoft Teams, it is due to incorrect settings.
Below are some steps to guide you in configuring your microphone settings on your Microsoft Teams:
- Open your Microsoft Teams application.
- Click on the Settings menu from the top-right corner of your Microsoft Teams application.
-
Select the Settings option from the drop-down list.

-
Click on the option “Devices” from your settings dropdown.

-
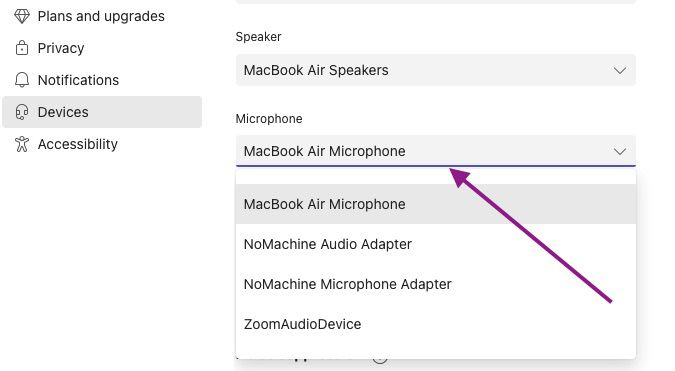
Click on the correct microphone from the Microphone drop-down menu under the “Audio devices” section.

- Select “Make a Test Call” to confirm your microphone is functional.
Your Microsoft Teams microphone should be able to function without any more issues after completing these steps.
Option 2: Reconfirm Privacy Access Settings
Reconfirming your privacy access settings can help you check if another app may have changed your microphone settings or if you changed them before. Reconfirming your microphone access settings is important. This lets you know if Microsoft Teams has proper permission to use your microphone.
Windows
- Click on the “Windows” icon on your home screen.
- Go to your windows settings.
- Select the Privacy option.
- Click ”Microphone” under your app permissions.
- Switch on “Allow desktop apps” to access your microphone.
macOS
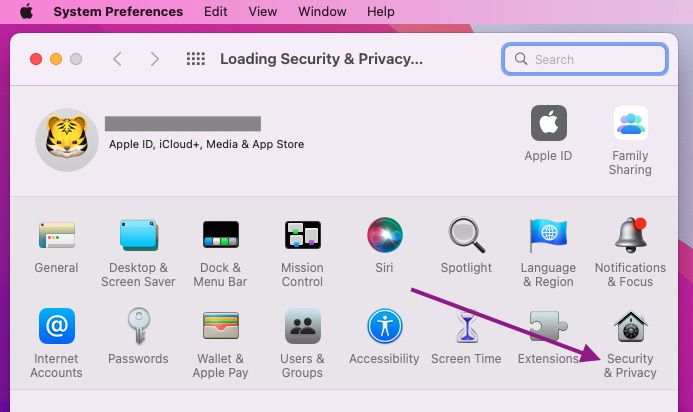
- Click the Apple icon on the top left of your MacBook and select system preferences.
-
Choose the security and privacy option.

-
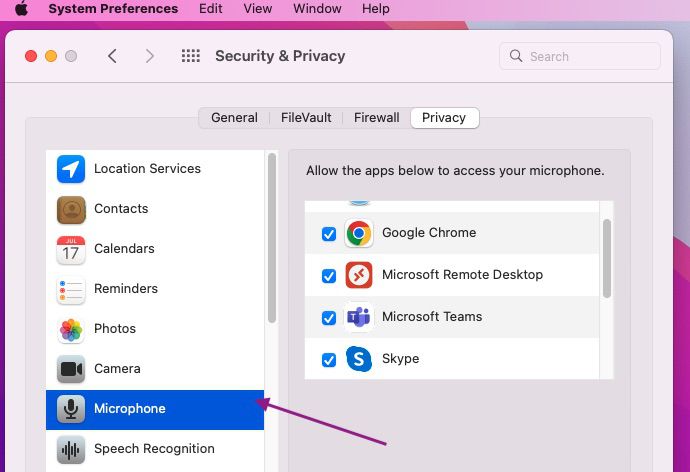
Select the microphone.

- Finally, confirm you’ve ticked Microsoft teams on your MacBook.
Microsoft Teams Web App
- From your search box, go to “teams.microsoft.com”.
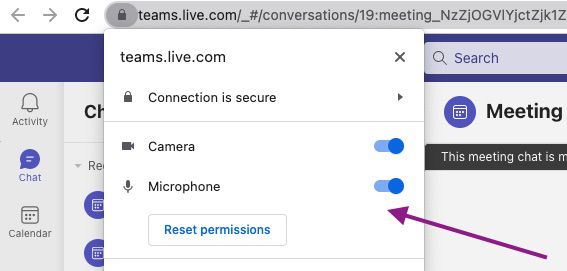
- Select the secure (lock) icon before the URL.
- Turn On the toggle for the microphone.
Option 3: Disable Extra Apps Using Microphone
Often, the reason why your microphone is not working in Teams is due to other apps using the device input. Closing the applications using your device’s input can help resolve the issue.
If your microphone isn’t being detected or your Microsoft Teams microphone is not working, you can try reconnecting it to make sure the issue isn’t from a physical connection. In cases where you are using a USB microphone, trying different USB ports and cables can resolve your microphone problems.
Additionally, restarting your computer can prove helpful in solving this problem.
You can experiment on computers with several microphones by unplugging the accessories (such as the one built into the webcam, a USB microphone, or one with the traditional headphone jack).
To find out which one is compatible with Teams, try the one built into the device (if applicable), then the one built into the external webcam, and finally the microphone with a direct connection to see which one is compatible with Teams.
Option 4: Use Microsoft Teams Web Version
To avoid your Teams microphone not working in meetings, you can try using the web version of Microsoft Teams.
- Open “Microsoft Teams web” in a new tab. Note that to use Microsoft Teams, you need to make use of a supported browser such as the latest version of Firefox, Google Chrome, or Microsoft Edge. In addition, older browsers Internet Explorer don’t support Microsoft Teams.
- Sign in with your Teams account information.
- Select the “Use the web app instead” option.
- Click the View site information button to the left of the address bar.
-
Select the “Allow” option for the “Microphone” settings under the “Permission for this site” section.

Option 5: Update the Microsoft Teams app
The following are some steps to help you install and update your Microsoft Teams application:
- Open Microsoft Teams.
- Click the Settings and more (three-dotted) menu from the top-right.
-
Click the Check for updates option.

- Reopen the app.
Option 6: Reinstall Microsoft Teams
Reinstalling the app is another option if upgrading it didn’t solve the issue. The reinstallation process can differ depending on the type of device you use.
On Windows:
- Click Start.
- Go to Settings.
- Click Apps, then select Microsoft Teams.
- Click Uninstall.
- Download the Microsoft Teams installer here.
- After you’ve completed the installation, log into Teams and make a test call. Under normal circumstances, the mic should be fully functional. If not, it might be a hardware problem.
On macOS:
Right-click the Microsoft Teams app in the dock of your MacBook, then from the options below, click “Force Quit” to quit the Teams app from your docks.
Go to your applications folder, select “Microsoft Teams,” and move it to your Mac’s trash. Finally, re-download the Teams app again and follow the onscreen instructions to set up the application.
Option 7: Confirm If You Are Muted
When you join a video conference in Microsoft Teams, your microphone gets turned on by default. If your microphone is turned off, the app can experience some troubles; additionally, you might have switched it off on your headset.
Regardless of whether the microphone gets turned off, you should always ensure the headset or microphone is on mute. Some headsets have a mute button to make this action easier. Finally, restart the Microsoft Teams app to check if the microphone is operational.
Option 8: Update Driver
Oftentimes, your Microsoft Teams microphone not working is due to issues with your device driver. Whenever this occurs, you can override this problem by updating your driver.
Update drivers on Windows 11
Below are steps you can follow to update your drivers, regardless of whether it's a stand-alone or integrated microphone:
- Open “Settings” on your Microsoft Teams application.
- Click on the “Windows Update” from the “Settings” dropdown.
- Click on the “Advanced options” page on the right side of the dropdown.
- Select the “Drivers” section.
- Choose the webcam or device driver.
- Then click on the “Download and install” button.
You should be able to use the microphone of your Microsoft Teams after following these procedures.
Reinstall microphone driver on Windows 10 or 11
There’s a possibility that the driver you’re using has been corrupted, especially if you’re making use of a webcam’s built-in device or a USB microphone. Reinstalling your microphone driver can help solve this issue with your Teams microphone not working.
You can use these steps to reinstall your device driver on Windows 10 or later versions:
- Click on the “Windows” icon on your computer.
- On the search bar, input “Device Manager” and click the top search to open the application.
- If you’re using a webcam, expand the “Cameras or sound, Imaging devices, Game controllers, and Video.” If you’re using a stand-alone microphone, expand the “Video, Game controllers, and Sound.
- Select the “Uninstall device” option after right-clicking on the peripheral.
- Click on the “Uninstall” button.
- Click on “Actions” option from the dropdown.
- Then click on the “Scan for hardware changes” option.
Launch Microsoft Teams after you’ve followed the steps to check that the microphone is functioning.
Frequently Asked Questions
Why am I not audible on Teams?
Why isn’t my microphone working on my Microsoft Teams on iPad?
How do I test my microphone on my Microsoft Teams Mac?
Following the Test Call Bot instructions on your Mac, you can record your call as a short message. This message will then be played back, giving you a summary of your test call. After evaluating the quality of your microphone, navigate to your device settings to make any necessary changes.