
Why Local Camera is not Recognized by AnyDesk, and How You Can Fix It
- HelpWire
- →
- Blog
- →
- Anydesk not working
- →
- Camera is Not Working in AnyDesk
If you use AnyDesk as a remote connectivity tool, you may have encountered the following problem. When you open Teams or Zoom for a meeting, your camera is not showing in AnyDesk. You can use the webcam locally, and the remote desktop is operational, but you cannot share the camera with remote users.
Don’t worry, once you understand the reason this happens, you can resolve the issue easily.
Three Reasons Your Camera is Not Recognized by AnyDesk
Before you can fix a problem effectively, you need to understand why it is happening. The AnyDesk local camera not recognized issue is usually caused by one of the following three reasons.
Reason 1: Lack of Permissions or Driver Conflicts
- • Windows 10/11 blocks desktop apps from accessing the camera by default. You must change permissions and configuration to fix this issue.
- • Your security software or firewall may deny AnyDesk’s device access requests.
- • Obsolete or corrupt drivers may prevent AnyDesk from connecting to your camera.
Reason 2: AnyDesk Lacks Hardware Device Redirection
AnyDesk focuses on screen mirroring and keyboard/mouse input, and does not support native hardware redirection. Applications like Teams or Zoom, running in a remote AnyDesk session, search for devices connected to the remote machine rather than to your computer. By default, AnyDesk will not forward local USB devices, such as your webcam, to the remote machine.
Since AnyDesk does not have the native device redirection capabilities of Microsoft RDP, you must configure it to resolve the issue of your camera not working in AnyDesk.
Cause 3: Network and Compatibility Issues
Camera detection can fail in AnyDesk for several reasons related to your network or system compatibility. You may encounter VPN interference, excessive latency, or a mismatch between AnyDesk versions running on the local and remote machines. This type of problem often occurs on cross-platform connections.
How You Can Restore Camera Access in AnyDesk
Once you understand how the “AnyDesk webcam not detected” problem occurs, you can fix it. The following steps should be performed in order, as the first and simplest solution may fix your issue. Steps 2 and 3 employ third-party tools that streamline device redirection.
Step 1: Check Basic Permissions and Driver Settings
-
Eliminate version mismatches by updating AnyDesk on the local and remote computers. Open AnyDesk → Help → Check for Updates and install all available updates.
-
Verify your local camera is working. Open the Camera app on your local machine and confirm your camera is working correctly. If it is not, open Device Manager → Cameras → right-click your webcam → Update driver. Uninstall the driver, then restart your machine to let Windows automatically reinstall it and resolve any corruption.
-
Fix OS privacy settings and permissions.
On Windows:
• Settings → Privacy & Security → Camera
• Enable “Let apps access your camera.”
• Enable “Let desktop apps access your camera.”On macOS:
• System Settings → Privacy & Security → Camera
• Make sure AnyDesk is checked in the list -
Check AnyDesk session permissions by clicking the ‘Permissions’ icon in the AnyDesk toolbar. Ensure that both the local and remote machines have camera and audio enabled for transmission.
-
Restart your AnyDesk session after making any of these changes. Test camera access and move to Step 2 if the webcam is still not detected.
Still Not Working? The Problem Might Be AnyDesk Itself
If the permissions fix didn’t help, it’s probably not your settings — it’s that AnyDesk lacks native USB device redirection. Steps 2 and 3 below work around this with third-party tools, but they require installing extra software and creating additional accounts.
If you’re already dealing with AnyDesk’s session cutoffs and license warnings, HelpWire is worth a look instead. Free on Windows, macOS, and Linux — session starts in under a minute.
HelpWire vs AnyDesk Free — What You Actually Get
| Feature | HelpWire | AnyDesk Free |
|---|---|---|
| Session time limits | Unlimited | ⚠️ Sessions cut off on free tier |
| Commercial use | Included | ⚠️ Triggers license warnings |
| Session start | Link-based — client needs no account or install | ⚠️ Client needs AnyDesk ID or account |
| File transfer | Copy & paste files during active session | ⚠️ Requires paid plan |
| Unattended access | Included | ⚠️ Requires paid plan |
| On-demand support | Included | ⚠️ Limited on free tie |
Find out more about HelpWire features and learn why it is the leading alternative to AnyDesk.
Step 2: Use FlexiHub to Share Your Webcam Over the Internet
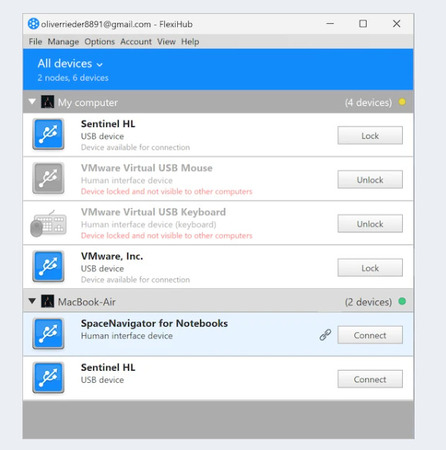
FlexiHub is a dedicated USB-over-Internet solution that lets you share a local webcam in an AnyDesk session without virtual camera workarounds. It provides native USB redirection for consistent and stable remote access to a local camera.
How to use FlexiHub for camera redirection:
-
Download and install FlexiHub on both machines
-
Create a FlexiHub account when starting the app, and confirm your email address.
-
Log in on both machines with the same account and password.
-
Connect your webcam to the local machine.
-
FlexiHub automatically detects the camera and lists all connected USB devices.
-
Open FlexiHub on the remote machine and connect to the shared webcam.
-
Zoom, Teams, or another video app on the remote machine can now access the webcam as a connected USB device.
FlexiHub works for remote sessions where both machines are on different networks. After connecting the webcam via FlexiHub, all applications on the remote machine can use it as a locally attached device.
Step 3: Advanced Options for Persistent Issues
Consider the following approach if Steps 1 and 2 don’t resolve the problem.
When both machines are on the same local network, try USB Network Gate, a solution designed to share USB devices over LAN.
How to use USB Network Gate:
-
First, request free trial and install USB Network Gate on the machine with the physical connection to the webcam.
-
Open the app and navigate to the Local USB devices tab.
-
Locate the webcam you want to share.
-
Click ‘Share’ next to the webcam to make it available over the network
-
Install and launch USB Network Gate on the remote machine.
-
Open the Remote USB devices tab, and click ‘Connect’ next to the webcam you want to access.
The remote machine will treat the webcam as a native USB device. All video applications can access the device without any additional configuration. USB Network Gate is an excellent solution for teams that must manage multiple USB devices over a shared office network.
Frequently Asked Questions
AnyDesk lacks native USB redirection, so the video app on the remote machine only detects cameras connected to that machine. FlexiHub is an efficient solution that shares the camera over the internet, enabling it to be recognized and used by the remote computer.
AnyDesk can easily access a local camera. However, it does not forward the local camera to a remote machine. To accomplish that, you need to use a USB sharing tool, such as FlexiHub for internet access or USB Network Gate for LANs.
Install FlexiHub on both machines. Share the camera from the local machine and connect to it from the remote computer. After the FlexiHub establishes the connection, the remote machine can detect and use the camera with full functionality.
It may. You should ensure that both the local and remote clients are on the same, most recent version of AnyDesk. Then you can rule out version mismatches before further investigation.
The AnyDesk “Waiting for Image” error indicates that the remote screen is not loading due to display driver issues. When a camera is not recognized, it is due to issues with the video app running on the remote computer.